“I wasn’t expecting dessert advice from my plumber, but there I was, watching him fix the leaky faucet while he told me about his grandmother’s molten lava cake recipe.” It was a strange moment, honestly, but that story stuck with me. The way he described the rich, gooey center contrasted with the cake’s tender edges sounded like pure magic. I couldn’t get it out of my head. A few weeks later, after some trial and error (and a kitchen that looked like a chocolate war zone), I finally nailed my version of decadent molten lava cakes with vanilla ice cream. Let me tell you, that first bite—oh boy—the warm chocolate oozing out paired with the cool creaminess of vanilla ice cream transported me straight to dessert heaven.
Maybe you’ve been there, craving something both comforting and impressive, but without the hassle of a complicated recipe. This molten lava cake recipe fits that bill perfectly. The balance between the molten center and the cakey exterior isn’t just about technique; it’s about patience, timing, and a few secrets I’m happy to share. Plus, the vanilla ice cream? It’s not just a sidekick; it’s the perfect match that makes every forkful sing. Honestly, this recipe has become my go-to whenever I want to impress or simply treat myself after a long day. And yes, I did mess up the first few times—forgot to grease the ramekins properly once, and nearly burnt a batch—but that’s part of the fun.
Whether you’re a seasoned baker or a curious novice, this recipe promises that warm, indulgent experience that feels fancy but is surprisingly easy to whip up. So, if you’re ready to enjoy a dessert that’s rich, satisfying, and paired with classic vanilla ice cream, let’s get started with these decadent molten lava cakes.
Why You’ll Love This Recipe
After countless attempts and tweaks in my kitchen, this decadent molten lava cake recipe stands out for several reasons. It’s not just another chocolate dessert; it’s a little indulgent moment that feels special. Here’s why it’s become a favorite:
- Quick & Easy: Ready in under 30 minutes—perfect for last-minute dessert cravings or spontaneous dinner parties.
- Simple Ingredients: You don’t need a long shopping list—basic pantry staples and quality chocolate are all it takes.
- Perfect for Romantic Dinners: Impress your date without sweating over complicated steps.
- Crowd-Pleaser: Kids and adults alike rave about the gooey center and moist cake exterior.
- Unbelievably Delicious: The rich chocolate flavor with a hint of vanilla is comfort food at its finest.
What makes this recipe different? Well, I blend a bit of unsalted butter with bittersweet chocolate to get a silky smooth batter that bakes just right, leaving that molten core intact. The secret is in timing the bake perfectly—too long, and you lose the lava; too short, and it’s undercooked. Also, I always recommend using a trusted brand like Ghirardelli or Valrhona for the chocolate to get that deep, rich flavor. Serve these warm with a scoop of creamy vanilla ice cream, and you’ve got a dessert that feels luxurious but is surprisingly simple.
Honestly, the first time I made these, I closed my eyes after the first bite and just smiled. It’s that kind of dessert that comforts and excites at the same time. So whether you’re impressing guests or just indulging yourself, this recipe won’t let you down.
What Ingredients You Will Need
This decadent molten lava cake recipe features straightforward, wholesome ingredients that combine for a lush, gooey texture and deep chocolate flavor. Most are pantry staples, with a few tips on choosing the best versions.
- Bittersweet Chocolate (6 oz / 170 g): Use high-quality chocolate bars or chips (I swear by Ghirardelli for consistent melting and flavor).
- Unsalted Butter (1/2 cup / 113 g): Softened; it adds richness and smoothness to the batter.
- Granulated Sugar (3/4 cup / 150 g): Balances the chocolate’s bitterness without overpowering.
- Large Eggs (3): Room temperature for best mixing and structure.
- All-Purpose Flour (1/4 cup / 32 g): Just enough to hold the cake together while keeping it tender.
- Vanilla Extract (1 tsp): Adds a warm, subtle note that complements chocolate perfectly.
- Pinch of Salt: Enhances the chocolate flavor and balances sweetness.
- Vanilla Ice Cream (for serving): Choose a creamy, full-fat variety (homemade or store-bought like Häagen-Dazs) for the perfect pairing.
Ingredient tips: If you want to try dairy-free, swap butter for coconut oil and use dairy-free ice cream. For gluten-free, almond flour can replace all-purpose flour, but expect a slightly different texture. Fresh eggs make a big difference in the cake’s rise and texture, so don’t skip room temperature prep. Also, in warmer months, try serving with fresh berries alongside the vanilla ice cream for a bright contrast.
Equipment Needed
- Ramekins (4 to 6 oz / 120 to 180 ml capacity): These individual baking dishes hold the lava cakes perfectly. I prefer ceramic ramekins for even heat distribution.
- Mixing Bowls: One medium bowl for melting chocolate and butter, and another for whisking eggs and sugar.
- Whisk and Spatula: For smooth mixing and scraping down the bowl.
- Baking Sheet: To hold ramekins in the oven and catch any drips.
- Double Boiler or Microwave-Safe Bowl: For gently melting chocolate and butter without burning.
- Measuring Cups and Spoons: Precise measurements help with consistent results.
If you don’t have ramekins, small oven-safe custard cups or even a muffin tin with liners can work, though the shape affects baking time slightly. For melting chocolate, I find a double boiler gives the best control, but the microwave works fine if you stir often. Keeping tools clean and dry is key—any moisture in melted chocolate can cause it to seize, a lesson I learned the hard way once!
Preparation Method
- Preheat your oven to 425°F (220°C). This high temperature helps set the cake edges quickly while keeping the center molten.
- Grease your ramekins thoroughly with butter. Don’t skip this step! Also, lightly dust with cocoa powder to prevent sticking and add a subtle chocolate crust.
- Melt chocolate and butter together. Use a double boiler or microwave in 30-second bursts, stirring in between until smooth and glossy. Let it cool slightly so it doesn’t cook the eggs in the next step.
- In a separate bowl, whisk eggs and sugar. Beat until the mixture is pale, thick, and slightly fluffy—this usually takes about 3-4 minutes by hand or 2 minutes with an electric mixer.
- Stir the vanilla extract and a pinch of salt into the egg mixture. This step boosts flavor complexity.
- Gently fold the melted chocolate and butter mixture into the eggs. Use a spatula and fold carefully to maintain some airiness.
- Sift the flour over the batter. Fold it in gently until just combined—don’t overmix, or the cakes might turn dense.
- Divide the batter evenly among prepared ramekins. I usually fill them about 3/4 full to leave room for rising.
- Bake for 12-14 minutes. The edges should be firm and set, while the center remains soft and slightly jiggly. Oven times can vary, so start checking at 12 minutes.
- Remove from oven and let the cakes rest for 1 minute. Run a thin knife around the edges to loosen, then invert onto serving plates.
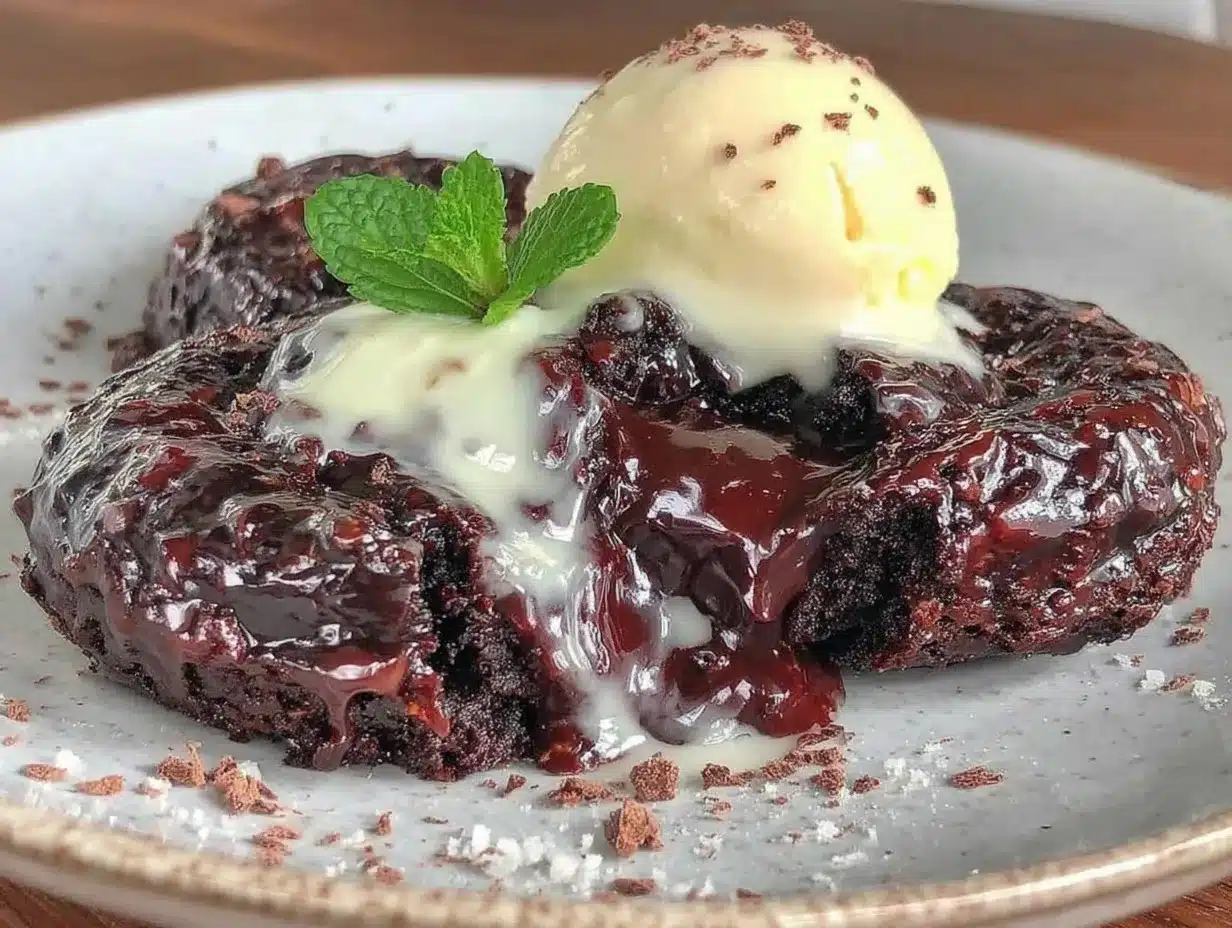
- Serve immediately with a scoop of vanilla ice cream. The contrast between warm cake and cold ice cream is key to the experience.
Tip: Keep an eye on the baking time. I’ve burned a few batches by even a minute or two too long—trust me, patience pays off. If you notice the center is too liquid, bake a little longer next time. Too cakey? Reduce the time slightly. It takes a little practice, but once you get it, the results are stunning.
Cooking Tips & Techniques
Molten lava cakes can be tricky, but a few tricks will have you feeling like a pro.
- Use quality chocolate: It makes a world of difference in flavor and texture. Cheap chocolate can be waxy or too sweet.
- Don’t overmix batter: Overmixing develops gluten, resulting in a tough cake. Gentle folding keeps it tender.
- Temperature matters: Room temperature eggs mix better and help create a smooth batter.
- Grease and dust ramekins well: This prevents sticking and helps the cake release cleanly when inverted.
- Watch the oven closely: Every minute counts. I set my timer early and peek through the oven window to avoid opening the door often, which can cause temperature drops.
One time, I underestimated the power of buttering and dusting the ramekins. The cakes stuck terribly, and I ended up with a chocolatey mess in the bottom. Lesson learned: don’t be lazy about prep! Also, multitasking during baking is doable—use those few minutes baking to prep your plates or chill the ice cream slightly.
Variations & Adaptations
This recipe is wonderfully adaptable depending on your mood or dietary needs.
- Seasonal Twist: Add a teaspoon of espresso powder to the batter for a mocha flavor, or sprinkle fresh raspberries on top before baking for a fruity kick.
- Dietary Swaps: Use almond flour for gluten-free, or coconut oil and dairy-free chocolate for a vegan-friendly version. Swap eggs with flax eggs, though the texture may be slightly different.
- Flavor Variations: Try white chocolate molten cakes by swapping bittersweet chocolate with white chocolate and reduce sugar slightly. Or add a pinch of cayenne pepper for a surprising spicy note.
One variation I love is folding in a tablespoon of peanut butter into the batter before baking—just enough nutty richness that pairs beautifully with the molten chocolate. Don’t be afraid to experiment a bit! Just remember, the baking time might need slight adjustments depending on added ingredients.
Serving & Storage Suggestions
These molten lava cakes are best served warm, straight out of the oven. The molten center cools quickly, so timing your plating and serving is key. Pair with a generous scoop of vanilla ice cream that melts slightly into the warm cake, creating that perfect creamy contrast.
For presentation, dust the cakes with powdered sugar or cocoa powder and garnish with fresh mint or berries. A drizzle of raspberry sauce or caramel can also add a touch of elegance.
Leftovers? Honestly, molten lava cakes are best fresh, but if you have any, store them covered in the fridge for up to 2 days. Reheat gently in a microwave for 20-30 seconds to regain some warmth, though the lava center won’t be quite the same. Avoid freezing as the texture suffers.
Flavors develop subtly after resting, but the magic is truly in that fresh-baked warmth paired with cold vanilla ice cream.
Nutritional Information & Benefits
Each serving of these decadent molten lava cakes (without ice cream) contains approximately:
| Calories | 380-420 kcal |
|---|---|
| Fat | 25 g |
| Carbohydrates | 40 g |
| Protein | 6 g |
The recipe provides a good source of antioxidants from the bittersweet chocolate, which has health benefits like improving heart health and mood. Using high-quality dark chocolate ensures less sugar and more cocoa solids. The eggs provide protein and essential nutrients. If you’re watching carbs or gluten, swapping flour for almond flour can lower the carb content and add a nutty touch.
Keep in mind, this is an indulgent dessert best enjoyed occasionally, but paired with vanilla ice cream made from real dairy, it offers a comforting treat with some nutritional value.
Conclusion
In the end, this decadent molten lava cake recipe with vanilla ice cream is one of those desserts that feels both elegant and homey. It’s a sweet reward after a busy day or a way to impress friends without hours in the kitchen. I love how it balances rich chocolate with a tender cake shell and that glorious molten center. Plus, thanks to the vanilla ice cream, every bite is a little scoop of heaven.
Don’t be afraid to make it your own—adjust baking times, try different chocolates, or add your favorite toppings. I’d love to hear how you customize it! Feel free to share your experiences, questions, or even your own twists in the comments below. Now, go on—treat yourself or your loved ones to a dessert that’s worth every bit of the mess and magic it takes to make.
Happy baking and even happier indulging!
FAQs
How do I know when molten lava cakes are done baking?
Look for firm and set edges with a slightly soft, jiggly center. This usually takes 12-14 minutes at 425°F (220°C). You can gently shake the ramekin to check for jiggle.
Can I prepare molten lava cakes ahead of time?
You can prepare the batter and fill the ramekins, then refrigerate for up to 24 hours before baking. Add a couple extra minutes to baking time if baking straight from the fridge.
What can I use if I don’t have ramekins?
Small oven-safe custard cups or a muffin tin with liners can work, but baking times may vary. Keep a close eye to avoid over or under baking.
Can I make this recipe vegan?
Yes! Swap butter for coconut oil, use dairy-free chocolate, and replace eggs with flax eggs (1 tbsp ground flaxseed + 3 tbsp water per egg). Texture will differ slightly.
How do I prevent the cakes from sticking to the ramekins?
Generously butter and dust with cocoa powder before adding the batter. This creates a non-stick surface and a nice chocolate crust.
Pin This Recipe!
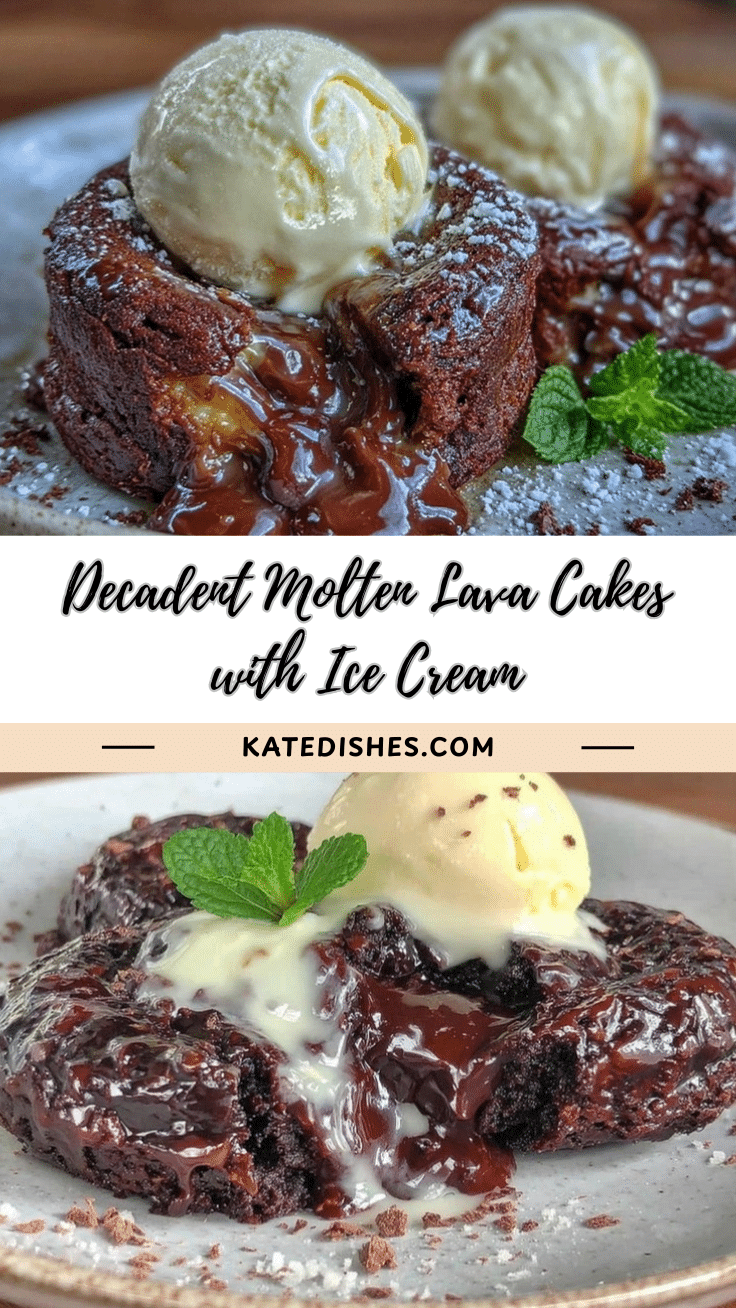
Decadent Molten Lava Cakes Recipe Easy Homemade Dessert with Vanilla Ice Cream

This decadent molten lava cake recipe features a rich, gooey chocolate center with a tender cake exterior, perfectly paired with creamy vanilla ice cream. It’s quick, easy, and ideal for impressing guests or treating yourself.
- Prep Time: 10 minutes
- Cook Time: 14 minutes
- Total Time: 24 minutes
- Yield: 4 servings 1x
- Category: Dessert
- Cuisine: American
Ingredients
- 6 oz (170 g) bittersweet chocolate (high-quality, e.g., Ghirardelli or Valrhona)
- 1/2 cup (113 g) unsalted butter, softened
- 3/4 cup (150 g) granulated sugar
- 3 large eggs, room temperature
- 1/4 cup (32 g) all-purpose flour
- 1 tsp vanilla extract
- Pinch of salt
- Vanilla ice cream (for serving)
Instructions
- Preheat your oven to 425°F (220°C).
- Grease your ramekins thoroughly with butter and lightly dust with cocoa powder.
- Melt chocolate and butter together using a double boiler or microwave in 30-second bursts, stirring until smooth. Let cool slightly.
- In a separate bowl, whisk eggs and sugar until pale, thick, and slightly fluffy (3-4 minutes by hand or 2 minutes with mixer).
- Stir vanilla extract and a pinch of salt into the egg mixture.
- Gently fold the melted chocolate and butter mixture into the eggs using a spatula.
- Sift the flour over the batter and fold gently until just combined; do not overmix.
- Divide the batter evenly among prepared ramekins, filling about 3/4 full.
- Bake for 12-14 minutes until edges are firm and center is soft and slightly jiggly.
- Remove from oven and let cakes rest for 1 minute. Run a thin knife around edges and invert onto serving plates.
- Serve immediately with a scoop of vanilla ice cream.
Notes
Use high-quality bittersweet chocolate for best flavor. Grease and dust ramekins well to prevent sticking. Watch baking time closely to maintain molten center. For dairy-free, substitute butter with coconut oil and use dairy-free ice cream. For gluten-free, replace all-purpose flour with almond flour. Batter can be prepared ahead and refrigerated up to 24 hours before baking, adding extra baking time if cold.
Nutrition
- Serving Size: 1 molten lava cake w
- Calories: 400
- Sugar: 28
- Sodium: 80
- Fat: 25
- Saturated Fat: 15
- Carbohydrates: 40
- Fiber: 4
- Protein: 6
Keywords: molten lava cake, chocolate dessert, easy dessert, homemade lava cake, vanilla ice cream, quick dessert, romantic dessert