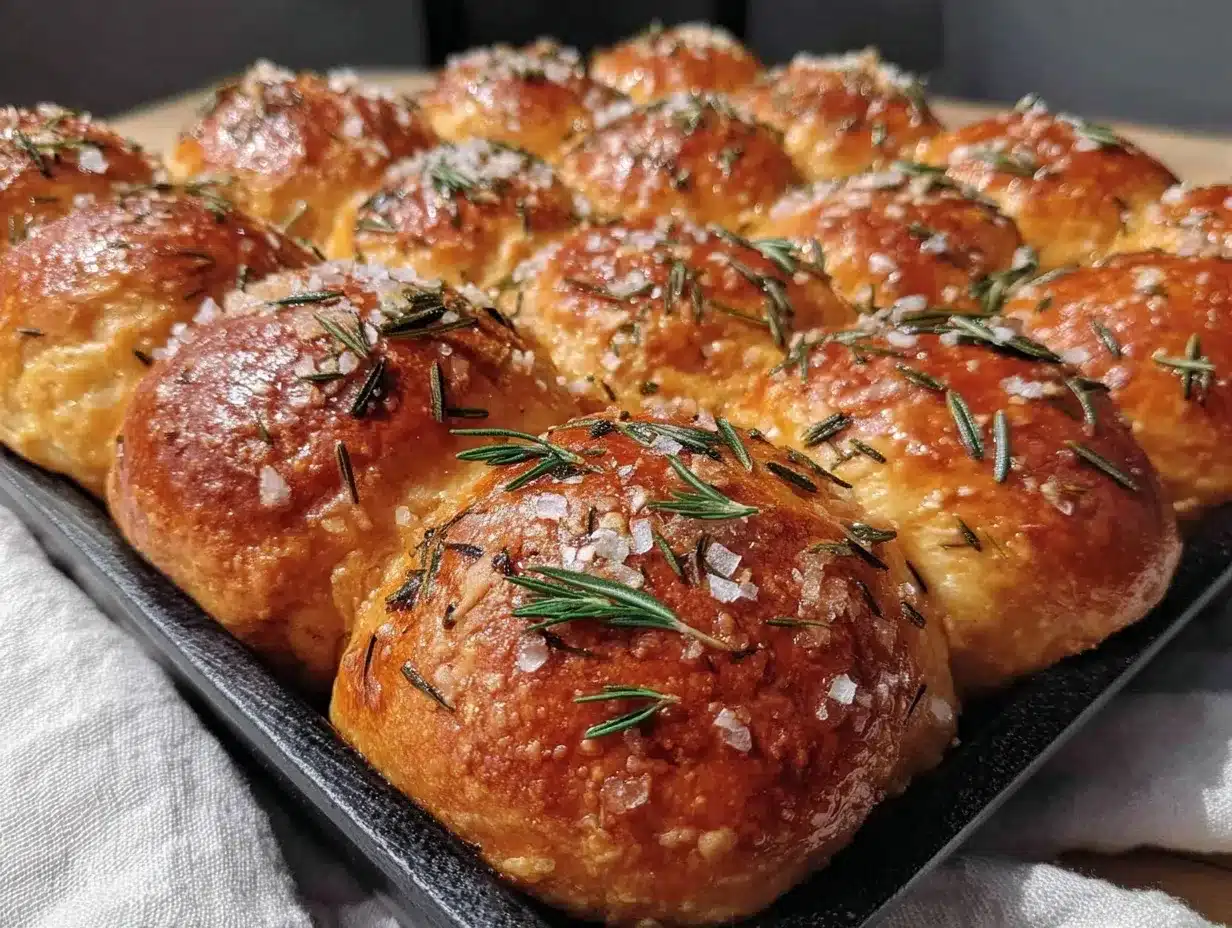
Just imagine this: the kitchen is filled with the warm, earthy scent of fresh rosemary and melting butter, and the soft golden tops of dinner rolls peek out from the oven—steam rising as you break open a pillowy roll, its interior so feathery-light and tender you can almost hear it sigh. That’s the magic of my Fluffy Grandma’s Rosemary Dinner Rolls. The first time I made these, I was instantly transported back to my grandma’s tiny farmhouse kitchen, where she’d always have a batch of these rolls rising on the windowsill, covered with a checkered towel (the kind with a few flour stains that told stories of a thousand meals). I was knee-high to a grasshopper, and I remember being barely tall enough to peek over the counter and watch her knead the dough with steady, loving hands.
There’s a moment, right as you pull them from the oven, when you pause, inhale, and let the buttery, herbal aroma wash over you. That’s when you just know you’re onto something truly special—something that feels like home. These rosemary dinner rolls have become more than a recipe; they’re a tradition. Whenever I bake them, my family can’t resist sneaking hot rolls right off the tray (and honestly, neither can I). There’s always a bit of playful arguing over who gets the last one, and nothing beats seeing those buttery crumbs on everyone’s lips at the end of the meal.
Honestly, I wish I’d discovered how easy and foolproof these rolls are years ago—they’re dangerously easy to whip up, yet the payoff is pure, nostalgic comfort. Perfect for Sunday dinners, cozy holiday gatherings, or just as a sweet treat for your kids’ lunchboxes. They brighten up any holiday table and look downright adorable on a Pinterest-worthy breadboard. After testing these more times than I’ll admit (all in the name of research, of course), they’re now a staple for family gatherings and edible gifting. If you’re craving a warm hug in the form of bread, you’re going to want to bookmark this rosemary dinner rolls recipe!
Why You’ll Love This Rosemary Dinner Rolls Recipe
I’ve made more batches of these fluffy rosemary dinner rolls than I can count—through rushed weeknights, holiday chaos, and quiet Sunday afternoons. They never fail to impress, and here’s why:
- Quick & Easy: These rolls come together in just about 2 hours, but the hands-on time is minimal. Perfect for when you want homemade bread but don’t have all day to fuss with it.
- Simple Ingredients: No wild goose chase at the grocery store—chances are you’ve got everything you need already. Just a bit of fresh rosemary, some pantry staples, and butter (of course!).
- Perfect for Any Occasion: Whether it’s a holiday dinner, a brunch spread, or a simple weeknight meal, these rolls steal the spotlight. They’re just as at home next to roast chicken as they are beside a big bowl of soup.
- Crowd-Pleaser: Kids, picky eaters, and bread connoisseurs all go for seconds. Seriously, I’ve never had leftovers unless I double the batch.
- Unbelievably Delicious: The combination of soft, pillowy centers, golden crusts, and that unmistakable herbal warmth from the rosemary makes these rolls pure comfort food.
What makes this rosemary dinner rolls recipe stand out? It’s the way the dough stays light and fluffy (thanks to just the right balance of milk, butter, and a touch of sugar). I use a special kneading technique my grandma swore by—just enough to develop structure, but never tough. And that sprinkle of sea salt on top? Game-changer. These aren’t just another dinner roll. They’re a recipe you’ll want to pass down.
I’m all about recipes that invite you in and make you feel like a kitchen rockstar, even if you’re new to bread making. These rolls have soul—they’re the kind of food that makes you close your eyes after the first bite and just enjoy the moment. Whether you’re hoping to impress guests without any stress or simply want to add a little extra love to your dinner table, this rosemary dinner rolls recipe has your back.
What Ingredients You Will Need
This recipe uses simple, wholesome ingredients to deliver bold flavor and the kind of soft, dreamy texture you crave in a homemade roll. Most of these are pantry staples or easy to find at your local market—and I promise, no fancy bread flours or specialty items required.
- For the Dough:
- All-purpose flour (500g / 4 cups), spooned and leveled – I love King Arthur or Gold Medal for consistent results
- Whole milk (240ml / 1 cup), warmed to about 110°F (43°C) – provides richness and tenderness
- Active dry yeast (2 1/4 teaspoons / 1 packet, 7g) – gives that beautiful rise and airy crumb
- Granulated sugar (2 tablespoons / 25g) – just enough to feed the yeast and add a hint of sweetness
- Unsalted butter (60g / 1/4 cup), melted and slightly cooled – you can use salted butter, just reduce the added salt
- Large egg (1), room temperature – binds everything beautifully
- Fine sea salt (1 1/2 teaspoons / 8g) – for flavor (plus a little extra for sprinkling on top)
- Fresh rosemary (1 1/2 tablespoons), finely chopped – if you’re using dried rosemary, use 2 teaspoons and crush it between your fingers to release the flavor
- For Brushing & Topping:
- Unsalted butter (2 tablespoons / 28g), melted – for brushing the tops
- Extra fresh rosemary (1 teaspoon), finely chopped – optional, for a pop of color and aroma
- Flaky sea salt (like Maldon), for sprinkling – that little crunch is so good
Ingredient Tips & Swaps:
- For a dairy-free option, substitute oat or almond milk and swap the butter for olive oil or vegan butter (results will be a bit less rich, but still yummy).
- If you have instant yeast, you can skip the proofing step and mix it straight into the flour.
- In a pinch, dried rosemary works—just use a little less and crush it well.
- Want whole wheat? Replace up to half the flour with white whole wheat for a heartier bite.
These ingredients are all about flavor and comfort—no complicated steps or hard-to-find items. Once you’ve tried them, you’ll see why this rosemary dinner rolls recipe is a keeper.
Equipment Needed
- Mixing Bowl: A large bowl for combining ingredients and letting the dough rise. Any sturdy bowl works; glass or ceramic holds heat nicely.
- Wooden Spoon or Sturdy Spatula: For mixing the dough before kneading—less sticky than metal, in my experience.
- Kitchen Scale (optional but recommended): For precise measuring—makes a difference with bread, but cup measurements work too.
- Measuring Cups & Spoons: For those who like things exact.
- 9×13-inch (23x33cm) Baking Pan or Casserole Dish: I use a glass Pyrex or a metal cake pan; both work well for browning. You can use two 8×8 pans if that’s what you have.
- Kitchen Towel or Plastic Wrap: For covering the dough as it rises—keeps things cozy and prevents drying out.
- Baking Sheet (optional): If you want free-form rolls instead of a cluster, bake them spaced apart on a sheet.
- Pastry Brush: For slathering on that glorious melted butter (a spoon works in a pinch).
If you don’t have a stand mixer, no worries—this rosemary dinner rolls recipe is designed for hand mixing and kneading. And if you’re using nonstick pans, just skip greasing, but for metal or glass, a quick swipe of butter or oil keeps things easy to remove. My grandma always used her trusty old wooden spoon and a faded Pyrex pan, and you know what? They work just fine. Keep things simple; bread doesn’t need fancy gear.
Preparation Method
- Proof the Yeast (5 minutes): In your large mixing bowl, combine the warm milk (110°F/43°C), sugar, and active dry yeast. Stir gently and let it sit for about 5 minutes until it’s foamy and smells a bit sweet and yeasty. If the surface doesn’t bubble, your yeast may be old—grab a fresh packet.
- Mix the Dough (10 minutes): Add the melted butter, egg, and salt to the foamy yeast mixture. Whisk gently to combine. Stir in the chopped rosemary. Gradually add the flour, about 1 cup (125g) at a time, mixing with a wooden spoon until a shaggy dough forms. If it’s super sticky, add another tablespoon or two of flour.
- Knead (8-10 minutes): Turn the dough out onto a lightly floured surface. Knead by hand for 8-10 minutes, until smooth and elastic (it should feel a bit tacky, not sticky, and bounce back when poked). If using a stand mixer with a dough hook, knead on medium for 5-6 minutes. Don’t over-flour—soft dough makes fluffier rolls.
- First Rise (60-90 minutes): Place the dough in a greased bowl, turning it to coat. Cover with a towel or plastic wrap and let rise in a warm spot until doubled, about 1 to 1 1/2 hours. (If your kitchen is chilly, place the bowl in your oven with just the light on for gentle warmth.) The dough should look puffed and slightly domed.
- Shape the Rolls (10 minutes): Punch down the risen dough and turn it out onto a lightly floured surface. Divide into 15 equal pieces (about 50g each). Roll each piece into a smooth ball by cupping your hand over the dough and moving it in circles. Place the balls in a greased 9×13-inch (23x33cm) pan, spaced evenly.
- Second Rise (30-45 minutes): Cover the pan loosely and let the rolls rise in a warm spot until puffy and just touching, 30 to 45 minutes. They won’t double this time, but they’ll get nice and soft.
- Bake (20-22 minutes): Preheat your oven to 375°F (190°C) during the second rise. Bake the rolls for 20-22 minutes, rotating the pan halfway through, until golden brown on top and the kitchen smells like absolute heaven. If you like a deeper golden color, bake a minute or two longer. (If tops brown too fast, tent loosely with foil.)
- Finishing Touches: Remove the pan from the oven and, while still hot, brush the tops generously with melted butter. Sprinkle with extra chopped rosemary and flaky sea salt. Let cool for 10-15 minutes before serving—if you can wait that long!
Prep Notes: If your dough feels dry, add a tablespoon of milk; if it’s sticky, dust in a little flour. For best results, don’t rush the rises—give the yeast time to do its thing. And trust your senses: the dough should smell slightly sweet and herby, and feel soft as a baby’s cheek when shaped.
Cooking Tips & Techniques
Baking bread can feel intimidating, but with this rosemary dinner rolls recipe, you’ll be a pro in no time. Here are my best tips, learned from both kitchen wins and a few, let’s say, “learning experiences.”
- Temperature Matters: Use a thermometer for the milk—110°F (43°C) is perfect for yeast. Too hot, and you’ll kill the yeast; too cold, and it won’t activate. If you don’t have a thermometer, aim for “baby bath” warm.
- Knead Just Enough: Under-kneading means dense rolls, over-kneading can toughen them. You want a soft, smooth dough that holds its shape but isn’t dry. If in doubt, err on the side of less flour—the dough should be tacky but not a mess.
- Proofing Tricks: My favorite “proofing box” is my (turned-off) oven with just the light on. Or, set the bowl on top of a warm (not hot) appliance. If your kitchen is cold, it might take a bit longer to rise—no biggie.
- Shaping for Consistency: Roll dough balls under a cupped hand to smooth them out. If you have a kitchen scale, weigh the pieces for perfectly even rolls (makes for a pretty presentation).
- Don’t Skip the Butter Brush: Brushing right when they come out of the oven locks in moisture and gives that irresistible, glossy look. For a flavor twist, infuse the melted butter with a sprig of rosemary beforehand.
- Learning From Oops: I’ve forgotten the salt before—don’t do it! Flat flavor isn’t fun. If you end up with pale rolls, bake a few minutes longer next time or try a metal pan for more browning.
- Multitasking: While the dough rises, prep your other dinner components. These rolls hold well, so you can bake them before guests arrive and rewarm just before serving.
- Consistency is Key: Stick to the weights/measurements for best results, but don’t stress over perfection. Bread is forgiving, and a little variance just adds character.
With a bit of practice, you’ll find your groove—and honestly, your kitchen will smell so good, no one will care if a roll or two comes out lopsided!
Variations & Adaptations
This rosemary dinner rolls recipe is a great jumping-off point for all sorts of flavors and dietary tweaks. Here’s how you can make it your own:
- Cheesy Rosemary Rolls: Add 1/2 cup (50g) shredded Parmesan or sharp cheddar into the dough with the rosemary. The cheese melts into the bread for an extra savory bite.
- Whole Wheat Option: Replace up to half the all-purpose flour with white whole wheat flour for a slightly earthier, nuttier roll. You might need an extra tablespoon or two of milk to keep the dough soft.
- Dairy-Free: Use unsweetened oat or almond milk and swap the butter for olive oil or a vegan butter alternative. The rolls stay fluffy but with a lighter, slightly different flavor.
- Sweet Herb Swap: Try chopped fresh thyme or sage instead of rosemary for a new flavor twist. In the summer, mix in minced chives and serve with herbed butter.
- Allergen-Friendly: For egg-free rolls, use a flax egg (1 tablespoon ground flaxseed + 2.5 tablespoons water, let sit for 5 minutes). Gluten-free all-purpose blends work too, but expect a slightly different texture—still tasty, just not as pillow-soft.
- Personal Favorite: Sometimes I’ll knead in a handful of roasted garlic cloves (just mash them right in) along with the rosemary—talk about a showstopper for garlic lovers!
Feel free to play around—swap herbs based on what you grow or love, adjust the salt for your taste, or make mini rolls for sliders. The recipe is forgiving and open to whatever you crave. That’s the fun of homemade bread!
Serving & Storage Suggestions
These fluffy rosemary dinner rolls are best enjoyed warm, right from the pan (slathered with a bit more butter, if you ask me). Here’s how to serve and store them for maximum happiness:
- Serving Ideas: Serve them in a breadbasket lined with a towel to keep them cozy at the table. They’re perfect with roast chicken, turkey, soups, or even alongside a simple salad. I love them with honey butter or dipped in olive oil with a sprinkle of sea salt.
- Pairings: These rolls go beautifully with hearty stews, creamy pastas, or as a base for mini sandwiches. They also shine on a holiday table next to mashed potatoes and gravy.
- Storage: Store leftover rolls in an airtight bag or container at room temperature for up to 2 days. For longer storage, freeze cooled rolls in a ziptop bag for up to 2 months. Thaw at room temperature or gently warm in a 300°F (150°C) oven for 10 minutes.
- Reheating: For soft, fresh rolls, sprinkle them lightly with water and reheat in a warm oven for 5-7 minutes. Microwaving works in a pinch, but you lose a bit of that freshly-baked texture.
- Flavor Over Time: These rolls stay tender for a couple of days, and the rosemary flavor even deepens on day two. If you want to prep ahead, shape the rolls and refrigerate overnight, then let them come to room temp and rise before baking.
Honestly, I doubt you’ll have leftovers, but if you do, they make killer croutons or bread pudding the next day!
Nutritional Information & Benefits
Here’s a quick look at what you’re getting with each fluffy rosemary dinner roll (assuming 15 rolls per batch):
- Calories: about 145 per roll
- Carbohydrates: 22g
- Protein: 3g
- Fat: 4g (mostly from butter and egg)
- Fiber: 1g
Health Benefits: Fresh rosemary is known for its antioxidants and anti-inflammatory properties, plus it just smells and tastes amazing. Using whole milk and real butter provides richness and a little calcium. You can swap in whole wheat flour for extra fiber and nutrients.
Dietary Considerations: This recipe contains gluten, dairy, and egg, but it adapts well for plant-based or allergen-friendly diets (see variations above). For a lower-carb option, try making smaller rolls or pairing with protein-rich mains.
From a wellness perspective, there’s something truly nourishing about homemade bread—no preservatives, just real, honest ingredients and a dose of kitchen therapy. Enjoy every bite!
Conclusion
So there you have it—my best-ever, tried-and-true rosemary dinner rolls recipe, just like Grandma used to make (with a fresh, herby twist). These rolls are worth every minute, trust me. They’re soft, buttery, and packed with flavor, the kind you’ll want to make for every special occasion—or just because you need a little comfort on a Wednesday night.
Don’t be afraid to tweak and make them your own—swap herbs, go cheesy, or try a different flour. I love this recipe because it’s as forgiving as it is delicious, and sharing it with my family (and now with you) just feels right. If you bake a batch, I’d love to hear how they turn out—drop a comment, share your own twists, or snap a photo for your Pinterest board!
Here’s to warm kitchens, happy tables, and recipes that feel like a hug. Happy baking, friends!
Frequently Asked Questions
How do I know when my rosemary dinner rolls are done baking?
Your rosemary dinner rolls should be golden brown on top and sound hollow when tapped. If you’re unsure, an instant-read thermometer inserted into the center should read about 190°F (88°C).
Can I make these rosemary dinner rolls ahead of time?
Absolutely! You can shape the rolls, cover the pan, and refrigerate overnight. Let them come to room temperature and rise until puffy before baking as directed.
What if I don’t have fresh rosemary?
No worries! You can use 2 teaspoons dried rosemary—just crush it well to release the oils. Thyme or sage also make tasty substitutes.
Can I freeze the baked rolls?
Yes, once the rolls are completely cool, freeze them in a ziptop bag for up to 2 months. Reheat in a warm oven for that fresh-baked texture.
Why did my rolls turn out dense instead of fluffy?
This usually happens if the dough is under-kneaded, the yeast was expired, or the dough didn’t rise enough. Next time, check your yeast’s freshness and let the dough rise in a warm spot until truly doubled.
Pin This Recipe!

Rosemary Dinner Rolls – Easy, Fluffy & Buttery Grandma’s Style

These fluffy rosemary dinner rolls are soft, buttery, and infused with fresh rosemary for a comforting, homemade bread that’s perfect for any occasion. Easy to make and irresistibly delicious, they’re a crowd-pleaser at holiday tables or weeknight dinners.
- Prep Time: 25 minutes
- Cook Time: 22 minutes
- Total Time: 2 hours
- Yield: 15 rolls 1x
- Category: Bread
- Cuisine: American
Ingredients
- 4 cups all-purpose flour (spooned and leveled)
- 1 cup whole milk, warmed to about 110°F
- 2 1/4 teaspoons active dry yeast (1 packet)
- 2 tablespoons granulated sugar
- 1/4 cup unsalted butter, melted and slightly cooled
- 1 large egg, room temperature
- 1 1/2 teaspoons fine sea salt (plus extra for sprinkling)
- 1 1/2 tablespoons fresh rosemary, finely chopped (or 2 teaspoons dried rosemary, crushed)
- 2 tablespoons unsalted butter, melted (for brushing tops)
- 1 teaspoon extra fresh rosemary, finely chopped (optional, for topping)
- Flaky sea salt (like Maldon), for sprinkling
Instructions
- In a large mixing bowl, combine warm milk, sugar, and active dry yeast. Stir gently and let sit for about 5 minutes until foamy.
- Add melted butter, egg, and salt to the yeast mixture. Whisk gently to combine. Stir in chopped rosemary.
- Gradually add flour, about 1 cup at a time, mixing with a wooden spoon until a shaggy dough forms. If sticky, add another tablespoon or two of flour.
- Turn dough onto a lightly floured surface. Knead by hand for 8-10 minutes until smooth and elastic (or use a stand mixer with dough hook for 5-6 minutes).
- Place dough in a greased bowl, turning to coat. Cover and let rise in a warm spot until doubled, about 1 to 1 1/2 hours.
- Punch down risen dough and turn onto a lightly floured surface. Divide into 15 equal pieces (about 50g each). Roll each piece into a smooth ball.
- Place balls in a greased 9×13-inch pan, spaced evenly.
- Cover pan loosely and let rolls rise in a warm spot until puffy and just touching, 30 to 45 minutes.
- Preheat oven to 375°F during second rise.
- Bake rolls for 20-22 minutes, rotating pan halfway, until golden brown on top.
- Remove pan from oven and, while hot, brush tops with melted butter. Sprinkle with extra rosemary and flaky sea salt.
- Let cool for 10-15 minutes before serving.
Notes
For dairy-free rolls, substitute oat or almond milk and vegan butter. If using instant yeast, skip the proofing step. For whole wheat rolls, replace up to half the flour with white whole wheat and add extra milk if needed. Rolls can be shaped and refrigerated overnight before baking. For extra flavor, infuse melted butter with rosemary before brushing.
Nutrition
- Serving Size: 1 roll
- Calories: 145
- Sugar: 2
- Sodium: 180
- Fat: 4
- Saturated Fat: 2
- Carbohydrates: 22
- Fiber: 1
- Protein: 3
Keywords: rosemary dinner rolls, fluffy rolls, homemade bread, buttery rolls, easy bread recipe, holiday rolls, grandma's rolls, comfort food