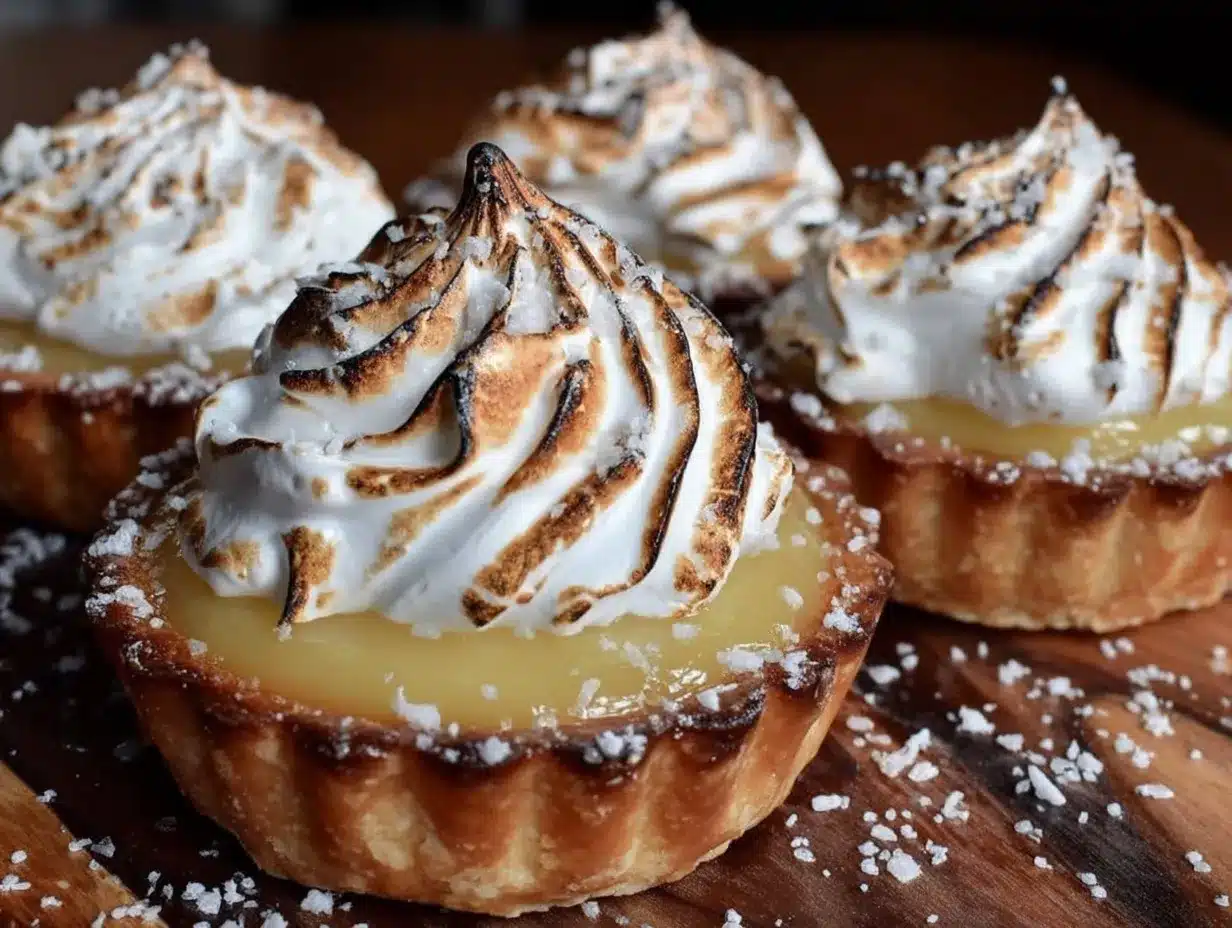
Let me tell you, the scent of zesty lemon filling mingling with the sweet, toasted peaks of fluffy meringue is enough to make anyone’s mouth water. The first time I baked these perfect mini lemon tarts with fluffy meringue topping was on a rainy Saturday afternoon, the kind of day that calls for something bright and comforting. I was instantly hooked—the kind of moment where you pause, take a deep breath, and just smile because you know you’re onto something truly special.
Years ago, when I was knee-high to a grasshopper, my grandma used to make lemon pies that felt like sunshine on a plate. But these mini tarts? They pack that nostalgic punch in bite-sized form, perfect for sharing or sneaking a few when no one’s looking. Honestly, I wish I’d discovered this recipe sooner—it’s dangerously easy and offers pure, nostalgic comfort.
My family couldn’t stop sneaking them off the cooling rack (and I can’t really blame them). Whether it’s for a brunch gathering, a sweet treat for your kids, or just to brighten up your Pinterest cookie board, these mini lemon tarts with fluffy meringue topping are the perfect answer. I’ve tested this recipe more times than I can count—in the name of research, of course—and it’s become a staple for family gatherings, gifting, and those moments when you want a little sunshine on a plate.
Why You’ll Love This Recipe
After countless trials (and a few burnt meringues along the way), I can say with confidence this recipe nails that balance between tart and sweet, crisp and fluffy. Here’s why this perfect mini lemon tarts recipe with fluffy meringue topping stands apart:
- Quick & Easy: Comes together in under an hour, perfect for busy weeknights or last-minute dessert cravings.
- Simple Ingredients: No fancy grocery trips needed; you likely already have everything in your pantry and fridge.
- Perfect for Entertaining: Great for potlucks, afternoon teas, or cozy dinners where you want to impress without stress.
- Crowd-Pleaser: Always gets rave reviews from kids and adults alike—fluffy meringue is a winner every time.
- Unbelievably Delicious: The crisp tart shell with a tangy lemon filling and cloud-like meringue topping is next-level comfort food.
This isn’t just another lemon tart recipe. I’ve perfected a lemon curd that’s tangy but smooth, paired it with a buttery crust that’s just firm enough to hold the filling without overpowering it, and topped everything with a meringue that’s fluffy and toasted to golden perfection. Honestly, this recipe hits all the right notes—comfort food with a fresh twist that makes you close your eyes after the first bite.
What Ingredients You Will Need
This recipe uses simple, wholesome ingredients to deliver bold flavor and satisfying texture without the fuss. Most are pantry staples, and substitutions are easy if needed.
- For the Tart Crust:
- 1 1/4 cups (160g) all-purpose flour (I recommend King Arthur for best texture)
- 1/4 cup (50g) granulated sugar
- 1/2 cup (115g) unsalted butter, cold and cubed (adds richness and flakiness)
- 1 large egg yolk (room temperature)
- 2 tablespoons ice water (adjust as needed)
- Pinch of salt
- For the Lemon Filling:
- 1/2 cup (120ml) freshly squeezed lemon juice (about 3-4 lemons)
- 1 tablespoon lemon zest (for extra zing)
- 3/4 cup (150g) granulated sugar
- 3 large eggs
- 1/4 cup (60ml) heavy cream (for smoothness; use coconut cream for dairy-free)
- 2 tablespoons unsalted butter, cut into small pieces (optional, for richness)
- For the Fluffy Meringue Topping:
- 4 large egg whites (room temperature; they whip better)
- 1/2 cup (100g) granulated sugar
- 1/4 teaspoon cream of tartar (stabilizes the meringue)
- 1 teaspoon vanilla extract (optional, for flavor)
If you want to keep it gluten-free, swap the all-purpose flour for a gluten-free blend that suits baking. For a lower-sugar option, try using a sugar substitute like erythritol, but keep in mind it might affect the texture a bit.
Equipment Needed
- Mini tart pans or a mini muffin tin with removable bottoms (for easy release)
- Mixing bowls (glass or metal work best for whipping egg whites)
- Electric mixer or stand mixer (essential for fluffy meringue)
- Zester or fine grater (for lemon zest)
- Whisk and spatula (for folding and mixing)
- Saucepan (to cook the lemon filling gently)
- Baking sheet (to place tart pans on while baking)
- Oven with broiler setting (for toasting meringue perfectly)
If you don’t have mini tart pans, a muffin tin lined with sturdy cupcake liners works fine—just be gentle when removing them. I usually use a silicone spatula to fold the meringue; it helps keep all that air in. Pro tip: a handheld mixer with a whisk attachment is a budget-friendly alternative to a stand mixer and does the job perfectly.
Preparation Method
- Prepare the Tart Crust: In a large bowl, whisk together 1 1/4 cups (160g) flour, 1/4 cup (50g) sugar, and a pinch of salt. Cut in 1/2 cup (115g) cold unsalted butter using a pastry cutter or your fingers until the mixture resembles coarse crumbs. Add 1 egg yolk and 2 tablespoons ice water gradually, mixing until the dough just comes together. Avoid overworking. Wrap the dough in plastic wrap and chill for at least 30 minutes.
- Preheat the Oven: Set your oven to 350°F (175°C) while the dough chills.
- Roll and Shape the Dough: On a lightly floured surface, roll out the dough to about 1/8 inch (3mm) thickness. Cut out circles slightly larger than your mini tart pans. Gently press dough into the pans and prick bottoms with a fork to prevent puffing. Chill again for 10 minutes to keep shapes crisp during baking.
- Bake the Tart Shells: Line each tart shell with parchment and fill with pie weights or dried beans. Bake for 12-15 minutes until edges are golden. Remove weights and parchment, then bake another 5 minutes to dry out the crust. Let cool completely.
- Make the Lemon Filling: In a saucepan, whisk together 1/2 cup (120ml) lemon juice, 1 tablespoon zest, 3/4 cup (150g) sugar, and 3 large eggs. Cook over medium heat, stirring constantly, until thickened and coats the back of a spoon (about 6-8 minutes). Remove from heat and whisk in 1/4 cup (60ml) heavy cream and 2 tablespoons butter until smooth. Let cool until just warm.
- Fill the Tart Shells: Spoon the lemon filling evenly into the cooled tart shells. Don’t overfill—leave a little room for the meringue.
- Prepare the Meringue: In a clean bowl, beat 4 egg whites with 1/4 teaspoon cream of tartar until soft peaks form. Gradually add 1/2 cup (100g) sugar a tablespoon at a time, beating until stiff, glossy peaks form. Beat in 1 teaspoon vanilla extract if using.
- Top the Tarts: Spoon or pipe the meringue over each lemon-filled tart, sealing edges to prevent shrinking.
- Toast the Meringue: Place tarts on a baking sheet and broil for 1-2 minutes, watching closely, until meringue is golden brown. Alternatively, use a kitchen torch for precise toasting.
- Cool and Serve: Let tarts cool to room temperature before serving. The meringue should be fluffy and soft, with a crisp, toasted exterior.
Watch your broiler carefully—meringue can go from golden to burnt in seconds! If your meringue weeps a bit after baking, don’t worry, it’s normal and still delicious. For extra efficiency, prepare the crust and filling a day ahead; just add meringue before serving.
Cooking Tips & Techniques
Getting the perfect fluffy meringue can be tricky, but here’s what I’ve learned from scrambles and successes alike. Always make sure your mixing bowl and whisk are spotless and grease-free; even a speck of fat can keep egg whites from whipping properly. Use room temperature egg whites—they whip up faster and reach higher volume.
Add sugar slowly—dumping it in all at once weighs the meringue down. Cream of tartar is your best friend here; it stabilizes the foam and helps prevent weeping. When folding meringue onto the lemon filling, be gentle to keep all that air in—light as a cloud, you know?
Common mistake? Overbaking the tart shells so they get too hard or burnt. Keep an eye on the edges and remove as soon as they’re golden. Also, don’t rush the lemon curd cooking; constant stirring prevents curdling and gives you that silky texture.
Multitasking tip: While the tart shells chill or bake, zest and juice your lemons to save time. Trust me, prepping ingredients ahead is a game-changer. Lastly, use a kitchen torch for the meringue if you want control; the broiler works fine but requires eagle eyes.
Variations & Adaptations
- Dairy-Free Version: Swap heavy cream with coconut cream and use dairy-free butter alternatives in the crust. The lemon flavor still shines bright!
- Different Citrus Twists: Try using lime or orange juice instead of lemon for a fresh spin. Grapefruit works too if you like a slightly bitter edge.
- Gluten-Free Crust: Use almond flour or a gluten-free baking blend for the crust. Press it into the pans instead of rolling for easy shaping.
For a fun seasonal twist, sprinkle fresh berries on top of the meringue just before serving, or add a tiny splash of Grand Marnier to the lemon filling for grown-up flavor. I once swapped out the sugar in the meringue for a honey drizzle after baking—unexpectedly delicious!
Serving & Storage Suggestions
These mini lemon tarts with fluffy meringue topping are best served at room temperature. The contrast between the cool, tangy lemon curd and the warm, lightly toasted meringue is heavenly. For presentation, dust a little powdered sugar or scatter thin lemon slices beside the tarts for a bright finish.
Pair with a cup of Earl Grey tea or a light, sparkling white wine for an elegant afternoon treat or dessert. If you’re planning ahead, store tarts in an airtight container in the refrigerator for up to 2 days. The crust might soften slightly but remains delicious.
To reheat, gently warm the tarts in a low oven (about 300°F / 150°C) for 5-7 minutes—avoid microwave reheating as it can make the crust soggy and meringue rubbery. Flavors actually develop over time, so these tarts taste even better the next day when the lemon filling has set fully.
Nutritional Information & Benefits
Each mini lemon tart with fluffy meringue topping contains approximately 220 calories, with 10g of fat, 28g of carbohydrates, and 3g of protein. The lemon juice and zest provide a good dose of vitamin C, which supports immune health and adds a refreshing brightness.
This recipe is naturally low in sodium and can be adjusted to be gluten-free or dairy-free as needed. Keep in mind the egg whites in the meringue add protein without fat, making it a lighter alternative to heavier dessert toppings.
From a wellness perspective, the fresh lemon juice cuts through sweetness and adds a clean, vibrant flavor that feels less indulgent yet satisfies that sweet craving perfectly. It’s a little slice of sunshine that doesn’t leave you weighed down.
Conclusion
So, why should you give these perfect mini lemon tarts with fluffy meringue topping a try? Because they manage to be elegant, easy, and downright delicious all at once. Whether you’re a seasoned baker or just looking for a sweet pick-me-up, this recipe is flexible enough to fit your style and simple enough to make on a whim.
I love these tarts because they remind me of family afternoons and joyful gatherings, with a fresh twist that keeps them feeling special. Don’t hesitate to customize the citrus or crust to your liking—baking is all about making it yours.
If you try this recipe, please leave a comment below or share your variations—I’d love to hear how you make these mini lemon tarts your own. Remember, baking is a journey, and every tart comes with a story. Happy baking and enjoy every bite!
FAQs
Can I make the tart crust ahead of time?
Yes! The dough can be prepared and chilled up to 2 days in advance. Just keep it wrapped tightly in the fridge and roll out when ready to bake.
What if my meringue starts to weep or get watery?
Weeping can happen if the meringue is overcooked or the air humidity is high. Using cream of tartar and serving tarts soon after toasting helps prevent this. Also, avoid cutting into the tart too early.
Can I use store-bought lemon curd instead of making my own?
Absolutely! Store-bought lemon curd is a convenient shortcut, but homemade filling offers a fresher, tangier flavor that really makes these tarts stand out.
How do I store leftover tarts?
Store them in an airtight container in the fridge for up to 2 days. Bring to room temperature before serving for the best texture.
Is it safe to use raw egg whites in the meringue?
Yes, as long as you use fresh, pasteurized eggs. If you’re concerned, you can gently heat the egg whites with sugar over a double boiler to make a Swiss meringue, which is safe and still fluffy.
Pin This Recipe!

Perfect Mini Lemon Tarts Recipe with Fluffy Meringue Topping

These mini lemon tarts feature a tangy lemon curd filling topped with fluffy, toasted meringue, perfect for sharing or a bright, comforting treat.
- Prep Time: 40 minutes
- Cook Time: 20 minutes
- Total Time: 1 hour
- Yield: 12 mini tarts 1x
- Category: Dessert
- Cuisine: American
Ingredients
- 1 1/4 cups (160g) all-purpose flour
- 1/4 cup (50g) granulated sugar
- 1/2 cup (115g) unsalted butter, cold and cubed
- 1 large egg yolk (room temperature)
- 2 tablespoons ice water
- Pinch of salt
- 1/2 cup (120ml) freshly squeezed lemon juice (about 3–4 lemons)
- 1 tablespoon lemon zest
- 3/4 cup (150g) granulated sugar
- 3 large eggs
- 1/4 cup (60ml) heavy cream
- 2 tablespoons unsalted butter, cut into small pieces (optional)
- 4 large egg whites (room temperature)
- 1/2 cup (100g) granulated sugar
- 1/4 teaspoon cream of tartar
- 1 teaspoon vanilla extract (optional)
Instructions
- Prepare the Tart Crust: In a large bowl, whisk together flour, sugar, and salt. Cut in cold butter until mixture resembles coarse crumbs. Add egg yolk and ice water gradually, mixing until dough just comes together. Wrap in plastic wrap and chill for at least 30 minutes.
- Preheat the oven to 350°F (175°C) while the dough chills.
- Roll and Shape the Dough: Roll dough to about 1/8 inch thickness on a floured surface. Cut circles slightly larger than mini tart pans. Press dough into pans and prick bottoms with a fork. Chill for 10 minutes.
- Bake Tart Shells: Line shells with parchment and fill with pie weights or dried beans. Bake 12-15 minutes until edges are golden. Remove weights and parchment, bake another 5 minutes. Cool completely.
- Make Lemon Filling: In a saucepan, whisk lemon juice, zest, sugar, and eggs. Cook over medium heat, stirring constantly until thickened (6-8 minutes). Remove from heat, whisk in heavy cream and butter until smooth. Cool until just warm.
- Fill Tart Shells: Spoon lemon filling evenly into cooled shells, leaving room for meringue.
- Prepare Meringue: Beat egg whites with cream of tartar until soft peaks form. Gradually add sugar, beating until stiff, glossy peaks form. Beat in vanilla if using.
- Top Tarts: Spoon or pipe meringue over lemon filling, sealing edges.
- Toast Meringue: Place tarts on baking sheet and broil 1-2 minutes until golden brown, watching closely. Alternatively, use a kitchen torch.
- Cool and Serve: Let tarts cool to room temperature before serving.
Notes
Use room temperature egg whites for better meringue volume. Add sugar slowly to stabilize meringue. Watch broiler carefully to avoid burning meringue. Dough can be prepared and chilled up to 2 days ahead. For gluten-free, substitute flour with gluten-free blend. For dairy-free, use coconut cream and dairy-free butter alternatives.
Nutrition
- Serving Size: 1 mini tart
- Calories: 220
- Sugar: 20
- Sodium: 50
- Fat: 10
- Saturated Fat: 6
- Carbohydrates: 28
- Fiber: 0.5
- Protein: 3
Keywords: lemon tart, mini tarts, meringue topping, lemon curd, dessert, easy lemon tart, fluffy meringue