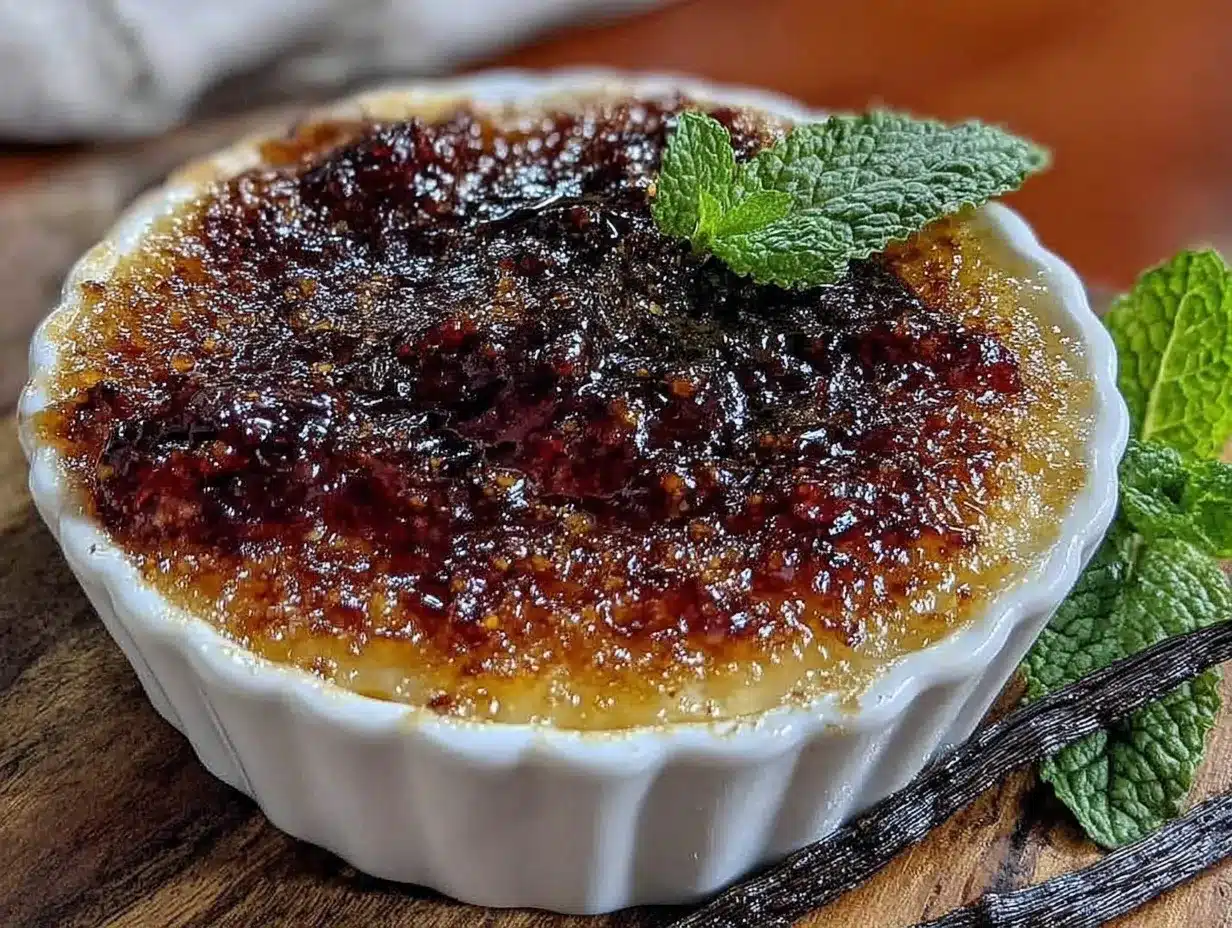
“Hand me that torch,” my neighbor whispered across the kitchen counter, her eyes twinkling with mischief as she prepared the caramelized top of her crème brûlée. It wasn’t just any dessert night; it was a small gathering where she was casually whipping up this elegant treat like it was the easiest thing in the world. Honestly, I was amazed how such a simple-looking dish could have such a dramatic flair. The crackling sound when the sugar meets the flame was like music to my ears, and the creamy custard beneath promised a moment of pure indulgence.
Three months ago, I stumbled upon this recipe scribbled on a napkin tucked inside an old cookbook at a flea market. I wasn’t hunting for desserts that day, but the note was so inviting, I just had to try it. The first attempt? Let’s just say the custard was a bit lumpy and the sugar burned faster than I could blink. But I didn’t give up. After a few tweaks, some burnt fingertips, and a slightly cracked ramekin (hey, it happens), I finally nailed the perfect classic crème brûlée that’s both creamy and crisp in all the right places.
You know that feeling when a dessert transports you somewhere else? Like the warmth of a Parisian café or a quiet evening at a countryside inn? That’s exactly what this recipe does for me. Maybe you’ve been there—caught off guard by a simple dessert that suddenly feels like a celebration. This crème brûlée recipe isn’t just about impressing guests; it’s about those small, sweet moments that stick with you. And honestly, I keep making it because it turns an ordinary night into something a little more special.
Why You’ll Love This Recipe
Having tested countless crème brûlée versions, this recipe stands out for its reliability and rich flavor. It’s one of those desserts that feels fancy but comes together without fuss—perfect for those moments when you want to treat yourself or impress others with minimal stress.
- Quick & Easy: Ready in under an hour, including baking and chilling time. Great for last-minute dessert cravings.
- Simple Ingredients: Uses pantry staples like eggs, cream, and sugar—no complicated shopping needed.
- Perfect for Elegant Dinners: Whether it’s a date night or holiday feast, this dessert fits right in.
- Crowd-Pleaser: The creamy custard and crispy caramelized topping always get rave reviews from friends and family.
- Unbelievably Delicious: The balance of silky texture with a crunchy top is pure comfort food with a twist.
What sets this crème brûlée apart? The secret lies in gently heating the custard to avoid curdling and using vanilla bean paste for an authentic, intense flavor without the fuss of scraping pods. I also trust Nielsen-Massey vanilla for the best aroma. Plus, the careful torching technique creates a perfectly thin, crackly sugar crust every single time. This isn’t just any custard; it’s the kind that makes you close your eyes after the first bite and savor every moment.
What Ingredients You Will Need
This recipe uses simple, wholesome ingredients to deliver bold flavor and satisfying texture without the fuss. Most are pantry staples, and you can find vanilla bean paste at well-stocked grocery stores or online. Feel free to substitute dairy-free cream if needed.
- Heavy cream – 2 cups (480 ml), for that luscious, creamy base
- Vanilla bean paste – 1 teaspoon (or 1 vanilla bean scraped), for rich, authentic vanilla flavor
- Large egg yolks – 5, room temperature, to create the custard’s silky texture
- Granulated sugar – ½ cup (100 g) plus extra for caramelizing
- Salt – a pinch, to balance flavors
Ingredient tips:
- I recommend using Nielsen-Massey vanilla bean paste for its depth and aroma.
- Choose fresh, high-quality eggs for best results—organic if possible.
- For a dairy-free version, swap heavy cream for full-fat coconut milk, but expect a slight flavor change.
- Using superfine sugar for the custard helps it dissolve smoothly, but regular granulated sugar works fine too.
Equipment Needed
- Ramekins: 4 to 6 small (about 6-ounce/180 ml) oven-safe dishes. I like ceramic for even heat.
- Baking dish: Large enough to hold ramekins comfortably for a water bath.
- Kitchen torch: Essential for caramelizing sugar on top. A small butane torch works best.
- Mixing bowls: For whisking egg yolks and cream.
- Whisk and spatula: For smooth blending.
- Fine mesh sieve: Helps strain custard for an ultra-smooth texture.
If you don’t have a kitchen torch, no worries! You can broil the sugar topping briefly, but watch it carefully to avoid burning. For budget-friendly ramekins, thrift stores often have perfect options. Keep your torch clean and store it safely away from children—trust me, a little care goes a long way.
Preparation Method
- Preheat your oven to 325°F (160°C). Position a rack in the center.
- Heat the cream and vanilla: In a medium saucepan, warm 2 cups (480 ml) heavy cream with 1 teaspoon vanilla bean paste over medium heat. Stir occasionally until just simmering (small bubbles around the edges), then remove from heat. This should take about 5 minutes.
- Whisk egg yolks and sugar: In a bowl, whisk 5 large egg yolks with ½ cup (100 g) granulated sugar and a pinch of salt until pale and thick—about 2 to 3 minutes. This step is crucial for the custard’s smoothness.
- Temper the eggs: Slowly pour the hot cream into the egg mixture, whisking constantly to prevent cooking the eggs. This gradual blending takes about 1-2 minutes and keeps the custard silky.
- Strain the custard: Pour the mixture through a fine mesh sieve into a clean bowl or large measuring cup. This removes any cooked bits and ensures a velvet-smooth custard.
- Prepare the ramekins: Place 4 to 6 ramekins in a baking dish. Pour the custard evenly into each ramekin.
- Add the water bath: Carefully pour hot water into the baking dish until it reaches halfway up the ramekins. This water bath helps the custard cook gently and evenly.
- Bake: Place the baking dish in the oven and bake for 35-40 minutes. The custard should be set but still slightly wobbly in the center when shaken gently.
- Cool and chill: Remove ramekins from water bath and cool to room temperature, then refrigerate at least 2 hours or overnight. This step is key for texture and flavor development.
- Caramelize the top: Just before serving, sprinkle about 1 teaspoon of granulated sugar evenly over each custard. Using your kitchen torch, melt and caramelize the sugar until golden and crisp, moving the flame in small circles to avoid burning. Let the sugar harden for a minute.
Tip: If you see bubbles forming while baking, don’t panic—it’s normal. Just avoid overbaking, which can cause curdling. Also, when torching, keep the flame moving continuously for an even caramel layer.
Cooking Tips & Techniques
For the perfect classic crème brûlée, temperature control is everything. Heating the cream gently and tempering the eggs slowly prevents scrambling and keeps the custard silky smooth. I’ve learned this the hard way after a few failed batches where I rushed and ended up with chunky bits—definitely not the experience you want.
When baking in a water bath, make sure the water is hot but not boiling. I usually boil water in the kettle and then pour it carefully around the ramekins. This keeps the oven temperature stable and avoids cracks.
Caramelizing the sugar top is where the magic happens. Using a kitchen torch gives you control to create that perfect thin, crackly crust. If you don’t have a torch, the broiler can work but requires close attention to avoid burning; I once left it too long, and the sugar turned bitter.
Multitasking tip: While the custards cool in the fridge, you can prep other meal elements or even clean up. The chilling time is a great pause that lets you breathe before the final spectacular step.
Consistency comes down to using the same size ramekins and oven settings every time. I keep a little notebook with my notes on timing and temperature, which helps me recreate the perfect texture each time.
Variations & Adaptations
- Chocolate Crème Brûlée: Add ¼ cup (25 g) unsweetened cocoa powder to the cream while heating, whisking well for a rich twist on the classic.
- Lavender Infused: Steep 1 tablespoon dried culinary lavender in the cream for 10 minutes, strain before mixing with eggs for a floral note.
- Dairy-Free Option: Use full-fat coconut milk instead of cream. The texture will be slightly different but still creamy and delicious.
For a seasonal touch, swapping vanilla bean paste for fresh citrus zest (like orange or lemon) adds brightness. Or try sprinkling brown sugar instead of white for a deeper caramel flavor. I once tried a salted caramel top, sprinkling a pinch of sea salt over the sugar before torching—unexpectedly amazing!
Serving & Storage Suggestions
Serve your crème brûlée chilled with the sugar crust freshly torched. The contrast between cold custard and warm caramel is part of the charm. For presentation, a simple garnish of fresh berries or a sprig of mint adds a pop of color without overpowering the delicate flavors.
This dessert pairs wonderfully with a light dessert wine like Sauternes or a cup of rich espresso to balance the sweetness.
Store leftover crème brûlée covered in the refrigerator for up to 3 days. Avoid caramelizing the sugar topping until just before serving to keep it crisp. If you want to prepare in advance, you can make the custard and chill it, then add sugar and torch right before eating.
Reheating is not recommended as it can soften the caramel crust and alter the custard texture, but if you must, a quick blast with a kitchen torch will revive the crispness.
Flavors actually deepen after a day in the fridge, so feel free to make it ahead for an even more satisfying experience.
Nutritional Information & Benefits
One serving of this classic crème brûlée contains approximately 350 calories, with 30 grams of fat, 6 grams of protein, and 20 grams of carbohydrates. The heavy cream provides a rich source of calcium and vitamin A, while eggs contribute essential protein and healthy fats.
This dessert is gluten-free, making it suitable for those with gluten sensitivities. For a lighter option, you can reduce sugar slightly or opt for lower-fat cream alternatives, keeping in mind the texture changes.
While indulgent, enjoying this dessert occasionally fits well within a balanced diet, especially when portion-controlled. The use of real vanilla bean paste adds flavor without artificial ingredients, aligning with a natural approach to cooking.
Conclusion
This classic crème brûlée recipe is a reliable, elegant dessert that anyone can master with a little patience and love. Its creamy texture paired with a crisp caramel top makes it a special treat that’s sure to impress, yet it’s surprisingly easy to make at home.
Feel free to tweak the flavorings or sugar topping to suit your taste or dietary needs. Honestly, I love this recipe because it’s both comforting and a bit fancy—a perfect combo for those moments when you want to feel a little fancy without the fuss.
Give it a try, and if you do, I’d love to hear how it turns out or what variations you come up with. Don’t be shy—drop a comment, share your photos, or tell me your secret twist. Happy cooking!
FAQs
Can I make crème brûlée ahead of time?
Absolutely! The custard can be prepared and chilled up to two days before serving. Just wait to sprinkle and torch the sugar topping until right before eating for the best crackly crust.
What if I don’t have a kitchen torch?
You can caramelize the sugar under a broiler on high heat for 1-3 minutes. Watch it closely to prevent burning and remove as soon as the sugar melts and bubbles.
Why did my custard turn out grainy?
This usually happens if the eggs cooked too quickly or the mixture wasn’t whisked well. Be sure to temper the eggs slowly with warm cream and strain the custard before baking.
Can I use milk instead of cream?
Using milk will result in a thinner, less rich custard. Heavy cream is preferred for that classic creamy texture, but a half-and-half mix can be a lighter alternative.
How do I get the sugar topping perfectly crisp?
Evenly sprinkle a thin layer of sugar and use a kitchen torch to melt it while moving the flame continuously. Avoid piling sugar too thickly, or it may not harden properly.
Pin This Recipe!

Perfect Classic Crème Brûlée

A reliable and elegant dessert featuring a creamy custard base topped with a crisp caramelized sugar crust, perfect for special occasions or a fancy treat at home.
- Prep Time: 15 minutes
- Cook Time: 40 minutes
- Total Time: 2 hours 55 minutes
- Yield: 4 to 6 servings 1x
- Category: Dessert
- Cuisine: French
Ingredients
- 2 cups (480 ml) heavy cream
- 1 teaspoon vanilla bean paste (or 1 vanilla bean scraped)
- 5 large egg yolks, room temperature
- ½ cup (100 g) granulated sugar, plus extra for caramelizing
- Pinch of salt
Instructions
- Preheat your oven to 325°F (160°C). Position a rack in the center.
- Heat the cream and vanilla: In a medium saucepan, warm 2 cups (480 ml) heavy cream with 1 teaspoon vanilla bean paste over medium heat. Stir occasionally until just simmering (small bubbles around the edges), then remove from heat (about 5 minutes).
- Whisk egg yolks and sugar: In a bowl, whisk 5 large egg yolks with ½ cup (100 g) granulated sugar and a pinch of salt until pale and thick (about 2 to 3 minutes).
- Temper the eggs: Slowly pour the hot cream into the egg mixture, whisking constantly to prevent cooking the eggs (about 1-2 minutes).
- Strain the custard: Pour the mixture through a fine mesh sieve into a clean bowl or large measuring cup.
- Prepare the ramekins: Place 4 to 6 ramekins in a baking dish. Pour the custard evenly into each ramekin.
- Add the water bath: Carefully pour hot water into the baking dish until it reaches halfway up the ramekins.
- Bake: Place the baking dish in the oven and bake for 35-40 minutes. The custard should be set but still slightly wobbly in the center when shaken gently.
- Cool and chill: Remove ramekins from water bath and cool to room temperature, then refrigerate at least 2 hours or overnight.
- Caramelize the top: Just before serving, sprinkle about 1 teaspoon of granulated sugar evenly over each custard. Using a kitchen torch, melt and caramelize the sugar until golden and crisp, moving the flame in small circles to avoid burning. Let the sugar harden for a minute.
Notes
Use Nielsen-Massey vanilla bean paste for best aroma. Temper eggs slowly to avoid curdling. Use a water bath to ensure gentle, even cooking. If no kitchen torch is available, caramelize sugar under broiler carefully. Chill custard at least 2 hours or overnight for best texture. Avoid overbaking to prevent curdling. Use superfine sugar for smoother custard if available.
Nutrition
- Serving Size: 1 ramekin (about 6 o
- Calories: 350
- Fat: 30
- Carbohydrates: 20
- Protein: 6
Keywords: crème brûlée, classic dessert, custard, caramelized sugar, elegant dessert, easy crème brûlée, vanilla custard