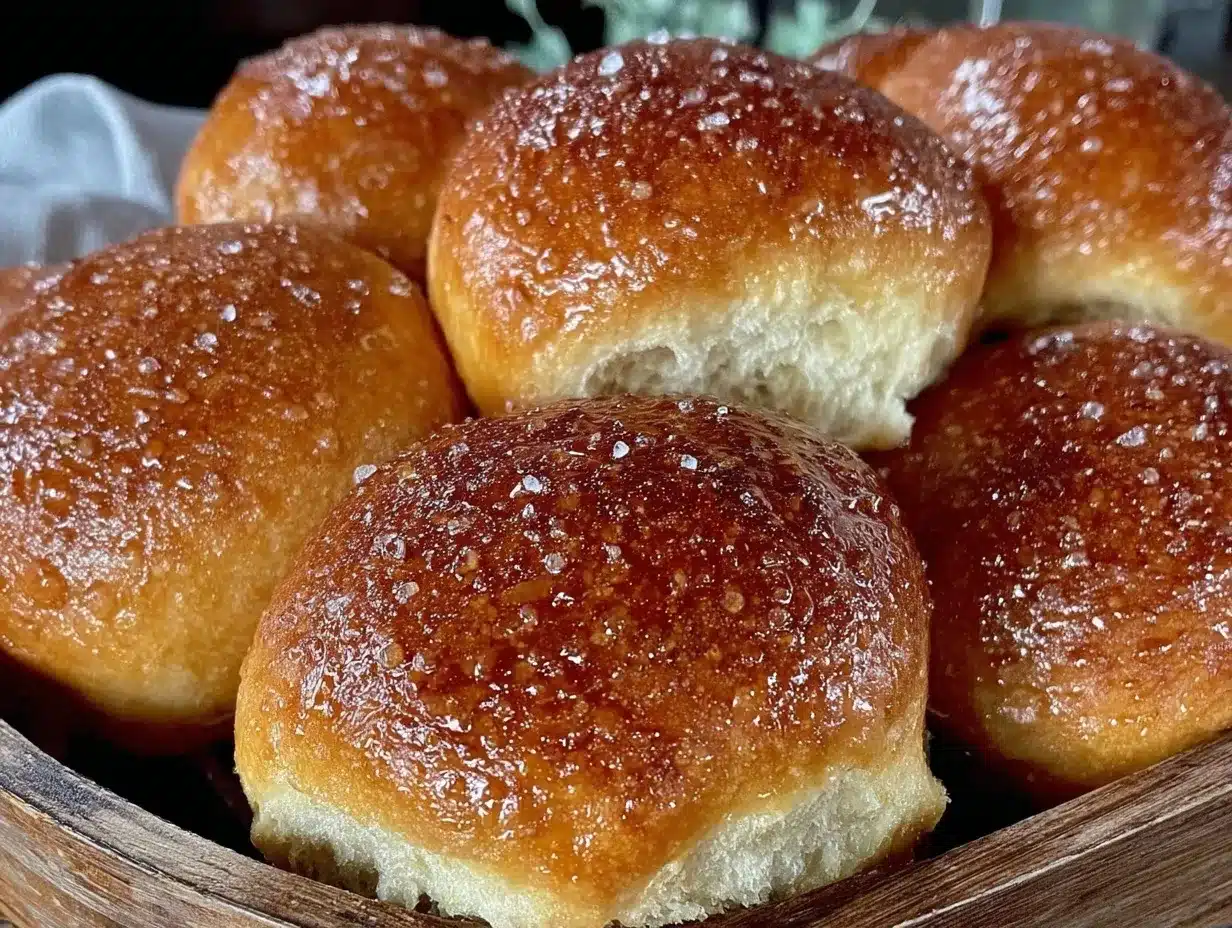
Close your eyes and imagine this: golden, fluffy honey whole wheat pan rolls, their tops shimmering with a sun-kissed sheen, filling your kitchen with the sweet, warm scent of baking bread. There’s a gentle hum from the oven, and that unmistakable yeasty aroma—warm, toasty, almost nutty—makes your mouth water before you’ve even had a taste. Honestly, the anticipation is half the fun. As you tear into a roll, steam escapes, revealing a pillowy crumb that’s just begging for a smear of butter or a drizzle of extra honey. The first time I pulled these rolls from the oven, I was instantly hooked. It was the kind of moment where you pause, take a deep breath, and just smile because you know you’re onto something truly special.
Growing up, my grandma would bake bread every Saturday morning—a tradition that made weekends feel like home. I’ll never forget being knee-high to a grasshopper, clambering up on a stool just to watch her sprinkle flour and knead dough with strong, practiced hands. These fluffy honey whole wheat pan rolls are my way of holding onto those memories while making things a little simpler for my own busy family. I actually stumbled on this recipe on a rainy weekend, trying to recreate the tender, slightly sweet rolls from my childhood, but with a healthier twist and a one-pan approach (because, let’s face it, who wants to wash a sink full of dishes?).
My family couldn’t stop sneaking them off the cooling rack—my youngest managed three in a row before dinner! There’s something about their soft texture and honey-kissed flavor that makes everyone reach for seconds. They’ve become a staple at our table, whether it’s Sunday suppers, Thanksgiving feasts, or just because we need a little extra comfort. And, yes, I’ve “tested” this recipe more times than I care to admit…in the name of research, of course. If you’re searching for pure, nostalgic comfort that’s dangerously easy to make (and perfect for potlucks, lunchboxes, or brightening up your Pinterest board), you’re going to want to bookmark this one.
Why You’ll Love This Fluffy Honey Whole Wheat Pan Rolls Recipe
I’ve baked countless batches of bread over the years—some good, some a little on the dense side, and a few that could’ve doubled as doorstops. But these fluffy honey whole wheat pan rolls? They’re consistently soft, tall, and just the right amount of sweet. That’s not just luck; it’s the result of lots of tweaking, taste-testing, and, yes, a few flops along the way. I wanted a recipe that was as forgiving as it was delicious, and honestly, I think I’ve nailed it. Here’s why you’ll love them:
- Quick & Easy: These rolls come together in about 1 hour, which means you can whip up a batch even on a busy weeknight (or when those bread cravings hit out of nowhere).
- Simple Ingredients: No fancy flours or hard-to-find sweeteners—just wholesome, pantry-friendly basics that you probably have right now.
- Perfect for Any Occasion: These rolls shine at Sunday dinner, but they’re just as good tucked into lunchboxes or as a cozy side for soup night.
- Crowd-Pleaser: Kids, adults, picky eaters—everyone grabs seconds. They’re soft, slightly sweet, and just sturdy enough to hold up to a good slather of butter.
- Unbelievably Delicious: The honey lends a gentle sweetness that pairs beautifully with the nutty depth of whole wheat, while the soft crumb makes these rolls feel like a treat.
What really sets this recipe apart? It’s all about the technique. Mixing a touch of all-purpose flour with whole wheat gives you the best of both worlds: hearty but not heavy, fluffy but not bland. The honey does more than sweeten—it helps keep the rolls moist and tender. And baking them close together in a single pan creates that classic, pull-apart edge that’s so satisfying. You know what? This isn’t just another bread roll—it’s my best version, and I’m betting it’ll become your go-to, too.
Honestly, these rolls are comfort food reimagined—faster, a little healthier, but just as soul-soothing as the ones grandma used to make. Whether you want to impress guests without stress, jazz up a weeknight dinner, or simply enjoy a kitchen full of happy faces, this recipe’s got your back. There’s a reason my family requests them for every holiday and “just because” dinner. I think you’ll understand why after the first bite.
What Ingredients You Will Need
This recipe uses simple, wholesome ingredients to deliver bold flavor and that signature fluffy texture—without any fuss or complicated steps. Most are pantry staples, while a few add that extra touch of comfort and nutrition. Here’s what you’ll need:
- For the Dough:
- Whole Wheat Flour (2 cups / 250g) – Provides a hearty, nutty flavor and boosts the fiber content; I love King Arthur or Bob’s Red Mill for consistent results.
- All-Purpose Flour (1 cup / 125g) – Lightens up the texture, making the rolls fluffy instead of dense. (You can swap for bread flour if you prefer a chewier crumb.)
- Instant Yeast (2¼ teaspoons / 7g) – Speeds things along; no proofing needed. (Active dry yeast works too, just activate in the warm liquid first.)
- Salt (1¼ teaspoons / 7g) – Essential for flavor. Don’t skimp!
- Warm Milk (1 cup / 240ml, about 110°F) – Adds richness and softness. Whole milk gives the best texture, but 2% or unsweetened almond milk also work.
- Honey (¼ cup / 85g) – Natural sweetness and a touch of moisture. (Local raw honey is wonderful if you have it on hand.)
- Unsalted Butter, Melted (¼ cup / 57g) – For tenderness and a subtle buttery flavor. You can substitute with mild olive oil for a dairy-free option.
- Large Egg (1, room temperature) – Adds structure and richness. (If you’re out, 3 tablespoons plain Greek yogurt work in a pinch.)
- For the Pan & Topping:
- Butter or Oil – For greasing the pan, so nothing sticks.
- Optional: Extra Honey & Melted Butter – For brushing on top of the warm rolls for a glossy shine and irresistible flavor boost.
- Optional: Flaky Sea Salt – A pinch on top after baking adds a lovely contrast to the honey.
Ingredient Notes & Substitutions:
- For a gluten-free version, use a 1:1 gluten-free baking blend and swap whole wheat with oat flour (texture will change, but it’s still yummy).
- If you like a sweeter roll, add an extra tablespoon of honey.
- Swap dairy milk and butter for plant-based options for a vegan-friendly batch (just skip the egg or use a flax egg).
- In summer, try swirling in a handful of chopped fresh herbs (like rosemary) or seeds for a twist.
Honestly, you don’t need anything fancy—just good basics, a bit of patience, and you’re well on your way to homemade comfort.
Equipment Needed
- Large Mixing Bowl – For combining all your ingredients. A wide bowl makes kneading easier.
- Sturdy Spoon or Dough Hook – You can mix by hand or with a stand mixer (fitted with the dough hook)—either works.
- Measuring Cups & Spoons – Accurate measurements make for reliable rolls.
- 9×13-inch (23x33cm) Baking Pan – The best size for perfectly shaped, pull-apart rolls. A glass, ceramic, or metal pan all work; just watch browning.
- Kitchen Scale (optional) – For weighing flour if you want super consistent results (I recommend OXO or Escali—mine has lasted years).
- Clean Kitchen Towel or Plastic Wrap – Covers the dough as it rises for a soft crust.
- Pastry Brush (optional) – Handy for brushing melted butter and honey on top, but a spoon works in a pinch.
If you don’t have a stand mixer, no problem—these rolls are easy to mix and knead by hand. I’ve even used a wooden spoon and a little elbow grease when visiting family. For the pan, a cake tin or two 8-inch (20cm) square pans will work if that’s what you have. Just grease well and check for doneness a few minutes early. Budget-friendly tip: thrift stores often have great bread pans and mixing bowls for a couple of dollars. Keep your tools clean and dry—especially your mixing bowl and towel—so nothing sticks and the dough rises beautifully.
Preparation Method
- Mix the Dough: In a large mixing bowl, combine 2 cups (250g) whole wheat flour, 1 cup (125g) all-purpose flour, 2¼ teaspoons (7g) instant yeast, and 1¼ teaspoons (7g) salt. Whisk together well so the yeast and salt are evenly distributed.
- Warm the Liquid Ingredients: In a small saucepan or microwave-safe bowl, gently warm 1 cup (240ml) milk until it’s just warm to the touch (about 110°F/43°C). Add ¼ cup (85g) honey and ¼ cup (57g) melted butter, then stir to combine. The mixture should be lukewarm, not hot—too hot and you’ll risk killing the yeast.
- Add Wet to Dry: Make a well in your dry ingredients and pour in the warm milk mixture. Crack in 1 large egg. Stir with a sturdy spoon until a shaggy dough forms. If using a stand mixer, use the dough hook on low speed.
- Knead: Knead by hand on a lightly floured surface for 6–8 minutes, or with a mixer for 5 minutes, until the dough is smooth and slightly tacky but not sticky. If it’s too sticky, add a sprinkle of all-purpose flour, a tablespoon at a time. (The dough should spring back when pressed—it’s ready for the next step!)
- First Rise: Shape the dough into a ball and place it back in your cleaned, lightly greased bowl. Cover with a clean kitchen towel or plastic wrap. Let rise in a warm, draft-free spot for 30–40 minutes, or until doubled in size. (I like to set mine on top of a barely-warm oven.)
- Shape Rolls: Gently deflate the dough (just punch it down—super satisfying), then divide into 12 equal pieces (about 2.6oz/75g each if you’re using a scale). Shape each piece into a smooth ball by tucking the edges under and pinching at the bottom.
- Second Rise: Arrange the dough balls evenly in a greased 9×13-inch (23x33cm) pan—4 rows of 3. Cover again and let rise for 20–25 minutes, until they’re puffy and touching. (If your kitchen is chilly, this can take a little longer.)
- Bake: Preheat your oven to 375°F (190°C) while the rolls finish rising. Bake for 18–22 minutes, or until the tops are deep golden and a roll sounds hollow when tapped. (If browning happens too quickly, tent loosely with foil.)
- Finishing Touch: While still warm, brush with a little melted butter and a drizzle of honey. Sprinkle with a pinch of flaky sea salt if you like.
- Cool & Serve: Let the rolls cool in the pan for 10–15 minutes before pulling apart and serving. The aroma will drive everyone wild, so good luck waiting!
Preparation Notes: If your dough isn’t rising, your kitchen might be too cool—try placing the bowl near a sunny window or in the oven with just the light on. If you’re short on time, you can skip the second rise, but the rolls will be a little less fluffy (still tasty, though!).
These fluffy honey whole wheat pan rolls are forgiving, but every batch is a little different. Trust your senses: the dough should feel soft and elastic, and the rolls should look puffed and golden before you pull them from the oven. Honestly, the hardest part is not eating them all straight from the pan.
Cooking Tips & Techniques
Baking bread can be a little intimidating, but these fluffy honey whole wheat pan rolls are perfect for beginners and seasoned bakers alike. Here are some tried-and-true tips from my kitchen:
- Temperature Matters: Make sure your milk is just warm, not hot. If you can comfortably dip your finger in, it’s perfect. Too hot and the yeast won’t work; too cold and the dough will take forever to rise.
- Kneading Is Key: Don’t skimp on kneading—it develops the gluten, giving your rolls that soft, stretchy texture. I once rushed this step and ended up with dense, sad little rolls (lesson learned!).
- Watch the Dough, Not the Clock: Rising times can vary based on your kitchen temperature. If the dough’s doubled, you’re good to go—even if it takes a bit longer or shorter than the recipe says.
- Shaping for Fluffiness: Roll each dough ball smooth and taut; it helps them bake up tall and airy. If you struggle with sticky dough, a light coating of oil on your hands works wonders.
- Pan Placement: Bake the rolls in the center of your oven for even cooking. If your oven has hot spots (mine definitely does), rotate the pan halfway through baking.
- Butter & Honey Glaze: Don’t skip brushing the warm rolls with butter and honey. It adds so much flavor and keeps them soft—even if you’re saving some for later.
- Troubleshooting: If your rolls don’t rise, double-check your yeast’s expiration date. Flat rolls can also mean the milk was too hot or too cold.
Honestly, I’ve had plenty of less-than-perfect batches over the years—dry rolls, flat rolls, overly sweet or bland. The best lesson? Trust your senses and don’t be afraid to adjust. If the dough feels right and smells good, you’re on the right track. And remember, even the “ugly” rolls taste amazing warm from the oven. That’s homemade comfort for you!
Variations & Adaptations
One of the best things about these fluffy honey whole wheat pan rolls is how easy they are to customize. Here are a few of my favorite twists:
- For Special Diets:
- Vegan: Use plant-based milk and butter, and swap the egg for a flax egg (1 tablespoon ground flaxseed + 3 tablespoons water, mixed and rested for 5 minutes).
- Gluten-Free: Substitute a 1:1 gluten-free flour blend for both flours, and add ½ teaspoon xanthan gum for structure.
- Lower Sugar: Halve the honey for a less-sweet roll that’s still soft and delicious.
- Seasonal Flavors:
- Herbed Rolls: Add 1 tablespoon chopped fresh rosemary or thyme to the dough.
- Cheese Variation: Mix in ½ cup (50g) shredded sharp cheddar for a savory twist.
- Autumn Spice: Add ½ teaspoon cinnamon and a pinch of nutmeg for a cozy, fall-inspired vibe.
- Different Cooking Methods:
- Air Fryer: Place shaped rolls in a parchment-lined air fryer basket and bake at 320°F (160°C) for about 12–15 minutes.
- Bread Machine: Use the dough cycle, then shape and bake as directed.
Allergen swaps are easy: use oat milk and vegan butter for dairy-free, or sunflower seed flour for nut allergies. Once, I added chopped sun-dried tomatoes and olives for a Mediterranean twist—so good with soup! This recipe is your canvas; don’t be afraid to play around and make it your own.
Serving & Storage Suggestions
Serving: These fluffy honey whole wheat pan rolls are best served warm, straight from the pan. The honey-butter glaze is irresistible when it’s still a little melty. For a pretty presentation, arrange them in a basket lined with a cloth napkin and let everyone pull their own (family style is the way to go!).
Pair them with roasted chicken, a hearty stew, or alongside a big salad for a balanced meal. I love them with a pat of salted butter, a drizzle of honey, or even split and filled with scrambled eggs for breakfast sandwiches. Hot tea or a frosty glass of milk makes a perfect match.
Storage: Cool any leftovers completely, then store in an airtight container at room temperature for up to 2 days. For longer storage, freeze the rolls in a zip-top bag for up to 2 months; just thaw at room temp and refresh in a warm oven (325°F/165°C) for 5 minutes. To keep them soft, add a slice of apple to the container—the old grandma trick really works!
The flavor actually deepens after a day, making these rolls just as good (if not better) the next day. They’re perfect for meal prep or make-ahead holiday baking.
Nutritional Information & Benefits
Each fluffy honey whole wheat pan roll (based on 12 rolls) contains approximately: 170 calories, 4g protein, 3g fiber, 6g fat, and 24g carbohydrates. The whole wheat flour adds extra fiber and minerals, making these rolls a more nourishing choice than typical white rolls. Honey provides natural sweetness and a little antioxidant boost, while using part whole wheat helps balance blood sugar spikes.
This recipe is nut-free as written, and can be made dairy-free or egg-free with simple swaps. If you’re watching carbs, you can reduce the honey a bit or make mini rolls for portion control. As someone who tries to keep our family meals wholesome but still cozy, I love knowing these rolls offer comfort and nutrition in every bite.
Just remember, if you or your guests have gluten or dairy allergies, check labels carefully and use the suggested substitutions. Homemade comfort, made for everyone!
Conclusion
There’s a reason these fluffy honey whole wheat pan rolls have become a staple in my kitchen—they’re simple, reliable, and absolutely delicious. The perfect blend of whole wheat goodness and honey-kissed sweetness, these rolls bring pure, homemade comfort to any meal. I hope you’ll play around with the flavors, try the different variations, and make this recipe your own family favorite.
Honestly, there’s nothing quite like the aroma of fresh-baked rolls filling your home. Whether you’re baking for a holiday, a special dinner, or just because, these rolls are sure to bring smiles (and maybe a few requests for seconds). If you try them, I’d love to hear how they turned out! Leave a comment, share your tips, or post your best pan roll photos. And don’t forget to save this recipe for your next craving—your future self will thank you. Happy baking, friend!
Frequently Asked Questions
Can I make these honey whole wheat pan rolls ahead of time?
Yes! You can shape the rolls, cover, and refrigerate overnight. Let them come to room temperature and finish rising before baking as usual. They also freeze beautifully after baking.
What’s the best way to reheat leftover rolls?
Wrap rolls in foil and warm in a 325°F (165°C) oven for about 10 minutes. Or microwave for 10–15 seconds until soft and warm.
Can I use all whole wheat flour?
You can, but the rolls will be denser. For best fluffiness, keep a little all-purpose or bread flour in the mix. If you do use all whole wheat, add an extra tablespoon of milk to keep the dough soft.
How can I tell if the dough has risen enough?
The dough should be doubled in size and spring back slowly when gently pressed. If it still feels dense, give it more time in a warm spot.
Can I make smaller or larger rolls?
Absolutely! For mini rolls, divide the dough into 18 pieces and reduce baking time by a few minutes. For larger sandwich rolls, make 8 balls and bake a bit longer, checking for golden tops and a hollow sound when tapped.
Pin This Recipe!

Fluffy Honey Whole Wheat Pan Rolls

These golden, fluffy honey whole wheat pan rolls are soft, slightly sweet, and perfect for any occasion. Made in one pan for easy cleanup, they deliver homemade comfort with wholesome ingredients and a tender, pull-apart texture.
- Prep Time: 20 minutes
- Cook Time: 20 minutes
- Total Time: 1 hour
- Yield: 12 rolls 1x
- Category: Bread
- Cuisine: American
Ingredients
- 2 cups whole wheat flour (250g)
- 1 cup all-purpose flour (125g)
- 2¼ teaspoons instant yeast (7g)
- 1¼ teaspoons salt (7g)
- 1 cup warm milk (240ml, about 110°F)
- ¼ cup honey (85g)
- ¼ cup unsalted butter, melted (57g)
- 1 large egg, room temperature
- Butter or oil, for greasing the pan
- Optional: Extra honey & melted butter, for brushing on top
- Optional: Flaky sea salt, for sprinkling on top
Instructions
- In a large mixing bowl, combine whole wheat flour, all-purpose flour, instant yeast, and salt. Whisk together well.
- Gently warm milk until just warm to the touch (about 110°F). Add honey and melted butter, stirring to combine.
- Make a well in the dry ingredients and pour in the warm milk mixture. Add the egg. Stir until a shaggy dough forms.
- Knead by hand on a lightly floured surface for 6–8 minutes, or with a mixer for 5 minutes, until the dough is smooth and slightly tacky but not sticky.
- Shape the dough into a ball and place it in a cleaned, lightly greased bowl. Cover and let rise in a warm spot for 30–40 minutes, or until doubled in size.
- Gently deflate the dough, then divide into 12 equal pieces. Shape each piece into a smooth ball.
- Arrange the dough balls evenly in a greased 9×13-inch pan. Cover and let rise for 20–25 minutes, until puffy and touching.
- Preheat oven to 375°F (190°C). Bake for 18–22 minutes, or until tops are deep golden and a roll sounds hollow when tapped.
- While still warm, brush with melted butter and a drizzle of honey. Sprinkle with flaky sea salt if desired.
- Let rolls cool in the pan for 10–15 minutes before serving.
Notes
For vegan rolls, use plant-based milk and butter, and a flax egg. For gluten-free, use a 1:1 gluten-free flour blend and add xanthan gum. If dough isn’t rising, place in a warmer spot. Brush rolls with butter and honey for extra flavor and softness. Rolls freeze well and can be reheated in the oven or microwave.
Nutrition
- Serving Size: 1 roll
- Calories: 170
- Sugar: 6
- Sodium: 210
- Fat: 6
- Saturated Fat: 3
- Carbohydrates: 24
- Fiber: 3
- Protein: 4
Keywords: whole wheat rolls, honey rolls, pan rolls, easy bread, homemade rolls, comfort food, pull-apart rolls, one pan bread, healthy bread, holiday rolls