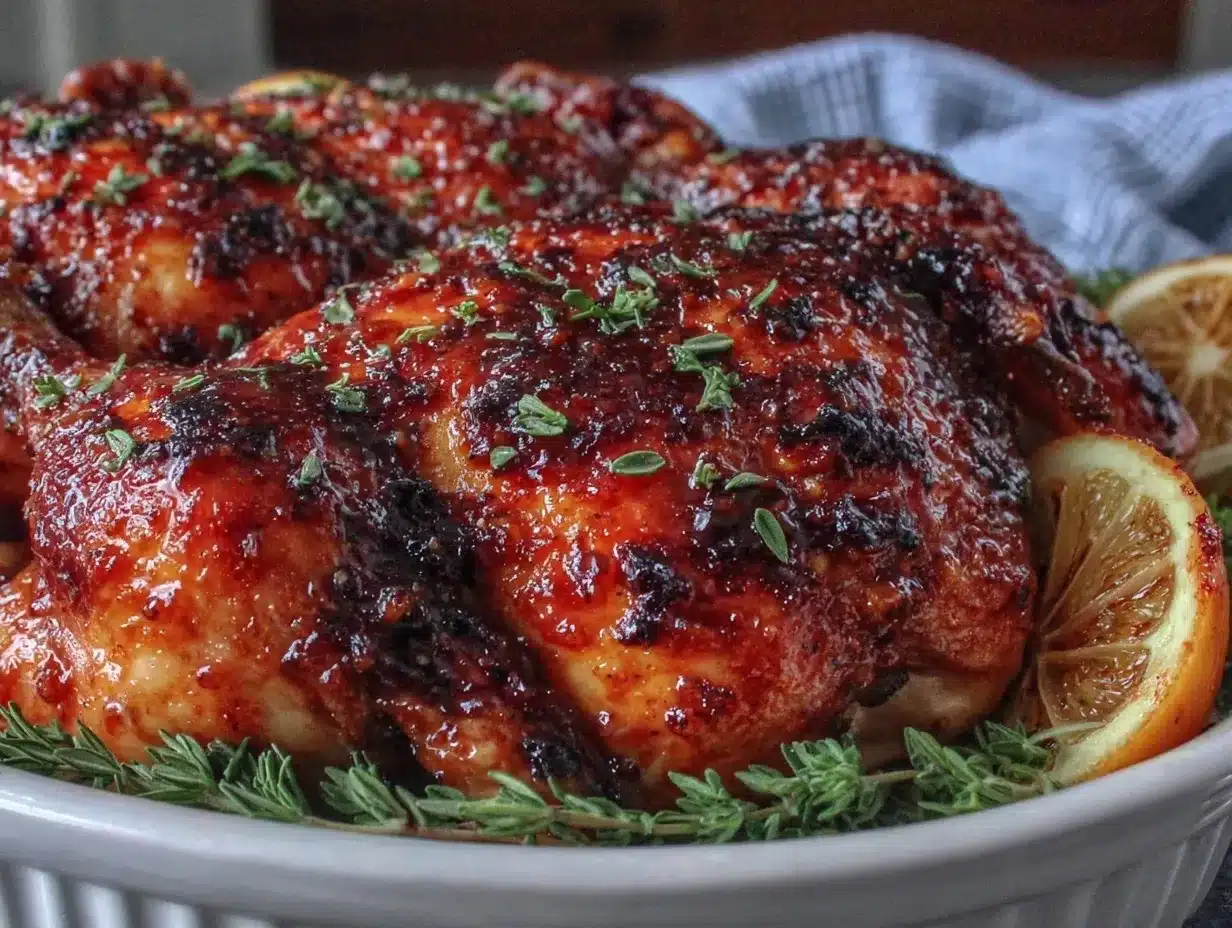
Let me tell you—the aroma of sizzling Cornish hens, their skin crackling and bubbling under a honey-lemon glaze, is downright irresistible. The first time I pulled these golden beauties from the oven, the kitchen was filled with the scent of fresh thyme and rosemary mingling with roasted citrus. The kind of comforting, savory perfume that has everyone poking their heads in, asking, “Are they ready yet?” Honestly, it’s the sort of meal that makes you pause, close your eyes for a second, and just breathe it in—because you know you’re in for something special.
I still remember the first time I made these crispy glazed Cornish hens—it was a chilly Sunday and I was feeling nostalgic for my grandma’s roast chicken, but I wanted something a little more… bite-sized. I’d found a few Cornish hens at the market (they’re so cute, you know), and decided to try my hand at a recipe that felt both homey and just fancy enough for a weeknight celebration. I was instantly hooked. The way the honey glaze caramelized on the skin, the zing from fresh lemon, and the herbs tucked under the skin—pure, nostalgic comfort. Let’s face it, I wish I’d stumbled on this recipe years ago!
My family couldn’t stop sneaking crispy pieces off the platter while they “helped” set the table (as if I didn’t notice). These hens have become a staple for family get-togethers, little celebrations, or those nights when you just want a meal that feels like a warm hug. Perfect for impressing dinner guests, brightening up your Pinterest feed, or making a regular Tuesday feel like a holiday. And yes, I’ve tested this recipe more times than I can count—in the name of research, of course. So if you need an easy oven-roasted dinner that’s as show-stopping as it is simple, you’re going to want to bookmark this crispy glazed Cornish hens recipe with fresh herbs and roasted lemon. Trust me.
Why You’ll Love This Recipe
I’ve spent years tinkering with roast chicken and Cornish hen recipes, and this one is a keeper because it checks all the boxes—crisp skin, juicy meat, and flavors that sing. Here’s why these crispy glazed Cornish hens with fresh herbs and roasted lemon will win you (and your guests) over every single time:
- Quick & Easy: In just about 1 hour, you can have a restaurant-worthy dinner with zero fuss. No complicated steps, just simple prepping and roasting.
- Simple Ingredients: The beauty of this recipe is in its simplicity. You probably have honey, fresh herbs, and lemons on hand already. No need for a fancy grocery run.
- Perfect for Small Gatherings: Cornish hens feel a little more special than regular chicken, making them perfect for date nights, family Sunday dinners, or holiday meals when you want something just a bit different.
- Crowd-Pleaser: The crispy, honey-glazed skin with those pops of fresh herbs and roasted lemon always gets rave reviews from kids and adults. Even picky eaters come back for seconds.
- Unbelievably Delicious: The combination of sweet honey, zesty lemon, and savory herbs creates a flavor that’s comforting but never boring—a next-level roast, honestly.
What truly sets this crispy glazed Cornish hens recipe apart is the technique: tucking herbs and lemon under the skin keeps the meat flavorful and moist, while a final high-heat blast gives you that coveted shatteringly crispy skin. Brushing on the honey-lemon glaze during the last part of roasting creates a sticky, caramelized finish that’s positively addictive. I learned the hard way—don’t skip that last glaze, it’s magic!
This isn’t just another chicken dinner. It’s the kind of recipe that makes you look forward to leftovers (if you have any). It’s a meal that makes weeknights special, transforms a regular dinner party, and puts a smile on everyone’s face. Whether you’re a seasoned cook or just starting out, you’ll love the ease and wow factor of these crispy glazed Cornish hens. It’s comfort food, but with fresh, vibrant flavors that keep things exciting. Trust me, you’ll want to make this again and again.
What Ingredients You Will Need
These crispy glazed Cornish hens with fresh herbs and roasted lemon come together with simple, wholesome ingredients that pack a punch of flavor. Most of these are pantry staples or easy-to-find at the grocery store, and I’ll share some of my favorite brands and swaps along the way:
- Main Ingredients:
- 2 Cornish hens (about 1 1/4 lbs/570g each), thawed if frozen, patted dry
- 2 lemons, one sliced and one juiced (for roasting and glaze)
- 3 tablespoons (45g) unsalted butter, softened
- 2 tablespoons (30ml) olive oil
- For the Herb Rub:
- 2 tablespoons (5g) fresh thyme leaves, chopped (or 2 teaspoons dried thyme)
- 1 tablespoon (3g) fresh rosemary, chopped (or 1 teaspoon dried rosemary)
- 1 tablespoon (2g) fresh parsley, chopped (optional for garnish)
- 4 garlic cloves, minced
- 1 teaspoon (5g) kosher salt
- ½ teaspoon (2g) black pepper
- For the Glaze:
- 2 tablespoons (30ml) honey (I like using local wildflower honey for depth)
- 1 tablespoon (15ml) Dijon mustard (adds a subtle tang)
- 1 tablespoon (15ml) fresh lemon juice (from above)
- 1 teaspoon (5ml) soy sauce or tamari (for a savory note; coconut aminos work for soy-free)
- Optional Vegetables for Roasting:
- 1 large onion, cut into thick wedges
- 2 carrots, cut into 2-inch pieces
- 1 cup (150g) baby potatoes, halved
Ingredient Tips: For the juiciest hens, look for ones with plump, pale skin and no added solutions. If you’re lucky enough to find organic or air-chilled Cornish hens, go for those—I notice they roast up crispier. If you can’t find fresh herbs, dried work in a pinch, just use about a third of the amount. For a gluten-free option, double-check your Dijon and soy sauce labels.
Substitutions: No Cornish hens? Try the glaze and herb rub on chicken thighs or bone-in breasts. No honey? Maple syrup works (though the flavor is a little different). You can swap butter for ghee or a dairy-free spread if needed. And if you want to make it all in one pan, just nestle those optional veggies underneath the hens for an easy side dish.
Equipment Needed
You don’t need a fancy kitchen to make these crispy glazed Cornish hens—just a few trusty tools will do the trick:
- Roasting pan or rimmed baking sheet: I prefer a sturdy, heavy-duty baking sheet lined with foil for easy cleanup. A roasting rack helps crisp the underside, but isn’t essential (I’ve used a bed of onion slices in a pinch).
- Small mixing bowls: For the herb butter and glaze. If you only have one, just rinse and reuse.
- Basting brush or spoon: Silicone brushes are easiest for spreading glaze, but a spoon works fine. I’ve even used the back of a teaspoon before!
- Sharp kitchen shears or knife: For trimming any excess hen skin and slicing lemons.
- Meat thermometer: Not required, but super handy for checking doneness (hens are ready at 165°F/74°C in the thickest part).
- Aluminum foil: For tenting the hens if they brown too quickly, and for lining your pan.
If you don’t have a roasting rack, crumple up some foil to prop up the hens or just roast them right on the pan with veggies. I’ve tried both ways—crispy skin every time. For a budget option, check thrift stores for sturdy baking sheets and brushes. Just give everything a good scrub before and after you cook.
Preparation Method
-
Preheat & Prep the Pan:
Set your oven to 425°F (220°C). Line your roasting pan or baking sheet with foil for easy cleanup. If using, place a rack on top or make a bed of onion wedges to elevate the hens a bit.
-
Prepare the Herb Butter:
In a small bowl, mix together the softened butter, olive oil, chopped thyme, rosemary, garlic, salt, and pepper. Mash it well with a fork. (If your butter isn’t soft, microwave it for 10 seconds—just until squishy.)
-
Prep the Hens:
Pat the Cornish hens very dry with paper towels (this helps the skin get crispy). Using your fingers, gently loosen the skin over the breasts and thighs—don’t tear it. Rub about half the herb butter under the skin of each hen, then spread the rest over the outside. Tuck a few lemon slices and extra herb sprigs under the skin if you like. Season all over with a pinch more salt and pepper.
-
Arrange on Pan:
Set the hens breast-side up on the rack or onions. Tuck the tips of the wings under. Scatter remaining lemon slices, onion wedges, carrots, and potatoes (if using) around the hens. Drizzle everything with a little olive oil and sprinkle with salt.
-
Roast & Glaze:
Roast hens for 25 minutes. While they roast, whisk together honey, Dijon mustard, lemon juice, and soy sauce in a bowl. (Tip: warm the honey a few seconds in the microwave if it’s too thick.)
-
First Glaze:
After 25 minutes, brush hens generously with half the glaze. Return to the oven, rotate the pan, and roast another 15 minutes.
-
Final Glaze & Crisp:
Brush on the remaining glaze and increase oven temp to 450°F (230°C) for the last 10-15 minutes. The skin should be deeply golden and crisp. If the hens brown too quickly, tent loosely with foil.
-
Check for Doneness:
Use a meat thermometer to check the thickest part of the thigh—it should read 165°F (74°C). Juices should run clear. If not, roast 5 more minutes and check again.
-
Rest & Serve:
Let hens rest 10 minutes on a cutting board before serving. This keeps them juicy! Slice in half or serve whole with roasted veggies and extra herbs. Spoon pan juices over the top for extra flavor.
Notes & Troubleshooting: If the skin’s not crisping, make sure your oven is hot enough and the hens are well dried before roasting. For extra brown skin, broil the hens for 1-2 minutes at the end (watch closely!). If the glaze starts to burn, tent with foil and lower the rack. And don’t forget to use up those pan juices—they’re gold!
Cooking Tips & Techniques
- Pat the Hens Dry: Every time I skip this, I regret it. Damp skin = soggy skin. Use paper towels and really get those hens dry before adding butter and herbs.
- Don’t Overcrowd: Give the hens space on the pan to help the hot air circulate. If you’re roasting veggies, keep them in a single layer around the birds.
- Layer Flavors: Tucking herbs and lemon slices under the skin infuses the meat. I learned this trick from a chef friend and it’s a game changer for flavor.
- Glaze at the Right Time: I used to add the honey glaze too early and ended up with burnt skin. Add it during the last 20-25 minutes of roasting for a caramelized, not burnt, finish.
- Check Doneness Carefully: Small birds cook quickly. Start checking at 45 minutes with a thermometer. Undercooked hens are a no-go, but overcooked ones dry out, so keep an eye out.
- Rest Before Carving: Letting the hens rest ensures juicy meat. I know it’s tempting to dig in right away, but a 10-minute wait makes all the difference. (I usually distract myself by prepping the sides or setting the table).
- Use the Broiler—Carefully: If you want extra crispy skin, pop the hens under the broiler for a minute or two at the end. Watch like a hawk—sugar burns fast!
Honestly, I’ve had my share of dry, bland hens before figuring out these little tricks. Now, it’s crispy, juicy, and flavorful every single time. If you’re multitasking, set a timer for each step so nothing gets forgotten. And don’t stress—this recipe is forgiving. With these tips, you’ll get picture-perfect Cornish hens that taste as good as they look.
Variations & Adaptations
This crispy glazed Cornish hens recipe is super flexible. Here are a few ways to make it your own (and a few I’ve tried with success):
- Gluten-Free: Swap soy sauce for gluten-free tamari or coconut aminos. Double-check your Dijon mustard label.
- Herb Variations: Use whatever fresh herbs you have—sage and oregano are also lovely. In winter, I use dried Italian seasoning for a cozy twist.
- Different Citrus: Try orange zest and juice instead of lemon for a sweeter glaze, or use a mix of lemon and lime for extra zing.
- Spicy Kick: Add ¼ teaspoon red pepper flakes to the glaze for a touch of heat. A dash of smoked paprika is also tasty.
- Vegetable Add-Ins: Toss sweet potatoes, parsnips, or fennel in with the onions and carrots for a one-pan meal.
- Dairy-Free: Swap the butter for olive oil or a plant-based spread.
- Grill Option: In summer, grill the hens over medium heat (indirect) for about 35-40 minutes, glazing in the last 10 minutes. The smoky flavor is fantastic!
My favorite riff? Using fresh tarragon instead of rosemary and serving with a simple arugula salad. The possibilities are endless—don’t be afraid to get creative with what’s in your fridge or garden.
Serving & Storage Suggestions
These crispy glazed Cornish hens are best served hot, right out of the oven. I love bringing the whole pan to the table so everyone can dig in family-style, with the roasted lemons and veggies scattered around for a rustic look. Garnish with a few extra sprigs of fresh herbs and lemon wedges for extra flair.
Pair with garlicky green beans, wild rice pilaf, or a crisp green salad. I also love a glass of chilled chardonnay or sparkling lemonade on the side. If you have leftovers (lucky you!), cool completely, then refrigerate in an airtight container for up to 3 days. To reheat, pop pieces in a 350°F (175°C) oven for 10-15 minutes until warmed through and the skin crisps up again. You can also freeze the hens (off the bone) for up to 2 months—just thaw overnight in the fridge before reheating.
The flavors deepen overnight, so I sometimes make extra hens just for salads and sandwiches the next day. The glaze is delicious cold, too—a perfect lunchbox treat!
Nutritional Information & Benefits
Each serving (half a Cornish hen with a portion of glaze and veggies) is approximately 450 calories, with 30g protein, 18g fat, and 16g carbohydrates. Cornish hens are a leaner poultry option, offering plenty of high-quality protein and essential vitamins like niacin, B6, and zinc.
The fresh herbs bring antioxidants and a burst of flavor without extra calories. The honey-lemon glaze is just enough for a sweet-savory contrast without feeling heavy. If you’re watching carbs, reduce the honey or skip the potatoes. This recipe is naturally gluten-free if you use tamari and is easily adapted for dairy-free folks. Just be mindful of soy, honey, and mustard if you have allergies. Personally, I love how light and satisfying this meal feels—it’s comfort food that won’t weigh you down.
Conclusion
If you’re searching for a dinner that’s simple yet special, these crispy glazed Cornish hens with fresh herbs and roasted lemon are a must-try. The flavors are bright and comforting, the technique is foolproof, and the results are picture-perfect every time. Whether you’re cooking for family, friends, or just treating yourself, this recipe brings a little magic to the table.
Don’t be afraid to tweak the herbs, swap the veggies, or play with the glaze—make it your own! I keep coming back to this recipe because it always delivers, and I hope it becomes a favorite in your kitchen, too. If you give it a try, let me know how it goes in the comments below. Share your twists, your best sides, or that one time someone ate the crispy skin before dinner (it happens!). Bookmark this one—you’ll be glad you did. Happy roasting!
Frequently Asked Questions
How do I know when Cornish hens are fully cooked?
The best way is with a meat thermometer—the thickest part of the thigh should reach 165°F (74°C). Juices should run clear, not pink. If you don’t have a thermometer, pierce the thigh joint and check for clear juices.
Can I make this recipe ahead of time?
You can prep the hens with the herb butter and keep them covered in the fridge for up to 24 hours. Roast and glaze just before serving for the crispiest skin.
What if I can’t find fresh herbs?
No worries! Use one-third the amount of dried herbs (e.g., 2 teaspoons dried thyme instead of 2 tablespoons fresh). The flavor will still be delicious.
What’s the best way to reheat leftovers?
Place leftover hens in a 350°F (175°C) oven for 10-15 minutes. This helps the skin crisp up again and keeps the meat juicy. Microwave works in a pinch, but the skin won’t stay as crispy.
Can I use this recipe for chicken pieces instead?
Absolutely! The glaze and herb rub are fantastic on bone-in chicken thighs, drumsticks, or breasts. Adjust roasting time as needed—pieces are usually done in 35-40 minutes.
Pin This Recipe!
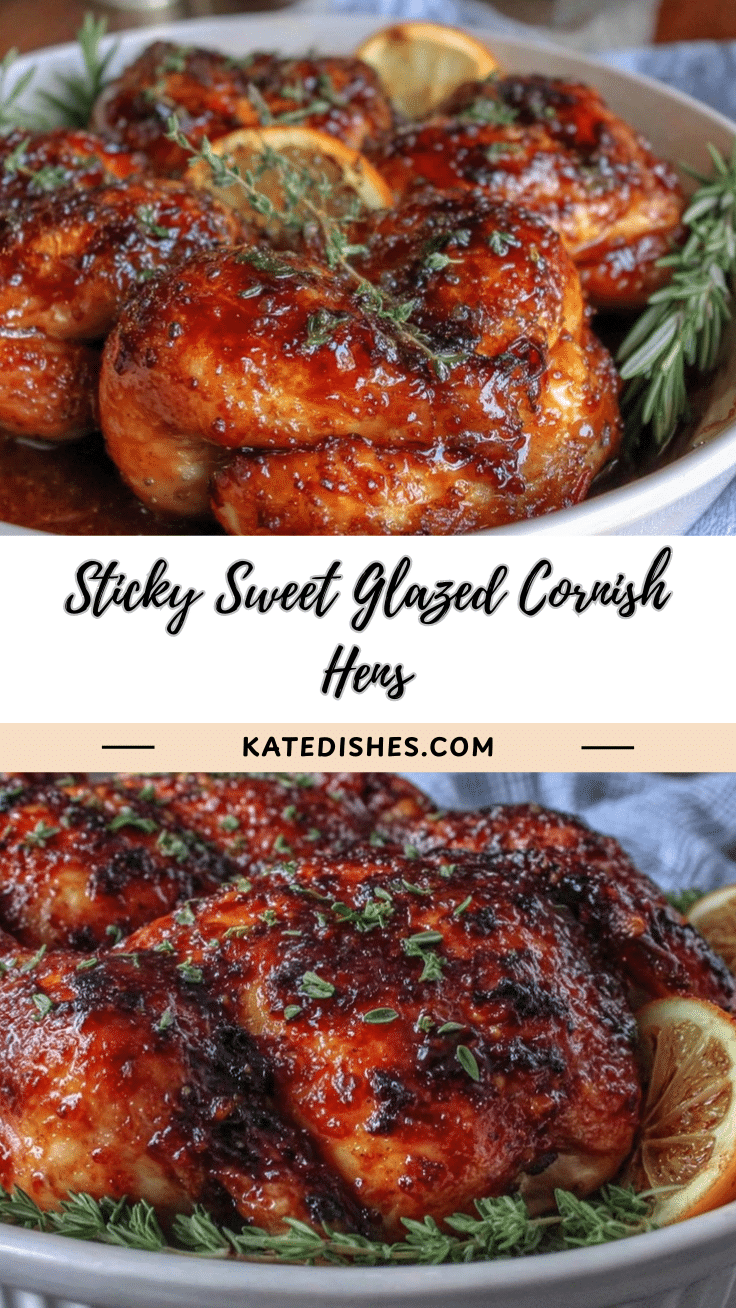
Crispy Glazed Cornish Hens with Fresh Herbs
These oven-roasted Cornish hens feature a shatteringly crispy skin, a sweet-savory honey-lemon glaze, and fresh herbs tucked under the skin for maximum flavor. Perfect for special occasions or a cozy weeknight dinner, this recipe is simple, show-stopping, and sure to impress.
- Prep Time: 15 minutes
- Cook Time: 50 minutes
- Total Time: 1 hour 5 minutes
- Yield: 4 servings 1x
- Category: Main Course
- Cuisine: American
Ingredients
- 2 Cornish hens (about 1 1/4 lbs each), thawed if frozen, patted dry
- 2 lemons (1 sliced, 1 juiced)
- 3 tablespoons unsalted butter, softened
- 2 tablespoons olive oil
- 2 tablespoons fresh thyme leaves, chopped (or 2 teaspoons dried thyme)
- 1 tablespoon fresh rosemary, chopped (or 1 teaspoon dried rosemary)
- 1 tablespoon fresh parsley, chopped (optional, for garnish)
- 4 garlic cloves, minced
- 1 teaspoon kosher salt
- 1/2 teaspoon black pepper
- 2 tablespoons honey
- 1 tablespoon Dijon mustard
- 1 tablespoon fresh lemon juice
- 1 teaspoon soy sauce or tamari (or coconut aminos for soy-free)
- 1 large onion, cut into thick wedges (optional, for roasting)
- 2 carrots, cut into 2-inch pieces (optional, for roasting)
- 1 cup baby potatoes, halved (optional, for roasting)
Instructions
- Preheat oven to 425°F (220°C). Line a roasting pan or baking sheet with foil. Place a rack on top or use onion wedges as a bed for the hens.
- In a small bowl, mix softened butter, olive oil, thyme, rosemary, garlic, salt, and pepper until well combined.
- Pat Cornish hens very dry with paper towels. Gently loosen the skin over the breasts and thighs. Rub half the herb butter under the skin of each hen, then spread the rest over the outside. Tuck lemon slices and extra herb sprigs under the skin if desired. Season with additional salt and pepper.
- Set hens breast-side up on the rack or onions. Tuck wing tips under. Scatter remaining lemon slices, onion wedges, carrots, and potatoes (if using) around the hens. Drizzle with olive oil and sprinkle with salt.
- Roast hens for 25 minutes.
- While roasting, whisk together honey, Dijon mustard, lemon juice, and soy sauce in a bowl.
- After 25 minutes, brush hens generously with half the glaze. Return to oven, rotate pan, and roast another 15 minutes.
- Brush on remaining glaze and increase oven temperature to 450°F (230°C) for the last 10-15 minutes, until skin is golden and crisp. Tent with foil if browning too quickly.
- Check doneness with a meat thermometer (165°F in the thickest part of the thigh). If not done, roast 5 more minutes and check again.
- Let hens rest 10 minutes before serving. Slice in half or serve whole with roasted veggies and extra herbs. Spoon pan juices over the top.
Notes
Pat hens very dry for crisp skin. Add glaze only in the last 20-25 minutes to avoid burning. Tent with foil if browning too quickly. Use pan juices for extra flavor. For gluten-free, use tamari or coconut aminos. For dairy-free, substitute butter with olive oil or plant-based spread. Broil briefly at the end for extra crispiness, watching closely.
Nutrition
- Serving Size: Half a Cornish hen w
- Calories: 450
- Sugar: 7
- Sodium: 650
- Fat: 18
- Saturated Fat: 6
- Carbohydrates: 16
- Fiber: 2
- Protein: 30
Keywords: cornish hens, oven roasted, crispy skin, honey glaze, fresh herbs, easy dinner, holiday, gluten-free, poultry, lemon, family meal