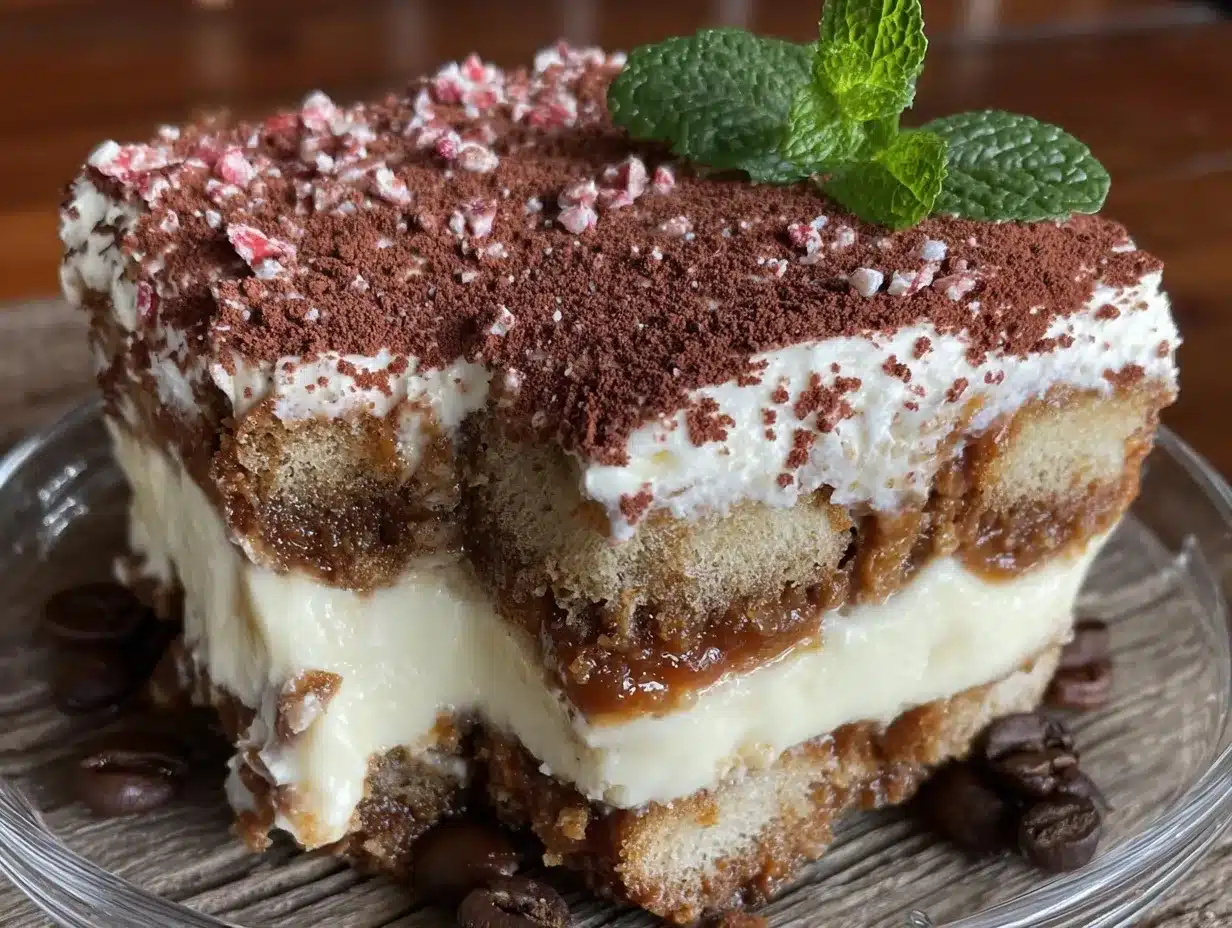
Let me tell you, the scent of rich espresso and sweet mascarpone wafting from my kitchen is enough to make anyone’s mouth water. The first time I made this creamy classic tiramisu with espresso layers, I was instantly hooked—honestly, the kind of moment where you pause, take a deep breath, and just smile because you know you’re onto something truly special. Years ago, when I was knee-high to a grasshopper, my Nonna used to whip up her own version, but it never quite matched the delicate balance I craved. So, after many rainy weekends and countless attempts, I stumbled on this recipe that delivers pure, nostalgic comfort with dangerously easy steps.
My family couldn’t stop sneaking spoonfuls off the tray while it chilled in the fridge (and I can’t really blame them). You know what makes this tiramisu stand out? It’s that creamy texture paired with bold espresso layers that brighten every bite. Let’s face it, this dessert is perfect for potlucks, impressing your dinner guests, or just a sweet treat to brighten up your Pinterest cookie board. After testing it multiple times in the name of research, of course, it’s become a staple for family gatherings and gifting. This recipe feels like a warm hug wrapped in coffee goodness, and you’re going to want to bookmark this one.
Why You’ll Love This Creamy Classic Tiramisu Recipe
Having played around with tiramisu recipes for years, this one truly hits the sweet spot. It’s a balance of creamy richness, smooth espresso, and just enough cocoa dusting that makes it unforgettable. Here’s why you’re going to adore it:
- Quick & Easy: Comes together in under 30 minutes, perfect for busy weeknights or last-minute dessert cravings.
- Simple Ingredients: No fancy grocery trips needed; you likely already have mascarpone, eggs, espresso, and ladyfingers in your pantry.
- Perfect for Entertaining: Great for dinner parties, holiday celebrations, or cozy weekend indulgences.
- Crowd-Pleaser: Always gets rave reviews from kids and adults alike – a true classic that never disappoints.
- Unbelievably Delicious: The texture is ultra-smooth with the espresso layers giving it just the right kick of flavor.
What sets this tiramisu apart is the gentle folding technique I use to keep the mascarpone perfectly fluffy without deflating it. Plus, soaking the ladyfingers just right in espresso prevents sogginess but keeps that luscious coffee essence. This isn’t just another version – it’s the best version you’ll want to make again and again. It’s comfort food reimagined – classic, creamy, and with a little Italian soul.
What Ingredients You Will Need
This creamy classic tiramisu recipe uses simple, wholesome ingredients to deliver bold flavor and a satisfying texture without any fuss. Most are pantry staples, and you can easily find or substitute them.
- For the Cream Layer:
- 8 ounces (225 g) mascarpone cheese, room temperature (I recommend Galbani for the creamiest result)
- 3 large eggs, separated (room temperature for best whipping)
- 1/2 cup (100 g) granulated sugar
- 1 teaspoon pure vanilla extract (adds a subtle warmth)
- For the Espresso Soak:
- 1 1/4 cups (300 ml) strong brewed espresso, cooled (use freshly brewed for the best aroma)
- 2 tablespoons coffee liqueur (optional, but it adds a lovely depth)
- For Assembly:
- 24 ladyfinger biscuits (savoiardi; crisp and airy – avoid soggy ones)
- Unsweetened cocoa powder, for dusting
If you want to keep it alcohol-free, just skip the coffee liqueur or add a splash of vanilla extract instead. For a dairy-free option, swap mascarpone with a vegan cream cheese alternative and use coconut cream to keep that luscious texture. In summer, I sometimes toss in fresh raspberries between layers to add a tart contrast.
Equipment Needed
- Mixing bowls – at least two: one for whipping egg whites, one for the mascarpone mixture
- Electric mixer or stand mixer (a whisk works but expect a good arm workout!)
- 9×9 inch (23×23 cm) glass or ceramic dish for assembly
- Fine mesh sieve for dusting cocoa powder evenly
- Spatula – a flexible one works best for folding ingredients gently
- Measuring cups and spoons for accuracy
If you don’t own an electric mixer, no worries! My first tiramisu was whipped up with a hand whisk and some elbow grease. The key is to whip the egg whites until stiff peaks form – that’s what gives the cream layer its dreamy, airy texture. For budget-friendly options, silicone spatulas and measuring cups from the dollar store work just fine. And hey, a nice glass dish will make presentation a breeze and impress everyone.
Preparation Method
- Prepare the espresso soak: Brew 1 1/4 cups (300 ml) of strong espresso and let it cool to room temperature. Stir in 2 tablespoons of coffee liqueur if using. Set aside. (This step takes about 10 minutes including cooling.)
- Separate the eggs: Carefully separate 3 large eggs, placing yolks in one bowl and whites in another. Make sure no yolk gets into the whites for proper whipping.
- Whip egg yolks and sugar: In a mixing bowl, whisk 3 egg yolks with 1/2 cup (100 g) granulated sugar and 1 teaspoon vanilla extract until pale, thick, and creamy—this takes about 3-5 minutes with an electric mixer at medium speed.
- Add mascarpone: Gently fold 8 ounces (225 g) room temperature mascarpone cheese into the egg yolk mixture. Use a spatula and fold carefully to keep the mixture light and smooth. Avoid overmixing or it may become runny.
- Whip egg whites: In a clean bowl, whisk the 3 egg whites until stiff peaks form. You’ll know it’s ready when the peaks stand straight up without drooping.
- Fold egg whites into mascarpone mixture: Add one-third of the whipped egg whites to the mascarpone mix to lighten it, then gently fold in the rest. This step is crucial for that creamy, airy texture.
- Assemble the tiramisu: Quickly dip each ladyfinger into the cooled espresso soak – don’t soak too long or they’ll get soggy (about 1 second per side). Lay a single layer in your 9×9 inch (23×23 cm) dish.
- Spread half the mascarpone cream: Spoon half of the mascarpone mixture evenly over the ladyfingers, smoothing with a spatula.
- Add another layer: Repeat with another layer of dipped ladyfingers and top with the remaining mascarpone cream.
- Chill: Cover the dish with plastic wrap and refrigerate for at least 4 hours, preferably overnight. This allows flavors to meld and the texture to set perfectly.
- Dust and serve: Just before serving, dust the tiramisu generously with unsweetened cocoa powder using a fine mesh sieve. For a pretty touch, add chocolate shavings or a few espresso beans on top.
Tip: If your mascarpone mixture looks a bit thick, a splash of cream can smooth it out just before folding in the egg whites. Also, keep the ladyfingers dry and crisp until right before dipping to avoid a soggy mess.
Cooking Tips & Techniques for the Best Tiramisu
Getting that perfect creamy classic tiramisu texture can be tricky, but these tips have saved me more than once:
- Use room temperature eggs and mascarpone: This helps everything blend smoothly without lumps.
- Whip egg whites to stiff peaks: Don’t stop too early; soft peaks won’t give you that airy creaminess.
- Fold gently: When folding egg whites into mascarpone, use a light hand to keep the air in. Overmixing leads to a dense, heavy cream.
- Don’t soak ladyfingers too long: A quick dip is all you need. Too soggy means a mushy tiramisu.
- Chill well: The longer the better. Overnight chilling lets flavors marry and the texture set beautifully.
- Use fresh espresso: Instant coffee just doesn’t cut it here. Brew strong and cool it before dipping ladyfingers.
- Dust cocoa just before serving: Cocoa powder can get damp and clump if added too early.
One lesson I learned the hard way was rushing the chilling time. Letting the tiramisu rest overnight made all the difference between “meh” and “wow.” Also, multitasking by brewing espresso while whipping eggs saves time and keeps everything fresh.
Variations & Adaptations
This creamy classic tiramisu is wonderfully adaptable depending on your mood or dietary needs. Here are a few ideas I’ve tried and loved:
- Berry Tiramisu: Swap espresso soak with a mix of berry juice and a splash of lemon vodka. Add fresh raspberries between layers for a fruity twist.
- Chocolate Tiramisu: Mix a tablespoon of cocoa powder into the mascarpone cream and use chocolate liqueur instead of coffee liqueur.
- Gluten-Free Version: Use gluten-free ladyfingers or substitute with thin layers of almond flour cake soaked in espresso.
- Vegan Adaptation: Replace mascarpone with coconut cream or cashew cream, use aquafaba to whip instead of egg whites, and dairy-free ladyfingers.
- Decaf Delight: Simply swap espresso for decaf coffee to keep the flavor without the caffeine kick.
I once tried adding a pinch of cinnamon to the espresso soak, which gave the tiramisu an unexpected warmth that impressed my friends. Feel free to customize the liqueur or add spices to suit your taste buds.
Serving & Storage Suggestions
Serve this creamy classic tiramisu chilled, straight from the fridge, for that perfect silky texture. A dusting of cocoa powder and a few chocolate shavings on top make the presentation extra special. Pair it with a small cup of espresso or a glass of dessert wine to complement the coffee flavors.
Store leftovers covered tightly in the refrigerator for up to 3 days. The flavors actually deepen over time, but watch out – ladyfingers can get soggy if kept too long. For longer storage, tiramisu can be frozen in airtight containers for up to 2 months. Thaw overnight in the fridge before serving.
When reheating, honestly it’s best enjoyed cold, but if you must, let it come to room temperature for about 30 minutes and enjoy the creaminess without losing that fresh feel. The cocoa dusting might lose its texture slightly after reheating, so consider adding a fresh sprinkle.
Nutritional Information & Benefits
This classic tiramisu packs around 350-400 calories per serving (approximately 1/8th of the recipe), with a good balance of protein from the eggs and mascarpone, and a moderate amount of fat. The espresso layers add negligible calories but a boost of antioxidants from the coffee itself.
Key benefits include:
- Mascarpone cheese provides calcium and vitamin A.
- Eggs contribute quality protein and essential nutrients.
- Espresso adds antioxidants and a natural energy boost.
If you’re watching carbs, you can reduce sugar slightly or try a sugar substitute, but honestly, part of tiramisu’s charm is its indulgent sweetness. For those with dairy allergies, consider the vegan adaptations mentioned earlier to enjoy this dessert without worry.
Conclusion
This creamy classic tiramisu with espresso layers is truly worth making for anyone who appreciates the magic of a well-made dessert. It’s easy enough for a weekday treat but elegant enough to impress at special occasions. I love how the smooth mascarpone and bold espresso come together in each bite — it’s comfort food that feels a little fancy, a little nostalgic, and totally satisfying.
Feel free to customize it based on your favorite flavors or dietary needs, and don’t be shy about sharing your own tweaks in the comments below. If you give this recipe a try, please let me know how it turned out or any fun variations you came up with. Now, go ahead and make yourself a slice of happiness — you deserve it!
FAQs about Creamy Classic Tiramisu with Espresso Layers
How long does tiramisu need to chill before serving?
At least 4 hours in the refrigerator, but overnight chilling is best for flavors to meld and the texture to set perfectly.
Can I make tiramisu without raw eggs?
Yes! You can use pasteurized eggs or substitute with whipped cream and mascarpone for a no-egg version, though texture will differ slightly.
What if I don’t have espresso – can I use regular coffee?
Strong brewed coffee works in a pinch, but espresso gives tiramisu its signature bold flavor. Avoid instant coffee for best results.
How do I prevent soggy ladyfingers?
Dip ladyfingers quickly (about 1 second per side) into the espresso soak. Too long and they’ll get mushy.
Can I prepare tiramisu a day ahead?
Absolutely! In fact, making it a day ahead improves flavor and texture. Just keep it tightly covered in the fridge.
Pin This Recipe!

Creamy Classic Tiramisu Recipe Easy Homemade Espresso Layer Dessert

A creamy classic tiramisu with bold espresso layers, smooth mascarpone cream, and a delicate cocoa dusting. Perfect for entertaining or a cozy indulgence.
- Prep Time: 20 minutes
- Cook Time: 0 minutes
- Total Time: 4 hours 20 minutes
- Yield: 8 servings 1x
- Category: Dessert
- Cuisine: Italian
Ingredients
- 8 ounces (225 g) mascarpone cheese, room temperature
- 3 large eggs, separated, room temperature
- 1/2 cup (100 g) granulated sugar
- 1 teaspoon pure vanilla extract
- 1 1/4 cups (300 ml) strong brewed espresso, cooled
- 2 tablespoons coffee liqueur (optional)
- 24 ladyfinger biscuits (savoiardi)
- Unsweetened cocoa powder, for dusting
Instructions
- Brew 1 1/4 cups (300 ml) of strong espresso and let it cool to room temperature. Stir in 2 tablespoons of coffee liqueur if using. Set aside.
- Carefully separate 3 large eggs, placing yolks in one bowl and whites in another, ensuring no yolk gets into the whites.
- Whisk 3 egg yolks with 1/2 cup (100 g) granulated sugar and 1 teaspoon vanilla extract until pale, thick, and creamy (3-5 minutes with an electric mixer).
- Gently fold 8 ounces (225 g) room temperature mascarpone cheese into the egg yolk mixture using a spatula, avoiding overmixing.
- Whisk the 3 egg whites in a clean bowl until stiff peaks form.
- Add one-third of the whipped egg whites to the mascarpone mixture to lighten it, then gently fold in the rest.
- Quickly dip each ladyfinger into the cooled espresso soak for about 1 second per side and lay a single layer in a 9×9 inch (23×23 cm) dish.
- Spread half of the mascarpone cream evenly over the ladyfingers.
- Repeat with another layer of dipped ladyfingers and top with the remaining mascarpone cream.
- Cover the dish with plastic wrap and refrigerate for at least 4 hours, preferably overnight.
- Just before serving, dust the tiramisu generously with unsweetened cocoa powder using a fine mesh sieve. Optionally, add chocolate shavings or espresso beans on top.
Notes
Use room temperature eggs and mascarpone for smooth blending. Whip egg whites to stiff peaks and fold gently to keep the cream airy. Dip ladyfingers quickly to avoid sogginess. Chill overnight for best flavor and texture. Fresh espresso is preferred over instant coffee. Dust cocoa powder just before serving to prevent clumping.
Nutrition
- Serving Size: Approximately 1/8th
- Calories: 375
- Sugar: 20
- Sodium: 90
- Fat: 25
- Saturated Fat: 15
- Carbohydrates: 30
- Fiber: 1
- Protein: 7
Keywords: tiramisu, classic tiramisu, espresso dessert, mascarpone, easy tiramisu, homemade tiramisu, Italian dessert