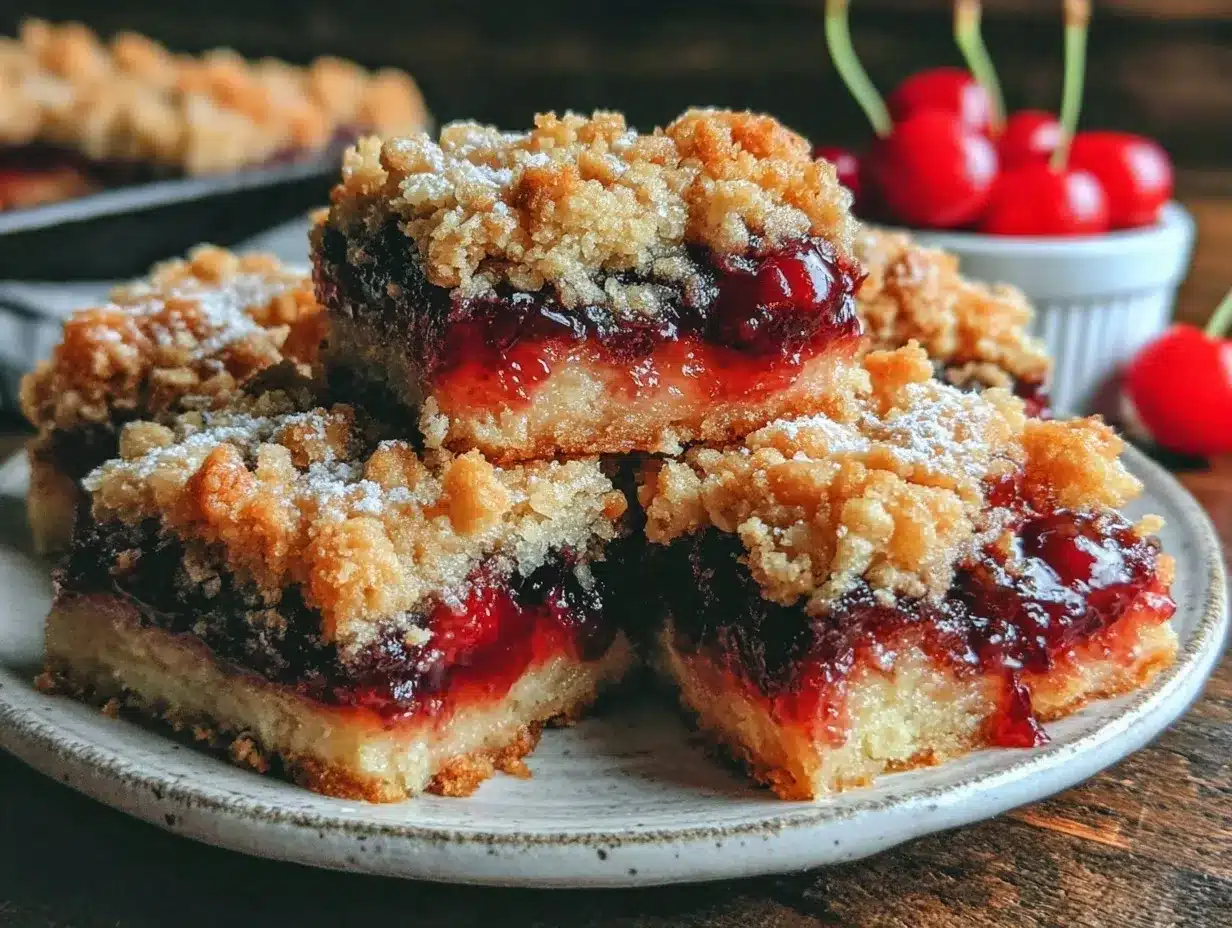
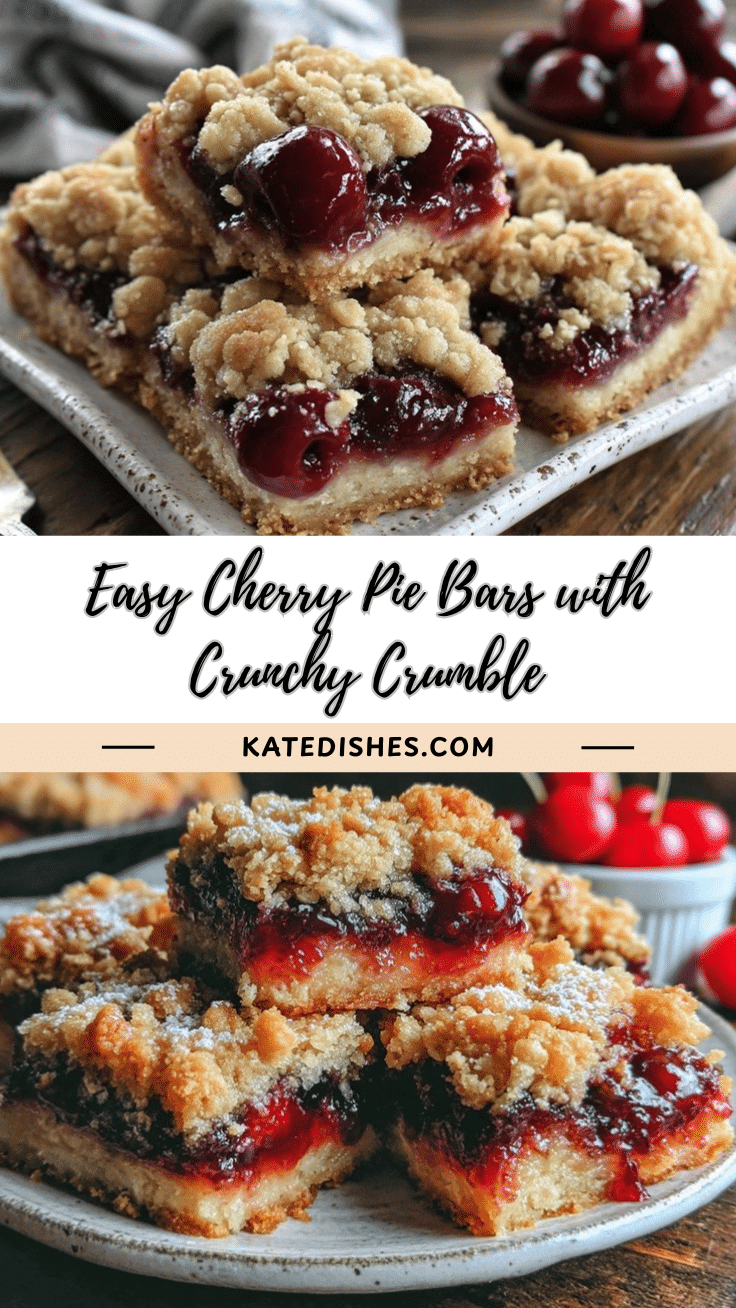
It was one of those restless summer nights, around 11 PM on a Wednesday, when all I could think about was cherry pie. The fridge was a little bare, and honestly, I didn’t feel like pulling out my usual baking arsenal. But you know that feeling when a craving just won’t quit? I rummaged through the pantry, grabbed a few staples, and started mixing things up in my kitchen. The result? These easy cherry pie bars with a crunchy crumble topping that totally surprised me.
I remember the way the crumble crackled as I sliced into the warm bars the next morning, the burst of cherry sweetness with every bite, and how the kitchen smelled like a cozy bakery. I’m not supposed to play favorites, but these bars have quickly become my go-to summer treat. Maybe you’ve been there too—wanting something sweet, simple, and satisfying without the fuss of a whole pie. That’s exactly why this recipe stayed with me and why I keep making it again and again.
Why You’ll Love This Recipe
Honestly, these cherry pie bars have a way of hitting all the right notes without demanding a ton of time or fancy ingredients. After testing dozens of variations (and yes, a few minor kitchen messes), I can say this recipe is a winner for many reasons:
- Quick & Easy: Ready in under an hour, perfect for those last-minute summer dessert cravings or weekend baking sessions.
- Simple Ingredients: You probably have everything in your pantry already—no special trips needed.
- Perfect for Summer: The bright cherry filling feels fresh and vibrant, making it ideal for picnics, potlucks, or casual backyard dinners.
- Crowd-Pleaser: Kids, adults, and even my picky neighbor couldn’t get enough of the crunchy crumble paired with juicy cherries.
- Unbelievably Delicious: The tender buttery base combined with a crisp, crumbly topping is seriously comforting and addictive.
What makes this recipe different? Well, the crumble topping is not your usual crumbly mess—it’s got just the right balance of crunch and chew, thanks to a little extra brown sugar and oats. Plus, the cherry filling is perfectly tart without being overpowering, striking a harmony that keeps you coming back for more. This isn’t just another cherry bar recipe; it’s the one I turn to when I want something that tastes like a slice of homemade goodness but without the pie fuss.
What Ingredients You Will Need
This recipe uses simple, wholesome ingredients to deliver bold flavor and a satisfying texture without the fuss. Most of these are pantry staples, and if you’re lucky enough to find fresh or frozen cherries in season, you’re in for a treat.
- For the Base and Crumble:
- All-purpose flour – 2 ½ cups (315 g), for structure and crumb
- Old-fashioned rolled oats – 1 cup (90 g), adds chewy crunch to the topping
- Brown sugar – 1 cup (200 g), packed, for sweet caramel notes
- Unsalted butter – 1 cup (227 g), softened, the secret to buttery richness (I like using Land O’Lakes for consistent results)
- Baking powder – 1 teaspoon, to give a slight lift to the base
- Salt – ½ teaspoon, balances sweetness
- For the Cherry Filling:
- Frozen pitted cherries – 4 cups (600 g), thawed and drained (fresh cherries in summer work great too!)
- Granulated sugar – ¾ cup (150 g), to sweeten the tart cherries
- Cornstarch – 3 tablespoons, thickens the filling perfectly without a gummy texture
- Lemon juice – 1 tablespoon, brightens the cherry flavor
- Vanilla extract – 1 teaspoon, adds depth
- Almond extract – ¼ teaspoon, optional but highly recommended for that nutty twist
If you want a gluten-free version, swapping the all-purpose flour for a gluten-free blend works well—just make sure it contains xanthan gum. For dairy-free, use a plant-based butter substitute like Earth Balance. And if you can’t find oats, crushed cornflakes or chopped nuts make a fun crumble alternative.
Equipment Needed
- 9×13-inch (23×33 cm) baking pan – standard size, but a square 8×8-inch pan works if you want thicker bars.
- Mixing bowls – at least two, for the base and cherry filling.
- Electric mixer or sturdy wooden spoon – for creaming butter and mixing the crumble.
- Measuring cups and spoons – precise measurements help get texture just right.
- Spatula – for spreading the filling evenly.
- Parchment paper – optional but highly recommended for easy removal and cleanup.
I used a glass baking dish because it heats evenly, but metal pans work fine too. If you don’t have an electric mixer, no worries—this recipe is sturdy enough to mix by hand, though it might take a few more minutes. Cleaning the butter bowl can be a bit messy (I confess, I dropped a chunk once), so lining your pan with parchment paper can save time and frustration.
Preparation Method
- Preheat your oven to 350°F (175°C). Line your 9×13-inch pan with parchment paper, leaving an overhang on the sides for easy removal later. This step saves you from the crumbly mess of trying to cut bars right in the pan.
- Make the base and crumble: In a large bowl, combine the flour, oats, brown sugar, baking powder, and salt. Add the softened butter in chunks, then mix with an electric mixer or your fingers until the mixture resembles coarse crumbs with some pea-sized bits. This texture is key—it gives you that wonderful contrast between tender base and crunchy topping. About 3–5 minutes mixing time.
- Press 2/3 of this crumble mixture firmly into the bottom of your prepared pan. Use the back of a spoon or your fingers to create an even, compact layer. Don’t skimp here; a sturdy base means your bars won’t fall apart.
- Prepare the cherry filling: In a medium bowl, toss the thawed cherries with granulated sugar, cornstarch, lemon juice, vanilla, and almond extract. Stir gently until everything is evenly coated. The cornstarch thickens the filling as it bakes, so don’t skip it! Let it sit for 5 minutes to macerate and release some juices.
- Spread the cherry filling evenly over the pressed base. Make sure to distribute the cherries and juices as evenly as possible for balanced flavor in every bite.
- Crumble the remaining 1/3 of the crumble mixture over the cherry layer. It’s okay if some larger chunks remain—that’s actually how you get that irresistible texture.
- Bake in the preheated oven for 45–50 minutes, until the topping is golden brown and the cherry filling is bubbling around the edges. If you notice the crumble browning too fast, tent loosely with foil after 30 minutes.
- Cool completely in the pan on a wire rack. This can take up to 2 hours, but it’s worth the wait because the filling sets nicely, making clean slices easier. If you cut too early, the filling might run a little.
- Use the parchment paper overhang to lift the bars out. Slice into 12–16 squares with a sharp knife. For cleaner cuts, warm the knife under hot water and wipe it dry between slices.
Pro tip: I like to make these bars the night before a gathering. They firm up beautifully in the fridge, and the flavors meld together. Just bring them back to room temperature before serving for maximum yum.
Cooking Tips & Techniques
Here are some tips I’ve picked up after a few batches (and a couple of small disasters):
- Don’t skip chilling the butter: It helps create that perfect crumbly texture. Too soft, and your crumble turns soggy.
- Press the base firmly: A solid base keeps the bars from breaking apart. I use the bottom of a glass to get an even, compact layer without smashing the oats.
- Drain your cherries well: Excess liquid means soggy bars. Thaw frozen cherries in a colander to let the juice drip off.
- Watch your baking time: Ovens vary, so check around 40 minutes. Golden brown on top and bubbling filling means you’re good to go.
- Multitask smartly: While the bars bake, clean your bowls and tools. Saves a mess later, trust me.
- Use parchment paper: This is a game-changer for cleanup and slicing neat bars.
Variations & Adaptations
If you want to switch things up, here are a few variations I’ve tried or recommend:
- Mixed Berry Magic: Replace half the cherries with blueberries or raspberries for a colorful, tangy twist.
- Nutty Crumble: Add ½ cup chopped walnuts or pecans to the crumble topping for extra texture and a toasty flavor.
- Gluten-Free Option: Use a gluten-free flour blend and certified gluten-free oats to make this recipe suitable for those avoiding gluten.
- Vegan Version: Swap butter for vegan margarine and use a flax egg for binding if you want to make it plant-based.
- Spiced Cherry Bars: Add 1 teaspoon ground cinnamon and a pinch of nutmeg to the crumble for warm, cozy notes.
One personal favorite is swapping in tart sour cherries when I can find them—they add a nice punch and balance the sweetness beautifully. Just remember to adjust sugar slightly if your cherries are extra tart.
Serving & Storage Suggestions
These cherry pie bars are best served at room temperature or slightly warmed. I sometimes pop a bar in the microwave for 10 seconds to bring out the gooey cherry filling—honestly, it’s like a hug in dessert form.
They pair wonderfully with a scoop of vanilla ice cream or a dollop of whipped cream, especially on a warm summer afternoon. For drinks, a cup of black coffee or a sparkling lemonade complements the sweet-tart flavor perfectly.
To store, cover the bars tightly with plastic wrap or keep them in an airtight container. They last up to 4 days at room temperature, or up to a week refrigerated. You can freeze individual bars for up to 3 months—just thaw overnight in the fridge and warm gently before serving.
Flavors actually deepen the next day, making leftovers even better. So, if you’re like me and find it hard to stop at one piece, at least you’ve got tomorrow’s dessert ready!
Nutritional Information & Benefits
Estimated per serving (based on 16 bars): approximately 220 calories, 10g fat, 30g carbohydrates, 2g protein.
Cherries bring antioxidants and vitamin C to the table, supporting immune health and adding natural sweetness with less refined sugar. Using oats in the topping adds fiber and helps keep you full longer. This recipe offers a balanced treat for summer—satisfying the sweet tooth while sneaking in some wholesome ingredients.
It’s gluten-free adaptable and can be made dairy-free, making it accessible to various dietary needs. Just keep an eye on nut additions if allergies are a concern.
Conclusion
These easy cherry pie bars with crunchy crumble topping are the kind of recipe that makes you smile after the first bite. They bring together buttery, crumbly, and fruity in a way that feels both indulgent and familiar. I love how they’re simple enough for a weekday treat but tasty enough to impress at any summer gathering.
Feel free to tweak the filling or topping to your taste, whether adding nuts, spices, or swapping fruits. The best part? You don’t need to be a baking pro to pull these off—just some basic ingredients and a little patience.
If you give this recipe a try, I’d love to hear how it goes! Share your variations, tips, or even your favorite way to enjoy these bars in the comments below. Happy baking, and here’s to many sweet summer moments ahead!
FAQs
Can I use fresh cherries instead of frozen for this recipe?
Absolutely! Fresh cherries work beautifully, especially in season. Just pit and chop them before mixing. You might want to add a tablespoon of lemon juice to brighten the flavor.
How do I prevent the crumble topping from burning?
If you notice the topping browning too fast, loosely cover the bars with foil about halfway through baking. This keeps the topping crisp without burning.
Can I make these bars ahead of time?
Yes! They actually taste better the next day once the flavors meld. Store at room temperature or in the fridge for up to a week, or freeze for longer storage.
Is it possible to make this recipe vegan?
Yes, swap the butter for a plant-based alternative and use a flax egg if you want a binding agent. The crumble texture might vary slightly but still delicious!
What’s the best way to slice these bars cleanly?
Use a sharp knife warmed under hot water and dried before slicing. Cutting after the bars have fully cooled or chilled helps keep the filling from oozing.
Pin This Recipe!
Easy Cherry Pie Bars Recipe with Crunchy Crumble Topping Perfect for Summer
These easy cherry pie bars feature a tender buttery base with a crisp, crunchy crumble topping and a bright, tart cherry filling. Perfect for a quick summer dessert that’s simple, satisfying, and crowd-pleasing.
- Prep Time: 15 minutes
- Cook Time: 45-50 minutes
- Total Time: 1 hour 5 minutes
- Yield: 12-16 bars 1x
- Category: Dessert
- Cuisine: American
Ingredients
- 2 ½ cups (315 g) all-purpose flour
- 1 cup (90 g) old-fashioned rolled oats
- 1 cup (200 g) packed brown sugar
- 1 cup (227 g) unsalted butter, softened
- 1 teaspoon baking powder
- ½ teaspoon salt
- 4 cups (600 g) frozen pitted cherries, thawed and drained
- ¾ cup (150 g) granulated sugar
- 3 tablespoons cornstarch
- 1 tablespoon lemon juice
- 1 teaspoon vanilla extract
- ¼ teaspoon almond extract (optional)
Instructions
- Preheat your oven to 350°F (175°C). Line a 9×13-inch baking pan with parchment paper, leaving an overhang on the sides for easy removal.
- In a large bowl, combine flour, oats, brown sugar, baking powder, and salt. Add softened butter in chunks and mix with an electric mixer or fingers until mixture resembles coarse crumbs with some pea-sized bits (about 3–5 minutes).
- Press 2/3 of the crumble mixture firmly into the bottom of the prepared pan to form an even, compact layer.
- In a medium bowl, toss thawed cherries with granulated sugar, cornstarch, lemon juice, vanilla extract, and almond extract. Stir gently until evenly coated and let sit for 5 minutes to macerate.
- Spread the cherry filling evenly over the pressed base.
- Crumble the remaining 1/3 of the crumble mixture over the cherry layer, leaving some larger chunks for texture.
- Bake for 45–50 minutes until the topping is golden brown and the cherry filling is bubbling. If topping browns too fast, tent loosely with foil after 30 minutes.
- Cool completely in the pan on a wire rack for up to 2 hours to allow the filling to set.
- Use the parchment paper overhang to lift the bars out of the pan. Slice into 12–16 squares with a sharp knife warmed under hot water and dried between cuts.
Notes
Use parchment paper for easy removal and cleanup. If topping browns too fast, tent with foil after 30 minutes. For gluten-free, substitute flour with gluten-free blend containing xanthan gum and use certified gluten-free oats. For dairy-free/vegan, use plant-based butter and flax egg. Drain cherries well to avoid soggy bars. Bars firm up better after chilling overnight.
Nutrition
- Serving Size: 1 bar (if sliced int
- Calories: 220
- Fat: 10
- Carbohydrates: 30
- Protein: 2
Keywords: cherry pie bars, cherry dessert, crumble topping, summer dessert, easy baking, fruit bars, quick dessert