Picture this: the buttery aroma of sugar cookies swirling through your kitchen, sunlight glinting off your countertops, and a tray of heart-shaped sugar cookies cooling—each one a little love note, waiting to be dressed up with glossy royal icing. The first time I made these Heart-Shaped Sugar Cookies with Royal Icing, I was knee-high to a grasshopper, standing on a rickety stool beside my grandma as she taught me the magic of rolling dough and pressing out perfect hearts. I still remember that bittersweet moment when I snuck a warm cookie off the tray, icing melting just a little on my fingertips—honestly, pure, nostalgic comfort that’s never left me.
Years later, I found myself trying to recreate those cookies for my own kids on a rainy Saturday (let’s face it, some traditions are too good to skip). The kind of moment where you pause, take a deep breath, and just smile because you know you’re onto something truly special. And let me tell you, these cookies didn’t last long. My family couldn’t stop sneaking them off the cooling rack (and I can’t really blame them). The best part? They looked absolutely adorable—Pinterest-worthy, if I do say so myself—and tasted even better.
Whether you’re baking for a Valentine’s Day swap, a birthday party, or just want to brighten up your cookie platter, this heart-shaped sugar cookies recipe fits every celebration. It’s the kind of recipe I wish I’d discovered years ago—dangerously easy, but with show-stopping results. I’ve tested it a dozen times (in the name of research, of course), and now it’s a staple for family gatherings and edible gifting. These cookies feel like a warm hug on a plate, and you’re going to want to bookmark this one. Trust me—your cookie jar will never be the same.
Why You’ll Love This Heart-Shaped Sugar Cookies Recipe
If you’re looking for the kind of sugar cookie that holds its shape, tastes amazing, and makes you look like a pro—even if you’re not—this recipe is for you. Years in the kitchen (and plenty of not-so-pretty cookie fails) have taught me the secrets to success, and I’m here to spill every one. Here’s why these heart-shaped sugar cookies are the ones you’ll come back to, batch after batch:
- Quick & Easy: No chilling required! You can mix, roll, cut, and bake in under an hour—perfect for spontaneous baking sessions or party prep panic.
- Simple Ingredients: Butter, sugar, eggs, flour—nothing fancy. You probably have everything on hand, so no last-minute grocery runs (we’ve all been there).
- Perfect for Celebrations: Whether it’s Valentine’s Day, birthdays, anniversaries, or just-because days, these cookies are the festive touch every table needs.
- Crowd-Pleaser: Kids love decorating them, adults love eating them, and they disappear magically at every get-together.
- Unbelievably Delicious: Crisp edges, soft centers, and that melt-in-your-mouth texture you dream about. The royal icing adds a sweet, glossy finish that’s just fun to eat.
What sets these heart-shaped sugar cookies apart? It’s all about the balance—using real butter (I swear by Challenge Butter for its consistent richness), just enough vanilla, and a pinch of salt for depth. I roll the dough a bit thicker for a soft bite, and the royal icing hardens to a shiny, picture-perfect finish without cracking your teeth. No crumbly, tasteless cookies here!
This recipe isn’t just good—it’s the kind that makes you close your eyes after the first bite, a little sigh escaping because it just tastes like “home.” It’s comfort food, made a little prettier, and always a conversation starter at parties. These cookies are my secret weapon for impressing guests, gifting friends, or turning a rainy day into a memory. If you want cookies that look as good as they taste—and you don’t want to fuss for hours—this is your new go-to recipe.
What Ingredients You Will Need
This heart-shaped sugar cookies recipe keeps things simple, letting classic flavors shine. Everything comes together with everyday ingredients—no need for specialty trips or oddball items. Here’s what you’ll need for both the cookies and that perfect royal icing:
For the Sugar Cookies:
- 2 3/4 cups (345g) all-purpose flour (sifted for best texture)
- 1 teaspoon (5g) baking powder (for just a hint of lift)
- 1/2 teaspoon (3g) kosher salt (balances the sweetness)
- 1 cup (227g) unsalted butter, room temperature (I use Challenge Butter—reliable every time)
- 1 cup (200g) granulated sugar (white sugar gives that classic flavor and pale color)
- 1 large egg, room temperature
- 2 teaspoons (10ml) pure vanilla extract (or vanilla bean paste for fancier flavor)
- 1/2 teaspoon (2ml) almond extract (optional, but adds a bakery-style depth)
For the Royal Icing:

- 3 cups (360g) powdered sugar (sifted to avoid lumps—trust me on this one)
- 2 large egg whites or 4 tablespoons (60ml) meringue powder + 1/4 cup (60ml) water (meringue powder is safer for kids, but classic egg whites work too)
- 1/2 teaspoon (2ml) vanilla extract
- Gel food coloring (for those Pinterest-worthy pinks, reds, or whatever your celebration calls for)
- Sprinkles and edible glitter (totally optional, but highly encouraged for a party look!)
Ingredient Tips & Substitutions:
- Butter: Salted butter is okay—just reduce the added salt to a pinch.
- Vanilla: Swap in lemon or orange zest for a citrusy twist.
- Egg-Free: Use Bob’s Red Mill Egg Replacer for cookies and aquafaba for royal icing.
- Gluten-Free: King Arthur Measure-for-Measure Gluten-Free Flour works perfectly here.
- Dairy-Free: Use Earth Balance sticks and check your meringue powder is dairy-free.
- Meringue Powder: Wilton brand is my go-to for consistent royal icing texture.
In summer, I’ll sometimes add a touch of strawberry or raspberry extract to the icing for a fruity pop. And if you’re baking with kids, let them pick the sprinkle colors—it’s half the fun. These ingredients are pantry-friendly, easy to swap, and always delicious.
Equipment Needed
You don’t need a professional bakery setup for these heart-shaped sugar cookies—just a few trusty tools and a pinch of patience. Here’s what you’ll want to have on hand:
- Mixing bowls: At least two—one for dough, one for icing. Glass or stainless steel are easiest to clean.
- Hand mixer or stand mixer: Makes creaming butter and sugar a breeze. A sturdy wooden spoon works in a pinch (hello, arm workout!).
- Measuring cups and spoons: For accuracy, especially with flour and sugar.
- Rolling pin: Any kind will do—mine is a $5 antique shop find, but a wine bottle works if you’re desperate.
- Heart-shaped cookie cutters: Metal gives the sharpest edges. If you don’t have one, trace a heart on cardboard and cut around with a sharp knife.
- Baking sheets: Lined with parchment paper for easy cleanup and nonstick baking.
- Cooling rack: Helps cookies cool evenly without getting soggy bottoms.
- Piping bags and small round tips: For neat royal icing lines. Zip-top bags with a snipped corner work in a jam.
- Toothpicks or scribe tool: For popping icing bubbles and swirling designs (don’t skip this for that flawless look).
- Offset spatula: Handy for lifting delicate cookies onto the tray without breaking them.
Pro tip: If you bake a lot, invest in reusable silicone baking mats—they clean up fast and last forever. I’ve had mine for years and never looked back. And don’t stress if your gear isn’t fancy; good cookies come from love, not gadgets.
How to Make Heart-Shaped Sugar Cookies with Royal Icing
-
Preheat and Prep:
Preheat your oven to 350°F (175°C). Line two baking sheets with parchment paper (or silicone mats). Have your ingredients measured and ready—it speeds things up! -
Cream Butter and Sugar:
In a large mixing bowl, beat 1 cup (227g) unsalted butter with 1 cup (200g) granulated sugar until light and fluffy, about 2-3 minutes on medium speed. The mixture should look pale and fluffy—don’t skimp on this step; it gives the cookies their tender crumb. -
Add Egg and Flavorings:
Beat in 1 large egg, 2 teaspoons vanilla extract, and 1/2 teaspoon almond extract (if using). Scrape down the sides as needed. The dough might look a bit loose at this point—totally normal. -
Incorporate Dry Ingredients:
In a separate bowl, whisk together 2 3/4 cups (345g) all-purpose flour, 1 teaspoon baking powder, and 1/2 teaspoon salt. Gradually add to the wet ingredients, mixing on low until just combined. The dough should pull away from the sides and feel soft but not sticky. If it’s crumbly, add a teaspoon of milk. -
Roll Out the Dough:
Dust your work surface and rolling pin with flour. Roll the dough to about 1/4 inch (6mm) thickness. For even cookies, I use rolling pin rings—totally optional, but they help! If the dough cracks, just squish it back together. -
Cut and Place Cookies:
Cut out hearts using your cookie cutter, re-rolling scraps as needed. Place 1 inch (2.5cm) apart on prepared baking sheets. These cookies don’t spread much, so don’t worry about crowding. -
Bake:
Bake for 8-10 minutes, until the edges are just turning golden (not brown). Keep a close eye—overbaking leads to dry cookies. Let cool on the baking sheet for 5 minutes, then transfer to a wire rack. -
Make the Royal Icing:
In a clean bowl, beat 3 cups (360g) powdered sugar with 2 large egg whites (or 4 tablespoons meringue powder + 1/4 cup water) and 1/2 teaspoon vanilla extract. Beat on high for 5-7 minutes until stiff peaks form. For flooding icing, add water a teaspoon at a time until it flows off a spoon in thick ribbons. -
Color and Fill Piping Bags:
Divide icing into bowls and tint with gel food coloring. Fill piping bags fitted with a small round tip. Cover bowls with plastic wrap—a skin forms quickly! -
Decorate:
Outline each cookie with icing, then fill (“flood”) the center. Use a toothpick to pop air bubbles and nudge icing into corners. Add sprinkles before the icing sets for best adhesion. -
Dry and Store:
Let cookies dry at room temperature for at least 4 hours (overnight is safest) before stacking or packaging. This step is key for that glossy finish!
Personal tip: If you’re in a hurry, set the decorated cookies near a fan to speed up drying. And don’t worry if your first few aren’t perfect—royal icing is a forgiving medium. Every cookie is a little unique, which is half the charm.
Top Cooking Tips & Techniques for Heart-Shaped Sugar Cookies
- Chill if Needed: While this dough doesn’t require chilling, if your kitchen is warm or you want the sharpest edges, pop the cut cookies in the fridge for 15 minutes before baking.
- Don’t Overmix: Once you add flour, mix until just combined. Overworking the dough can make cookies tough—learned the hard way (more than once!).
- Even Thickness Matters: For cookies that bake evenly, use rolling pin guides or two stacked wooden spoons as rails. It’s a game-changer for uniform batches.
- Royal Icing Consistency: For outlining, you want “toothpaste-thick” icing. For flooding, it should flow like honey but not run off the cookie. A 15-second test (icing line disappears in 15 seconds) works wonders.
- Color Bleed Prevention: Let each layer of icing dry before adding another color. Humidity can cause colors to bleed—I’ve lost many a pink heart to rainy weather!
- Troubleshooting: If cookies spread too much, check your oven temp with an oven thermometer and use cool baking sheets for each batch. If royal icing separates, beat it again to reincorporate.
- Multitasking: While cookies bake, prep your icing and decorations. Lay out parchment for drying, and keep a damp cloth over piping tips to prevent clogging.
Don’t be discouraged if your first batch isn’t bakery-perfect. I’ve had my share of lopsided hearts and drippy icing. With every batch, you’ll get a little better—and honestly, the imperfect ones taste just as sweet.
Variations & Adaptations
- Gluten-Free: Swap all-purpose flour for a 1:1 gluten-free blend (like King Arthur or Bob’s Red Mill). Keep an eye on dough texture—sometimes you need a tablespoon less flour.
- Dairy-Free: Use vegan butter sticks and double-check that all decorations are dairy-free. The result is just as soft and tasty.
- Flavor Twists: Add 1 tablespoon lemon or orange zest to the dough for a citrusy touch (great for spring parties). Try almond, peppermint, or coconut extract in the icing for a personalized finish.
- Holiday Shapes: This dough works with any cookie cutter—stars for Christmas, eggs for Easter, leaves for Thanksgiving.
- Natural Colors: Tint icing with beet, spirulina, or turmeric powder for plant-based color. It’s a fun science experiment with kids!
- My Favorite Twist: I sometimes sandwich two cookies with a little raspberry jam before icing the top. It’s a surprise treat and gets rave reviews every time.
If you need nut-free, just skip the almond extract—the cookies will still be delicious. For those who want less sugar, reduce the icing or sprinkle with sanding sugar before baking for sparkle without the sweet hit. This recipe is a blank canvas—let your creativity run wild!
Serving & Storage Suggestions
These heart-shaped sugar cookies shine as a centerpiece for dessert tables or as sweet party favors tucked in cellophane bags. Serve at room temperature for the best texture—soft, buttery centers and crisp edges. Pair with hot cocoa in winter, lemonade in summer, or a simple glass of milk (classic never fails).
For gifting, stack cookies between layers of wax paper in a decorative tin or box. The royal icing keeps them neat and stackable, making them perfect for shipping or sharing. If you want to really wow your guests, set out bowls of extra icing and sprinkles for a DIY decorating station—kids and adults both love it.
To store, keep cookies in an airtight container at room temperature for up to 1 week. For longer storage, freeze undecorated cookies (layered with parchment) for up to 2 months. Thaw and decorate fresh for best results. If freezing decorated cookies, layer gently and allow to come to room temp before serving—icing may dull a bit, but the taste stays perfect.
Pro tip: The flavor deepens after a day, so they’re even better on day two (if they last that long). I often bake ahead for parties and decorate the night before—easy peasy!
Nutritional Information & Benefits
Each heart-shaped sugar cookie (with icing) is about 120 calories, with 6g fat, 18g carbs, and 1g protein. They’re a treat, for sure, but made with real butter and simple ingredients—no weird preservatives or artificial flavors.
The royal icing uses egg whites or meringue powder for that classic crunch and sheen, but you can make them egg-free with aquafaba if needed. For gluten-free or dairy-free folks, simple swaps keep these cookies in the rotation for everyone.
Allergens to note: contains wheat, dairy, and eggs (unless adapted). As always, check your decorations for hidden allergens—some sprinkles contain traces of nuts or gluten.
I love that these cookies are a little bite of joy—sometimes, that’s the best wellness tip I can give. Bake, share, and enjoy—in moderation, of course!
Conclusion
There’s just something magical about these heart-shaped sugar cookies with royal icing—the kind of recipe that turns an everyday moment into a celebration. They’re easy, dependable, and endlessly customizable, whether you want a Pinterest-perfect cookie platter or a fun family baking day. Honestly, I make them for every celebration and “just because” days, and they never fail to bring smiles (and a few happy crumbs) to the table.
Don’t be afraid to experiment—swap flavors, colors, or shapes, and make them your own. That’s the real secret behind a cherished recipe. If you try these, I’d love to hear how you decorated them or what special occasion you brought them to—let’s swap cookie stories in the comments!
So preheat that oven, grab your favorite cookie cutter, and get ready for a batch of cookies that feels like a warm hug. Happy baking, and may your celebrations be as sweet as your cookies!
FAQs: Heart-Shaped Sugar Cookies with Royal Icing
How do I keep my heart-shaped sugar cookies from spreading?
Use room temperature butter (not too soft), measure flour accurately, and bake on cool trays. If it’s hot in your kitchen, chill cut cookies for 10–15 minutes before baking to help them keep their shape.
Can I make the dough or icing ahead of time?
Yes! The dough can be wrapped and refrigerated for up to 2 days or frozen for 2 months. Royal icing can be made 2–3 days ahead—store in an airtight container and re-whip before using.
What’s the best way to get vibrant icing colors?
Use gel food coloring for bold, non-watery colors. Start with a little, adding more as needed, and let the icing sit—colors deepen over time.
Can I freeze decorated cookies?
Absolutely. Freeze decorated cookies between layers of parchment in an airtight container for up to 1 month. Thaw at room temperature; icing may lose a little shine but stays delicious.
What if I don’t have a heart-shaped cookie cutter?
No problem! Trace a heart on sturdy cardboard, cut it out, and use a paring knife to cut around the shape. Even a drinking glass or small jar lid works for simple rounds if you’re in a pinch.
Pin This Recipe!

Heart-Shaped Sugar Cookies with Easy Royal Icing
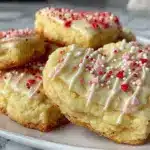
These heart-shaped sugar cookies are buttery, tender, and hold their shape perfectly, making them ideal for parties and celebrations. Decorated with glossy royal icing, they’re easy to make, fun to customize, and always a crowd-pleaser.
- Prep Time: 25 minutes
- Cook Time: 10 minutes
- Total Time: 35 minutes (plus 4 hours drying time for icing)
- Yield: 24 cookies 1x
- Category: Dessert
- Cuisine: American
Ingredients
- 2 3/4 cups all-purpose flour, sifted
- 1 teaspoon baking powder
- 1/2 teaspoon kosher salt
- 1 cup unsalted butter, room temperature
- 1 cup granulated sugar
- 1 large egg, room temperature
- 2 teaspoons pure vanilla extract
- 1/2 teaspoon almond extract (optional)
- 3 cups powdered sugar, sifted
- 2 large egg whites or 4 tablespoons meringue powder + 1/4 cup water
- 1/2 teaspoon vanilla extract
- Gel food coloring
- Sprinkles and edible glitter (optional)
Instructions
- Preheat oven to 350°F (175°C). Line two baking sheets with parchment paper or silicone mats.
- In a large mixing bowl, beat butter and granulated sugar until light and fluffy, about 2-3 minutes.
- Beat in egg, vanilla extract, and almond extract (if using). Scrape down sides as needed.
- In a separate bowl, whisk together flour, baking powder, and salt. Gradually add to wet ingredients, mixing on low until just combined. If dough is crumbly, add a teaspoon of milk.
- Dust work surface and rolling pin with flour. Roll dough to 1/4 inch thickness.
- Cut out heart shapes using cookie cutter, re-rolling scraps as needed. Place cookies 1 inch apart on prepared baking sheets.
- Bake for 8-10 minutes, until edges are just turning golden. Cool on baking sheet for 5 minutes, then transfer to wire rack.
- For royal icing: In a clean bowl, beat powdered sugar with egg whites (or meringue powder + water) and vanilla extract on high for 5-7 minutes until stiff peaks form. For flooding, add water a teaspoon at a time until icing flows in thick ribbons.
- Divide icing into bowls and tint with gel food coloring. Fill piping bags fitted with small round tip.
- Outline each cookie with icing, then fill the center. Use a toothpick to pop air bubbles and nudge icing into corners. Add sprinkles before icing sets.
- Let cookies dry at room temperature for at least 4 hours (overnight is best) before stacking or packaging.
Notes
No chilling required for the dough, but chilling cut cookies for 15 minutes before baking can help maintain sharp edges. For gluten-free or dairy-free adaptations, use 1:1 gluten-free flour and vegan butter. Royal icing can be made with aquafaba for egg-free needs. Let icing dry completely before stacking. Cookies are even better the next day as flavors deepen.
Nutrition
- Serving Size: 1 cookie
- Calories: 120
- Sugar: 10
- Sodium: 60
- Fat: 6
- Saturated Fat: 4
- Carbohydrates: 18
- Protein: 1
Keywords: sugar cookies, heart-shaped cookies, royal icing, party cookies, Valentine's Day, easy sugar cookies, decorated cookies, kid-friendly baking, holiday cookies