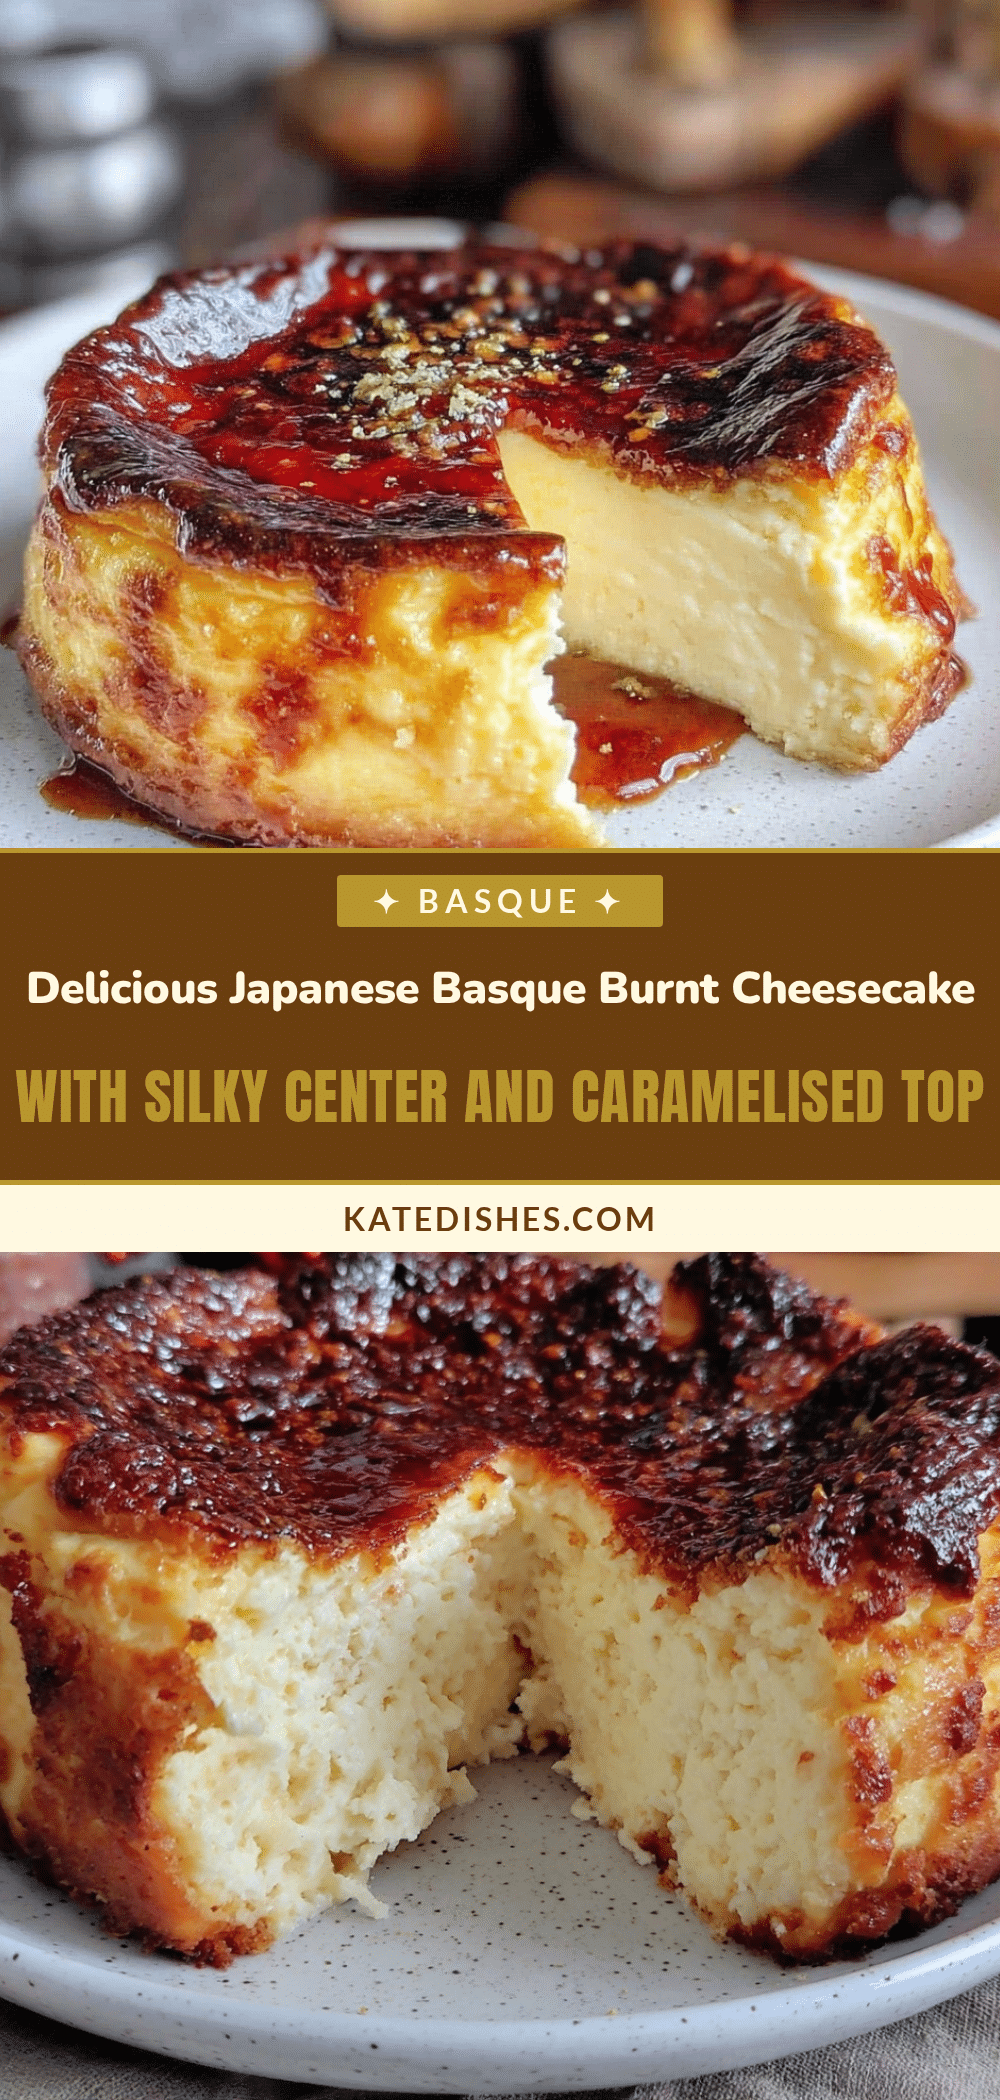
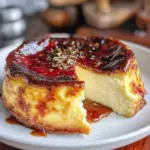
“You’ve got to try this cheesecake,” my neighbor said casually, dropping off a small, slightly burnt cake wrapped in parchment. I raised an eyebrow, skeptical about a dessert that looked more like a baking mishap than a treat. But then I took a bite of that Delicious Japanese Basque Burnt Cheesecake with Silky Center, and honestly, I was hooked. The outside had that deep, caramelized crust that looks almost charred (but in a good way), while the inside was this luscious, custard-like silkiness that just melted on my tongue. It was nothing like the dense, heavy cheesecakes I’d known before.
This wasn’t some fussy, complicated dessert either. It came together quickly, with simple ingredients that I usually keep in my fridge. I found myself making it repeatedly that week—once as a late-night indulgence, another time for a casual dinner with friends. Each time, it surprised me a little more, proving there’s beauty in a burnt surface and softness right beneath. It quietly became my go-to when I wanted that cozy, comforting dessert but didn’t want to fuss over a complicated recipe.
The charm of this Japanese Basque Burnt Cheesecake lies in its simplicity and that perfect balance of textures. It’s a dessert that feels special without the stress, a sweet little secret I’m happy to share. And honestly, once you try it, you might find yourself reaching for it when you need a little calm, a little indulgence, or just something delicious that works every time.
Why You’ll Love This Recipe
I’ve made plenty of cheesecakes, but this Japanese Basque burnt cheesecake stands out for several reasons I keep coming back to:
- Quick & Easy: You won’t be stuck in the kitchen all day. This cheesecake comes together in about 15 minutes of prep and 50 minutes of baking — perfect for last-minute dessert cravings.
- Simple Ingredients: No fancy stuff here. Cream cheese, eggs, sugar, cream, flour — all pantry staples that you probably have on hand right now.
- Perfect for Any Occasion: Whether you’re hosting a casual dinner or just want to treat yourself on a quiet evening, this cheesecake fits the bill. It’s great alongside a cup of coffee or even as a unique birthday dessert.
- Crowd-Pleaser: I’ve brought this to potlucks and family gatherings, and it disappears fast. Kids and adults love it alike — the burnt top adds a rustic charm that’s hard to resist.
- Unbelievably Delicious: The contrast between the slightly bitter caramelized crust and the creamy, silky center is honestly next-level comfort food. It’s the kind of dessert that makes you close your eyes after the first bite.
What makes this cheesecake different from the usual? It’s the technique of baking at high heat to get that signature burnt exterior while keeping the center soft and custardy. Some versions blend in a bit of heavy cream for extra silkiness, and others skip a crust altogether, making it all about texture. I’ve tweaked the sugar balance to keep it just sweet enough without overwhelming the subtle tang of the cream cheese. This isn’t just another cheesecake recipe — it’s my favorite way to enjoy a dessert that’s both simple and impressive.
This cheesecake isn’t just tasty; it feels like a little moment of joy in your day. If you’ve enjoyed rich, creamy desserts like the creamy one-pot chicken Alfredo with broccoli or the creamy baked feta pasta recipes from this site, you’ll find this cheesecake just as comforting but with a sweet, silky twist.
What Ingredients You Will Need
This recipe uses simple, wholesome ingredients to deliver bold flavor and satisfying texture without the fuss. Most are pantry staples, and you can swap a few to suit your preferences or dietary needs.
- Cream Cheese, 16 oz (450 g), softened — I like using Philadelphia for a smooth texture.
- Granulated Sugar, 1 cup (200 g) — balances the tanginess but not overly sweet.
- Large Eggs, 4, room temperature — helps with structure and silkiness.
- Heavy Cream, 1 cup (240 ml) — adds richness and that signature silky center.
- All-Purpose Flour, 2 tbsp (15 g) — just a touch to give body without heaviness.
- Vanilla Extract, 1 tsp — for subtle warmth and depth.
- Lemon Juice, 1 tsp (optional) — brightens the flavor and balances richness.
Substitutions: Use gluten-free flour blends if you need a gluten-free version, or swap heavy cream with full-fat coconut milk for a dairy-free twist (though it changes the flavor slightly). I usually recommend fresh, high-quality cream cheese and cream — but in a pinch, store brands work fine.
Seasonally, you might add a handful of fresh berries on top or swirl in some yuzu marmalade for a Japanese-inspired twist. But honestly, this cheesecake shines on its own.
Equipment Needed
- Springform Pan, 8-inch (20 cm) — essential for easy removal, but a regular cake pan lined with parchment works too.
- Mixing Bowls — one large for beating cream cheese and sugar, another for whisking eggs.
- Electric Mixer or sturdy whisk — makes mixing smooth and fast.
- Rubber Spatula — for folding ingredients gently.
- Oven with reliable temperature control — the high heat is key to that burnt exterior.
- Parchment Paper — line the pan generously to prevent sticking and for that signature rustic look.
If you don’t have a springform, I’ve done this in a loaf pan lined well with parchment, but it’s trickier to unmold. For budget-friendly options, a good electric hand mixer will do the job without the need for a stand mixer.
Preparation Method

- Preheat your oven to 400°F (205°C). Line an 8-inch (20 cm) springform pan with parchment paper, making sure the paper extends above the rim by 2 inches (5 cm) — this helps the cheesecake rise and gives it that rustic look.
- Beat the cream cheese and sugar in a large bowl until smooth and creamy — about 3 to 5 minutes using an electric mixer. This step is crucial for a silky texture, so no lumps!
- Add eggs one at a time, mixing well after each addition. The batter should be shiny and slightly thick but still pourable.
- Pour in the heavy cream and vanilla extract, then gently fold in the flour with a spatula. Avoid overmixing here to keep the cheesecake light.
- Optional: Stir in lemon juice for a subtle tang that cuts through the richness.
- Pour the batter into the prepared pan. Tap the pan gently on the counter to release any air bubbles.
- Bake at 400°F (205°C) for about 50 to 55 minutes. The top should be a deep golden brown with a few darker spots — don’t worry if it looks burnt; that’s the charm!
- Check for doneness: The center should still wobble slightly when you gently shake the pan. It will firm up as it cools.
- Cool the cheesecake in the pan for about an hour, then transfer to the fridge for at least 4 hours or overnight for the best texture.
- Remove from pan and peel off parchment gently before slicing. Serve chilled or at room temperature.
Tip: If the top seems to brown too fast, tent loosely with foil halfway through baking. Also, if you want a lighter crust, reduce the oven temperature to 375°F (190°C) but expect a less dramatic burnt effect.
Cooking Tips & Techniques
Getting that perfect burnt top with a silky center takes a little finesse, but it’s not rocket science. Here’s what I’ve learned:
- Don’t skip softening the cream cheese. It blends better and prevents lumps. I usually leave it out for about an hour before baking.
- Use room temperature eggs. They incorporate more easily, giving you a smooth batter.
- High heat is your friend. It creates that signature burnt exterior. Just keep an eye near the end to avoid tipping into actual burnt.
- Line your pan generously with parchment. This recipe is famously sticky, and the parchment also helps create those rustic folds and cracks.
- Don’t overbake. The cheesecake should wobble slightly in the center; it will set as it cools. Overbaking leads to dryness, which kills that silky texture.
- Chill it well. Overnight chilling helps flavors meld and improves slicing.
Honestly, the first time I made it, I was nervous about the burnt top looking too dark. But that contrast is exactly what gives this cheesecake its depth and character. If you’ve ever made a rich dish like creamy one-pot chicken Alfredo, you know that texture balance makes all the difference.
Variations & Adaptations
This cheesecake is versatile and welcoming to tweaks, here are some ways I’ve played with it:
- Matcha Basque Cheesecake: Add 1 tablespoon of matcha powder to the batter for an earthy green tea flavor and color.
- Berry Swirl: Gently fold in ¼ cup of fresh or frozen berries before baking for a fruity surprise.
- Gluten-Free: Swap the all-purpose flour with almond flour or a gluten-free blend — the texture is slightly different but still delicious.
- Dairy-Free: Use coconut cream instead of heavy cream and a dairy-free cream cheese alternative. It won’t be exactly the same silky texture, but still tasty.
- Caramel Drizzle: Serve with a homemade caramel sauce for extra indulgence — a friend swears by this combo.
When I first tried the matcha variation, it was a hit at a small tea party. The bitterness of the green tea complemented the burnt crust perfectly. For a quick twist, try pairing it with a hot cup of coffee or tea — the flavors marry really well.
Serving & Storage Suggestions
Serve this cheesecake chilled or at room temperature, sliced into generous wedges. The burnt top adds a rustic aesthetic that pairs beautifully with a dusting of powdered sugar or fresh berries.
It’s wonderful with a cup of black coffee or a light green tea if you want to keep the flavors balanced. For a richer indulgence, a dollop of whipped cream on the side is never a bad idea.
Store leftovers in an airtight container in the refrigerator for up to 5 days. The texture actually improves after a day or two in the fridge as the flavors settle in. You can freeze it wrapped well in plastic and foil for up to 2 months — thaw overnight in the fridge before serving.
Reheat slices gently in a warm oven (about 300°F / 150°C) for 5-7 minutes if you want that slightly warm silky center again. Just don’t overdo it or it melts too much.
Nutritional Information & Benefits
This Japanese Basque burnt cheesecake is rich but surprisingly light in texture. Per serving (1/8 of the cake), here’s an approximate breakdown:
| Nutrient | Amount |
|---|---|
| Calories | 320 |
| Fat | 26g |
| Carbohydrates | 15g |
| Protein | 6g |
The key ingredients like cream cheese and heavy cream provide calcium and protein, though the dessert is higher in fat and calories, so moderation is key. For those watching gluten, this recipe is easily adaptable. Just note the potential allergens: dairy and eggs.
From a wellness perspective, I appreciate that this cheesecake doesn’t rely on heavy sugars or elaborate toppings. It’s a straightforward dessert that feels satisfying without going overboard, making it easier to enjoy as an occasional treat.
Conclusion
This Delicious Japanese Basque Burnt Cheesecake with Silky Center is the kind of recipe that surprises you with its simplicity and wins you over with its unique texture. It’s approachable, quick, and perfect for those moments when you want something special but not complicated.
Feel free to customize it — whether that’s a hint of matcha, a swirl of berries, or a gluten-free tweak, this cheesecake welcomes your personal touch. It’s become one of my favorite desserts to make, especially when I want to impress without stress.
If you’ve enjoyed rich and creamy dishes like the creamy baked feta pasta or the spicy vodka rigatoni, this cheesecake delivers that same comforting richness but with a playful burnt twist.
I’d love to hear how your cheesecake turns out or any fun variations you try. Drop a comment below or share your photos — nothing makes me happier than seeing this recipe come to life in your kitchen!
FAQs
What makes Basque cheesecake different from regular cheesecake?
Basque cheesecake is baked at a high temperature to create a deeply caramelized, almost burnt exterior and a creamy, silky center. Unlike traditional cheesecakes, it has no crust and a rustic, cracked appearance.
Can I make this cheesecake without a springform pan?
Yes, you can use a regular cake pan lined with parchment paper, but removing the cheesecake will be trickier. A springform pan is recommended for easy release and the best results.
How do I know when the cheesecake is done?
The top should be deeply golden brown with some darker spots. The center will still wobble slightly when you gently shake the pan. It firms up as it cools, so don’t overbake.
Can I prepare this cheesecake ahead of time?
Absolutely! It tastes even better after chilling overnight. Store it covered in the refrigerator for up to 5 days, or freeze it for longer storage.
Is this recipe gluten-free?
Not as written, since it uses all-purpose flour. However, you can substitute with gluten-free flour or almond flour to make it gluten-free without sacrificing much texture.
Pin This Recipe!
Japanese Basque Burnt Cheesecake
A quick and easy cheesecake with a deeply caramelized burnt exterior and a silky, custard-like center. This dessert is simple to make with pantry staples and perfect for any occasion.
- Prep Time: 15 minutes
- Cook Time: 50 minutes
- Total Time: 5 hours 5 minutes
- Yield: 8 servings 1x
- Category: Dessert
- Cuisine: Japanese
Ingredients
- 16 oz (450 g) cream cheese, softened
- 1 cup (200 g) granulated sugar
- 4 large eggs, room temperature
- 1 cup (240 ml) heavy cream
- 2 tbsp (15 g) all-purpose flour
- 1 tsp vanilla extract
- 1 tsp lemon juice (optional)
Instructions
- Preheat your oven to 400°F (205°C). Line an 8-inch (20 cm) springform pan with parchment paper, extending the paper 2 inches (5 cm) above the rim.
- Beat the cream cheese and sugar in a large bowl until smooth and creamy, about 3 to 5 minutes using an electric mixer.
- Add eggs one at a time, mixing well after each addition until the batter is shiny and slightly thick but still pourable.
- Pour in the heavy cream and vanilla extract, then gently fold in the flour with a spatula. Avoid overmixing.
- Optionally stir in lemon juice for a subtle tang.
- Pour the batter into the prepared pan and tap gently to release air bubbles.
- Bake at 400°F (205°C) for 50 to 55 minutes until the top is deep golden brown with some darker spots.
- Check for doneness: the center should wobble slightly when shaken gently.
- Cool the cheesecake in the pan for about an hour, then refrigerate for at least 4 hours or overnight.
- Remove from pan and peel off parchment gently before slicing. Serve chilled or at room temperature.
Notes
If the top browns too quickly, tent loosely with foil halfway through baking. For a lighter crust, reduce oven temperature to 375°F (190°C) but expect less burnt effect. Use room temperature eggs and softened cream cheese for best texture. Chill overnight for best slicing and flavor.
Nutrition
- Serving Size: 1/8 of the cake
- Calories: 320
- Fat: 26
- Carbohydrates: 15
- Protein: 6
Keywords: Basque cheesecake, burnt cheesecake, Japanese cheesecake, silky cheesecake, easy cheesecake, no crust cheesecake, creamy dessert