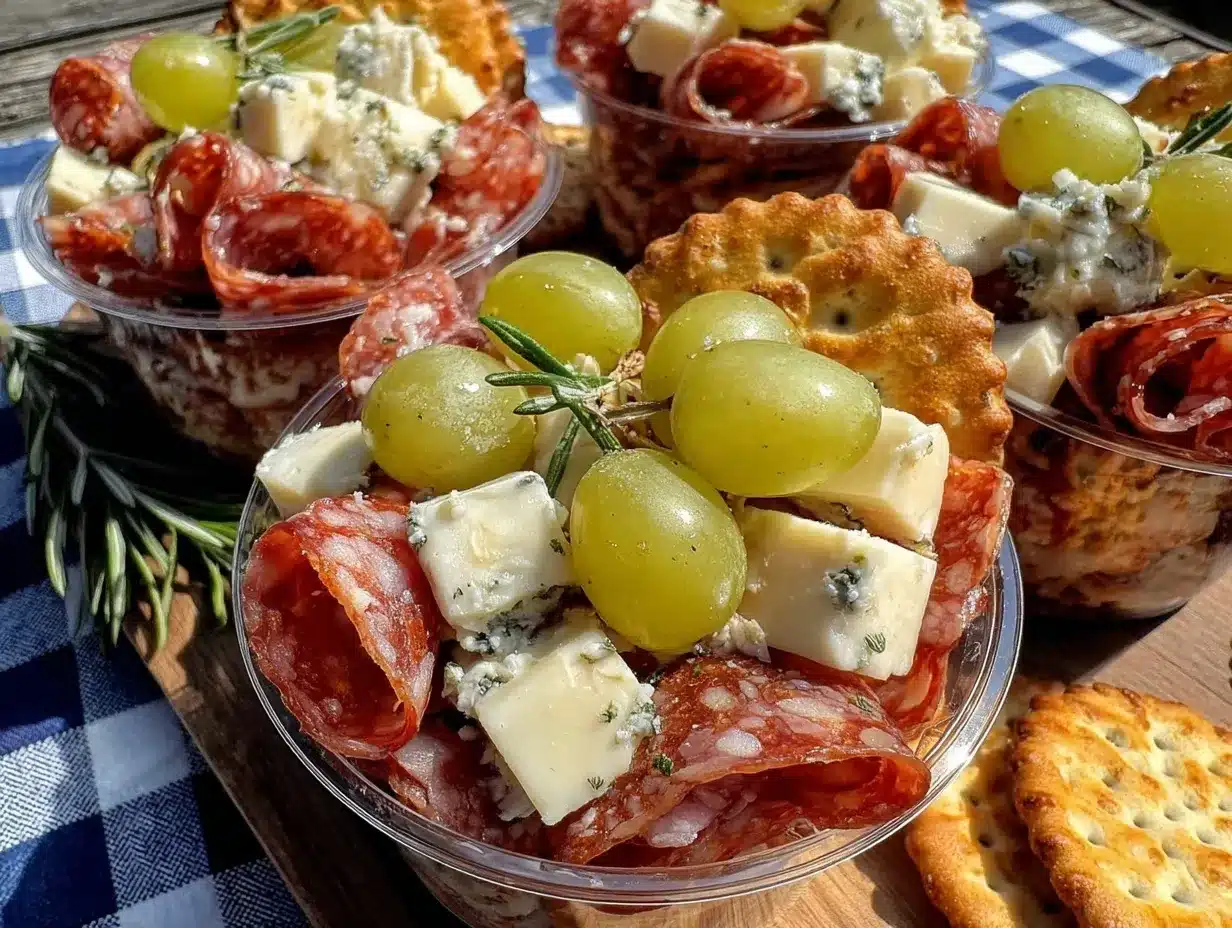
“Hey, grab a cup and load it up!” That’s the phrase that echoed through my backyard last graduation weekend, while everyone juggled plates, napkins, and sun hats. Honestly, I wasn’t sure if these Easy Graduation Picnic Grazing Cups would steal the show or just be another snack in the mix. But as the sun warmed the grass and laughter filled the air, these little cups became the unofficial MVPs of the party. I still remember the curious glances when I first set them out—snacks in a cup? Skeptical, I was. But by the end, friends were asking for the recipe, and even the picky eaters were sneaking back for seconds.
What made these grazing cups work so well? The perfect bite-sized layers of savory, sweet, and crunchy that somehow avoided the chaos of a typical picnic spread. Plus, they’re easy to eat standing up, which is a total win when you’re balancing a drink and trying not to spill on your graduation gown (been there). This recipe became my go-to when I needed snacks that could handle the sunshine, the chatter, and the little hands reaching for a quick nibble.
It’s funny, because I first whipped these up on a whim, half-assembling them while texting a friend about how stressed I was juggling snack prep and last-minute decorations. The result was this simple, crowd-pleasing snack that felt fancy but was effortless—exactly what I needed. Since then, they’ve popped up at brunches, potlucks, and impromptu get-togethers, always delivering that perfect pinch of flavor and fun.
So if you’re looking for a snack that’s as easy to make as it is to devour, these Easy Graduation Picnic Grazing Cups might just become your new favorite for celebrations and beyond. They’re a little party in a cup, without the fuss, and honestly, that’s pretty comforting when life’s a little hectic.
Why You’ll Love This Recipe
After making these grazing cups multiple times over graduation weekends and casual hangouts, I can vouch for why they’re a hit beyond just the looks. Here’s what really makes them stand out:
- Quick & Easy: You can assemble these in under 20 minutes, perfect for last-minute guests or when you’re juggling a million things (trust me, I’ve been there).
- Simple Ingredients: No need for exotic buys. Most ingredients are typical pantry and fridge staples, and substitutions won’t hurt a bit.
- Perfect for Outdoor Gatherings: Whether it’s a graduation picnic, backyard BBQ, or casual potluck, these cups keep things neat and mess-free.
- Crowd-Pleaser: Kids, adults, and everyone in between love grabbing these cups. The mix of textures and flavors hits all the right notes.
- Unbelievably Delicious: The balance of creamy cheese, fresh veggies, crunchy crackers, and savory meats means every bite feels thoughtfully composed—without the fuss.
- Unique Presentation: These aren’t just snacks thrown on a plate; they’re curated little portions that look inviting and are easy to personalize.
What sets this recipe apart is the layering technique: building flavors and textures in each cup to keep every bite interesting. Plus, I use a quick homemade herb vinaigrette that brings everything together without overwhelming the fresh ingredients. This is not your average snack platter—it’s a thoughtful, fuss-free way to impress with minimal effort.
Honestly, these grazing cups make me feel like I’m serving something special without having to spend hours in the kitchen. They bring a bit of elegance to casual gatherings and are the kind of snack that invites smiles and second helpings. If you’ve ever wanted a no-fail, show-stopping picnic treat, this is it.
What Ingredients You Will Need
This recipe uses simple, wholesome ingredients to deliver bold flavor and satisfying texture without the fuss. The beauty is in the balance—fresh produce, creamy cheese, crunchy elements, and savory meats come together effortlessly. Most of these you probably have on hand or can easily grab from your local store.
- For the Base:
- Mini clear plastic or glass cups (4 oz) – perfect for individual servings
- Mixed greens (baby spinach, arugula, or spring mix) – fresh and crisp
- For the Protein:
- Cooked chicken breast, shredded or chopped (rotisserie chicken works great)
- Hard-boiled eggs, chopped (adds creaminess and protein)
- Salami or pepperoni slices, cut into bite-sized pieces (for a savory kick)
- For the Veggies & Crunch:
- Cherry tomatoes, halved (bright and juicy)
- Cucumber slices or mini pickles (adds crunch and tang)
- Carrot sticks or shredded carrots (for subtle sweetness)
- Crackers or pita chips, broken into pieces (for texture contrast)
- For the Cheese:
- Feta cheese, crumbled (adds tangy creaminess)
- Mozzarella balls (bocconcini) or shredded mozzarella (mild and melty)
- For the Dressing:
- Olive oil (extra virgin recommended for flavor)
- Fresh lemon juice (brightens the whole cup)
- Dijon mustard (just a touch for tang)
- Honey or maple syrup (balances acidity)
- Salt and freshly cracked black pepper
- Fresh herbs (parsley or basil), finely chopped (adds freshness)
Pro tip: I like to use rotisserie chicken from my local market—makes this recipe a breeze. For cheese, I recommend a good-quality feta like Athenos for authentic flavor. If you’re prepping for a summer picnic, swapping in seasonal veggies like fresh peas or radishes can add a fun twist.
Equipment Needed
- Small clear plastic or glass cups (about 4 oz capacity) – these make serving and eating easy and mess-free.
- Mixing bowl for dressing – a medium bowl works well to whisk ingredients together.
- Sharp knife and cutting board – for chopping veggies, meats, and cheese.
- Measuring spoons and cups – to get the dressing proportions just right.
- Serving tray – optional, but helpful for transporting and presenting the grazing cups neatly.
If you don’t have mini cups, small mason jars or even sturdy paper cups can do the trick. I’ve tried both, and glass cups feel a little more elegant for celebrations, but plastic cups score high on convenience and disposal. For the dressing, a small whisk or fork works fine—no fancy gadget needed.
Preparation Method
- Prepare the Dressing (5 minutes): In a medium bowl, whisk together 3 tablespoons (45 ml) olive oil, 1 tablespoon (15 ml) fresh lemon juice, ½ teaspoon Dijon mustard, 1 teaspoon honey, and a pinch of salt and pepper. Stir in 1 tablespoon fresh chopped herbs like parsley or basil. Set aside to let flavors mingle.
- Chop Ingredients (10 minutes): While the dressing rests, halve 1 cup (150 g) cherry tomatoes, slice ½ cucumber into thin rounds, chop 2 hard-boiled eggs, shred about 1 cup (140 g) cooked chicken breast, and cut ½ cup (50 g) salami into bite-sized pieces. Crumble ½ cup (75 g) feta cheese and prepare about 1 cup (30 g) crackers or pita chips by breaking into smaller pieces.
- Layer the Cups (10-15 minutes): Start each cup by placing a small handful (about 1 cup or 30 g) of mixed greens as the base. Drizzle a teaspoon of the dressing over the greens to keep them flavorful. Add a spoonful of chicken, a few pieces of salami, and a couple of chopped egg pieces. Then layer cherry tomatoes, cucumber slices, and shredded carrots. Sprinkle feta cheese on top, then finish with a few cracker pieces for crunch.
- Final Drizzle and Garnish (2 minutes): Give each cup a tiny extra drizzle of dressing and sprinkle a pinch of fresh herbs for color and aroma. This final touch makes a difference in flavor and presentation.
- Chill or Serve Immediately: If you’re prepping ahead, cover the cups with plastic wrap and refrigerate for up to 4 hours before serving. Just keep crackers separate until last minute if you want them extra crunchy.
If you notice any sogginess creeping in, it’s usually from the crackers sitting too long under the dressing—so layering them on top at the last minute helps. Also, don’t overload the cups; you want enough space to eat comfortably without spills, especially in a picnic setting.
Cooking Tips & Techniques
While this recipe isn’t cooking-heavy, a few tricks make all the difference:
- Keep it Fresh: Use crisp veggies and fresh herbs. I once tried making these with soggy greens from a wilting bag, and it was a total flop—lesson learned!
- Balance the Dressing: The dressing should be bright but not overpowering. Taste as you go, especially with the honey and lemon, until it feels just right.
- Layer Thoughtfully: Putting heavier ingredients like chicken and salami at the bottom helps keep the greens from getting crushed. Plus, the crackers on top stay crunchier.
- Time Your Assembly: If you’re making these more than an hour before serving, keep the crackers separate and add them last. This keeps them crisp and satisfying.
- Mix Textures: The success of these grazing cups is about variety—soft cheese, crunchy veggies, chewy meats, and crisp crackers all play a role.
One time, I tried swapping the dressing for a creamy ranch, and while tasty, it weighed down the cups. Sticking to a light vinaigrette keeps things fresh and picnic-friendly. Also, multitask by prepping your dressing and chopping ingredients while the chicken cools or while you boil eggs. It cuts down on stress and makes assembly smooth.
Variations & Adaptations
These grazing cups are incredibly versatile and welcome all sorts of tweaks:
- Vegetarian Version: Skip the chicken and salami, and add extra veggies like roasted red peppers, olives, or marinated artichokes. You can include chickpeas or white beans for protein.
- Gluten-Free Option: Use gluten-free crackers or substitute crunchy nuts like toasted almonds or pecans for texture.
- Seasonal Twist: In spring or summer, swap cherry tomatoes for fresh strawberries or blueberries to add a sweet contrast. In fall, roasted butternut squash cubes work beautifully.
- Different Proteins: Try smoked salmon or grilled shrimp for a seafood flair. For a spicy kick, swap salami with chorizo.
- Dairy-Free: Use dairy-free cheese alternatives or avocado slices to keep creaminess without cheese.
Personally, I once made a version with mini meatballs from my easy turkey meatball recipe, which added great flavor and heartiness. It was a hit for a football-watching party and showed how flexible these cups can be.
Serving & Storage Suggestions
These Easy Graduation Picnic Grazing Cups taste best chilled or at room temperature—perfect for outdoor settings. Serve them on a large tray for easy grab-and-go snacking, or arrange them in neat rows for a polished look. Pair with refreshing beverages like iced tea, lemonade, or even a light white wine for grown-up gatherings.
For storage, cover the cups tightly with plastic wrap and keep refrigerated. If crackers are added beforehand, they might soften after a couple of hours, so storing crackers separately in a container or bag and adding just before serving keeps the crunch intact.
To reheat (if needed), these are best eaten cold or room temp, but if you prefer warm, remove crackers and gently heat the savory ingredients in a microwave-safe bowl. Add crackers fresh after warming.
Flavors tend to meld nicely over a few hours, especially the dressing and herbs, so these cups can actually taste better after sitting a little. Just keep an eye on texture and freshness.
Nutritional Information & Benefits
Each grazing cup is a balanced mini meal with protein, veggies, and healthy fats. Here’s a rough estimate per cup:
| Calories | Approx. 180-220 kcal |
|---|---|
| Protein | 12-15 grams (from chicken, eggs, and cheese) |
| Fat | 10-14 grams (mostly healthy fats from olive oil and cheese) |
| Carbohydrates | 10-15 grams (from veggies and crackers) |
| Fiber | 2-4 grams (from greens and veggies) |
These cups provide a good dose of vitamins A and C from the fresh vegetables and antioxidants from olive oil and herbs. They’re gluten-friendly if you pick the right crackers and adaptable for dairy-free or vegetarian diets. Personal wellness-wise, I appreciate how they keep me satisfied without feeling heavy or sluggish—a big plus during busy celebration days.
Conclusion
If you’re hunting for a snack that’s fuss-free, flavorful, and fits a crowd, these Easy Graduation Picnic Grazing Cups deliver every time. They’re flexible to suit your tastes, easy to prep ahead, and just fun to eat. I love how they bring a little bit of order to the chaos of party snacking—everyone gets a neat, tasty portion that feels special.
Feel free to mix and match ingredients based on what you have or what your crowd prefers. Honestly, that’s part of the fun—making it your own. This recipe holds a special place for me because it turned a hectic celebration into a relaxed and happy memory for all involved.
Give these a try, and I’d love to hear how you customize your grazing cups! Drop a comment or share your version to keep the snack ideas flowing.
FAQs About Easy Graduation Picnic Grazing Cups
Can I prepare the grazing cups a day ahead?
Yes, you can prep most ingredients and assemble the cups up to 4 hours ahead. Just keep crackers separate and add them last to preserve crunch.
What can I use instead of chicken for a vegetarian option?
Try chickpeas, white beans, or extra cheese and veggies for protein and flavor without meat.
Are these grazing cups suitable for kids?
Absolutely! The individual portions and familiar ingredients make them kid-friendly and easy to handle.
Can I make these gluten-free?
Yes, just swap regular crackers for gluten-free varieties or use crunchy nuts and seeds instead.
What’s the best way to keep the cups fresh during an outdoor picnic?
Keep them chilled in a cooler until serving, and add crackers just before eating to avoid sogginess.
For more quick and easy crowd-pleasing recipes, you might enjoy my easy juicy sheet pan sloppy joes or the five-dollar chicken fried rice—both great for busy nights and casual gatherings.
Pin This Recipe!

Easy Graduation Picnic Grazing Cups Recipe for Crowd-Pleasing Snacks

These Easy Graduation Picnic Grazing Cups are quick, easy, and perfect for outdoor gatherings, offering a balanced bite of savory, sweet, and crunchy flavors in a convenient cup.
- Prep Time: 15 minutes
- Cook Time: 0 minutes
- Total Time: 15 minutes
- Yield: 12 servings
- Category: Snack
- Cuisine: American
Ingredients
- Mini clear plastic or glass cups (4 oz)
- Mixed greens (baby spinach, arugula, or spring mix)
- Cooked chicken breast, shredded or chopped (rotisserie chicken works great)
- Hard-boiled eggs, chopped
- Salami or pepperoni slices, cut into bite-sized pieces
- Cherry tomatoes, halved
- Cucumber slices or mini pickles
- Carrot sticks or shredded carrots
- Crackers or pita chips, broken into pieces
- Feta cheese, crumbled
- Mozzarella balls (bocconcini) or shredded mozzarella
- Olive oil (extra virgin recommended)
- Fresh lemon juice
- Dijon mustard
- Honey or maple syrup
- Salt and freshly cracked black pepper
- Fresh herbs (parsley or basil), finely chopped
Instructions
- Prepare the Dressing (5 minutes): In a medium bowl, whisk together 3 tablespoons olive oil, 1 tablespoon fresh lemon juice, ½ teaspoon Dijon mustard, 1 teaspoon honey, and a pinch of salt and pepper. Stir in 1 tablespoon fresh chopped herbs like parsley or basil. Set aside to let flavors mingle.
- Chop Ingredients (10 minutes): Halve 1 cup cherry tomatoes, slice ½ cucumber into thin rounds, chop 2 hard-boiled eggs, shred about 1 cup cooked chicken breast, and cut ½ cup salami into bite-sized pieces. Crumble ½ cup feta cheese and prepare about 1 cup crackers or pita chips by breaking into smaller pieces.
- Layer the Cups (10-15 minutes): Start each cup by placing a small handful (about 1 cup) of mixed greens as the base. Drizzle a teaspoon of the dressing over the greens. Add a spoonful of chicken, a few pieces of salami, and a couple of chopped egg pieces. Then layer cherry tomatoes, cucumber slices, and shredded carrots. Sprinkle feta cheese on top, then finish with a few cracker pieces for crunch.
- Final Drizzle and Garnish (2 minutes): Give each cup a tiny extra drizzle of dressing and sprinkle a pinch of fresh herbs for color and aroma.
- Chill or Serve Immediately: Cover the cups with plastic wrap and refrigerate for up to 4 hours before serving. Keep crackers separate until last minute if you want them extra crunchy.
Notes
Keep crackers separate until last minute to maintain crunch. Layer heavier ingredients like chicken and salami at the bottom to protect greens. Use fresh, crisp veggies and herbs for best results. The dressing should be bright but not overpowering; adjust honey and lemon to taste. Can be prepped up to 4 hours ahead. Variations include vegetarian, gluten-free, dairy-free, and seasonal ingredient swaps.
Nutrition
- Serving Size: One 4 oz grazing cup
- Calories: 200
- Sugar: 3
- Sodium: 350
- Fat: 12
- Saturated Fat: 4
- Carbohydrates: 12
- Fiber: 3
- Protein: 14
Keywords: grazing cups, picnic snacks, easy snacks, crowd-pleaser, graduation party, finger food, quick assembly, outdoor gathering